Table of Contents
Introduction to Gipfeli Recipe – The Swiss Croissant You Need in Your Life
What Are Gipfeli?
Gipfeli, often referred to as Swiss croissants, are a beloved pastry with a rich history and unique characteristics that set them apart from their French counterparts. Unlike the more globally recognized croissant, gipfeli recipe has its roots deeply embedded in Swiss culture and tradition. These crescent-shaped pastries are crafted using high-fat butter, which contributes to their flaky texture and rich flavor, making them an irresistible choice for breakfast or snack time.
A Brief History of Gipfeli Recipe
The origins of gipfeli recipe can be traced back to the kipferl, a baked bread roll common in Central Europe, particularly in Austria, dating as far back as the 13th century [[8]]. Over time, this simple crescent-shaped bread evolved into the sophisticated gipfeli we know today. As culinary traditions spread across borders, variations emerged, but the essence of the original recipe remained intact, preserving the authentic taste and texture that make gipfeli so special.
Why Choose Gipfeli Recipe for Breakfast?
When it comes to breakfast options, gipfeli recipe offers a delightful balance of convenience and indulgence. Not only do they provide a quick and easy solution for busy mornings, but they also deliver on taste and satisfaction. With their buttery layers and slightly dense interior, gipfeli cater to those who appreciate a more substantial breakfast option without compromising on flavor. Moreover, given the right preparation method, such as the one outlined in this article, you can enjoy homemade gipfeli with just ten minutes of prep work, making them an accessible luxury for everyday enjoyment.

Essential Ingredients for Gipfeli Recipe
Key Components of Gipfeli Dough
To make authentic gipfeli, you need a few essential ingredients that work together to create the perfect texture and flavor. The foundation of any good gipfeli recipe starts with high-quality flour. Most recipes recommend using bread flour, which is higher in protein than all-purpose flour, giving your croissants their delicate yet sturdy structure necessary for layering. Alongside flour, active dry yeast plays a crucial role in leavening the dough, ensuring it rises properly during proofing stages. Combining these with sugar adds sweetness while also aiding in yeast activation, contributing to both taste and texture development throughout the baking process.
Incorporating Fats for Flakiness
Butter is an indispensable component when making gipfeli recipe as it contributes significantly to achieving those iconic flaky layers. Unsalted butter should be used so you can control the amount of salt added separately; this allows for better customization based on personal preference or dietary needs. When preparing the dough, ensure the butter remains cold until incorporated into the layers—this helps maintain its integrity through folding processes, resulting in crispier pastry walls once baked. Additionally, incorporating fats like butter not only enhances flavor but also improves mouthfeel by adding richness and moisture content within each bite.
Substitutions for Dietary Preferences
For those looking to adapt traditional recipes according to specific diets or allergies, there are several viable options available without compromising too much on quality or taste. Whole wheat flour mixed half-and-half with all-purpose flour provides additional fiber content while still maintaining structural integrity needed for laminated pastries such as gipfeli recipe. If lactose intolerance is a concern, consider substituting dairy milk with alternatives like almond milk or oat milk—they may alter slight nuances in final product characteristics but remain functional substitutes overall. Furthermore, individuals avoiding eggs might find success employing egg substitutes derived from plant-based sources depending upon how integral they were intended originally within formulation steps outlined beforehand.
Step-by-Step to Making Gipfeli Recipe at Home

Preparing the Dough
- In a large mixing bowl, combine all-purpose flour, sugar, salt, and instant yeast. Stir thoroughly until evenly distributed.
- Gradually add warm milk while continuing to mix until a shaggy dough forms.
- Transfer the mixture onto a lightly floured surface and knead vigorously for approximately 8–10 minutes until smooth and elastic.
- Place the dough back into a clean, oiled bowl, cover loosely with plastic wrap, and allow it to rest for about 30 minutes at room temperature.
First Proofing Stage
After kneading, place the dough in a clean, oiled bowl, cover it with plastic wrap or a damp cloth, and let it rest for approximately 30 minutes at room temperature. This resting period allows the yeast to work its magic, causing the dough to rise slightly. The first proofing step is essential because it enhances the texture and flavor of your final product, ensuring that your gipfeli recipe will have a soft interior and light structure once baked.
Incorporating Butter Layers
Once the dough has rested, flatten it into a rectangle on a well-floured surface. Spread cold unsalted butter evenly over two-thirds of the dough’s surface, leaving one-third uncovered. Carefully fold the unbuttered third over the center section, followed by folding the opposite end over the top, forming an envelope-like shape. Rotate the packet 90 degrees and roll it out again into another long rectangle. Repeat this folding process twice more to create multiple layers of butter and dough, which are responsible for the flaky texture of gipfeli.
Shaping the Crescents
With the laminated dough ready, cut it into triangles with a sharp knife or pizza cutter, ensuring each piece has a pointed tip pointing toward the wider base. Starting from the broad edge, roll each triangle tightly toward the narrow end, shaping them into crescents characteristic of traditional gipfeli recipe design. Place the shaped pastries onto baking sheets lined with parchment paper, spacing them apart to allow for expansion during the second proofing stage.
Final Proofing and Baking
Allow the shaped gipfeli to proof for another 15–20 minutes under warm conditions, letting them puff up slightly before baking. Preheat your oven according to the recipe instructions, typically between 375°F–400°F, depending on your preference for crispiness versus softness. Before baking, brush the tops of the gipfeli recipe with a beaten egg wash to enhance their golden color and shine. Bake until they turn a deep golden brown, signaling that your homemade gipfeli are ready to enjoy.
Presentation and Serving Suggestions

Creative Ways to Present Gipfeli Recipe
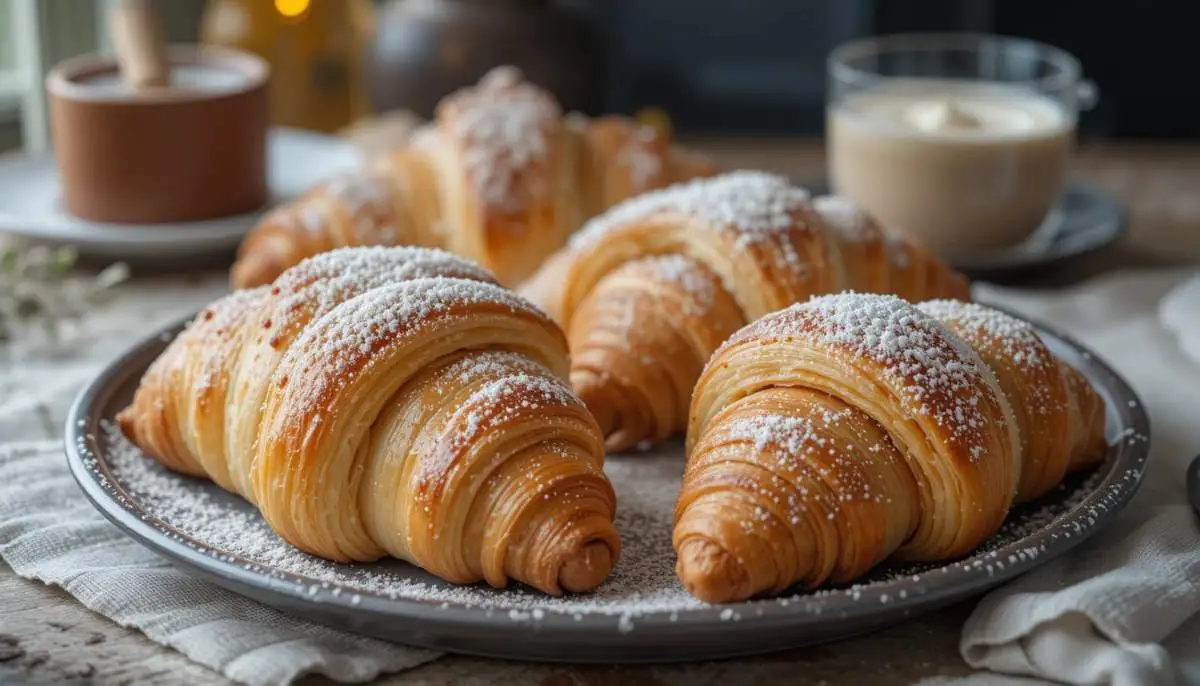
When presenting gipfeli, think of the plate as your canvas. Just like chefs use sauces and garnishes to frame focal points on their dishes, you can enhance the visual appeal of gipfeli recipe by arranging them neatly on a white plate, perhaps dusted lightly with icing sugar for an elegant touch. Consider adding a sprinkle of powdered sugar just before serving to create that irresistible, bakery-fresh look.
Adding Color and Texture
To make your presentation more vibrant and appealing, incorporate elements that add color and texture. For instance, serve your gipfeli alongside fresh fruit slices or a small bowl of homemade jam, which not only complements the flavors but also adds visual interest. The eye appreciates variety, so pairing the golden brown hues of gipfeli recipe with bright colors from fruits or berries can significantly boost its attractiveness.
Pairing Options for Gipfeli Recipe
Gipfeli pairs wonderfully with various accompaniments depending on whether you’re enjoying it for breakfast or as a snack. For breakfast, consider offering it alongside a steaming cup of coffee or tea. If serving as a midday treat, try pairing it with a light soup or salad. These combinations cater to different tastes while enhancing the overall dining experience.
Simple Packaging Ideas
For those looking to gift or transport gipfeli, simple packaging ideas can elevate their presentation. Use clear bags tied with rustic twine or include personalized touches such as handmade labels or small potted herbs. Such details add charm and thoughtfulness, making even a humble pastry feel special when presented thoughtfully.
Storage Tips and Make-Ahead Strategies
Storing Baked Gipfeli Recipe for Freshness
Once your gipfeli recipe are baked, the best way to store them is in an airtight container at room temperature. This method keeps them fresh for up to 2 days. If you want to extend their freshness, you can refrigerate them, which allows storage for about 3-4 days. However, keep in mind that refrigeration might make the pastries slightly less flaky over time.
Freezing Gipfeli for Long-Term Storage
For longer storage, freezing is your best option. Place the gipfeli in a freezer-safe bag or container, ensuring they’re well-sealed to prevent freezer burn. Frozen gipfeli recipe can be stored for several months without losing quality. When ready to enjoy, simply thaw them at room temperature or reheat directly from frozen using an oven or toaster oven for optimal results.
Preparing Dough Ahead of Time
If you’re planning ahead, preparing the dough in advance can save time on busy mornings. After mixing the dough, let it rest at room temperature for about an hour before transferring it to the refrigerator overnight. This process helps the yeast develop flavor while slowing down fermentation, leading to better texture when you bake the gipfeli later.
Reheating Techniques for Perfect Results
When reheating previously baked gipfeli recipe, use methods that restore their original flakiness and warmth. A conventional oven or toaster oven works best for this purpose, as these appliances can crisp up the exterior while warming the inside evenly. Avoid microwaving unless you wrap the gipfeli in a damp paper towel to retain moisture, though this may compromise the desired texture somewhat.
Conclusion About Gipfeli Recipe
With this simple yet effective gipfeli recipe , you now have the tools to bring a touch of Switzerland to your breakfast table. Don’t be afraid to tweak the ingredients and try new combinations. Remember, baking is all about creativity and fun. So go ahead, roll up your sleeves, and create some delicious memories with these flaky delights!
FAQs About Gipfeli Recipe
Can I prepare the dough ahead of time?
Absolutely! You have the option to make the dough ahead of time, up to 24 hours before, and store it in the refrigerator. Just remember to let it come to room temperature before proceeding with the next steps.
Are gipfeli healthy?
While gipfeli recipe contain butter and sugar, they offer a good source of carbohydrates and protein thanks to the flour and eggs used in the recipe. Enjoying them in moderation as part of a balanced diet can fit well into a healthy eating plan.
How do I know if my gipfeli are done baking?
Look for a deep golden brown color and listen for a hollow sound when tapped on the bottom. These signs indicate perfectly baked gipfeli recipe ready to enjoy.
What is the difference between a croissant and a gipfeli?
The main differences between a croissant and a gipfeli lie in their texture, flavor, and preparation. Croissants are typically lighter, flakier, and have an airy, open honeycomb interior due to their laminated dough. In contrast, gipfeli tend to be more compact with a denser texture while still being buttery and flaky. Additionally, Swiss gipfeli often maintain a better shape compared to French croissants and may contain slightly less butter. Overall, though similar in some respects, they each offer unique characteristics that set them apart.