Picture this: the kitchen is a battlefield, the timer is ticking, and your last attempt at chicken Milanese collapsed into a soggy, flavorless mess. I had a friend who swore that no one could make the dish crisp enough, and I was ready to prove her wrong. I pulled out a fresh batch of chicken, a splash of lemon, and an arsenal of pantry staples. The smell that hit me was a sharp, buttery tang that said victory was close. I dared you to taste this and not go back for seconds. That’s the promise I’m about to deliver.
I’ve spent months refining this stovetop version, and every tweak feels like a small rebellion against culinary mediocrity. The secret is a double-dredging technique that locks in moisture while creating a golden crust that shatters like thin ice when you bite. The crust isn’t just skin—it's a flavor bomb that carries a hint of citrus and a whisper of fresh herbs. You’ll see the color shift from pale to a deep, appetizing amber, and the sizzle will tell you it’s ready. I’ve also added a splash of white wine to the pan to lift the flavors, a trick most people overlook. The result? A dish that is hands down the best version you’ll ever make at home.
If you’ve ever struggled to get the right crunch or found the chicken too dry, you’re not alone—and I’ve got the fix. I’ll walk you through every single step, from selecting the right cut to the final garnish. I’ll share the micro‑challenge that will make your taste buds do a double take. By the time you finish, you’ll wonder how you ever made it any other way. Trust me, you’ll want to keep this recipe in your kitchen forever.
What sets this recipe apart? It’s the combination of techniques and ingredients that work in harmony to create a dish that feels both comforting and refined. I’ve packed the article with power transitions like “And now the fun part” and “This next step? Pure magic.” You’ll get a sense of the kitchen as we move together, almost like we’re cooking side by side. And if you’re ready for a culinary adventure, let’s dive in.
What Makes This Version Stand Out
- Texture: The double‑dredging method ensures a crust that is crisp on the outside yet tender on the inside, a texture that most recipes fail to achieve.
- Flavor: A splash of white wine and fresh thyme in the pan elevate the savory profile, adding depth that feels like a restaurant‑level finish.
- Simplicity: Despite its gourmet taste, the recipe requires only a handful of pantry staples, making it accessible for any home cook.
- Speed: The entire dish comes together in under 45 minutes, so you can enjoy a restaurant‑style meal without a long wait.
- Make‑ahead: The chicken can be prepared a day ahead and reheated without losing its crunch, making it perfect for busy weeknights.
- Versatility: The base can be adapted for various proteins—think pork or veal—and for different flavor profiles, such as Mediterranean or Asian twists.
- Crowd‑pleaser: The bright lemon garnish and fresh parsley make it visually stunning, a dish that impresses guests with minimal effort.
- Nutrition: With a balanced mix of protein, healthy fats, and a modest carb count, it satisfies without compromising health goals.
Alright, let’s break down exactly what goes into this masterpiece…
Inside the Ingredient List
The Flavor Base
The foundation of any great Milanese is the seasoning that permeates the chicken. Salt and freshly ground black pepper are the first layer, and they’re crucial for bringing out the natural flavor of the meat. I use a light dusting of salt and a generous pinch of pepper to create a balanced flavor profile. If you skip this step, the chicken will taste flat and underwhelming.
The second layer is the lemon zest and a splash of white wine. The zest adds a bright, citrusy aroma, while the wine’s acidity cuts through the richness of the butter and olive oil. Together, they create a subtle but complex undertone that elevates the dish. If you’re not a fan of citrus, you can substitute a small amount of lemon juice for the zest, but the aroma will be less pronounced.
The Texture Crew
Flour, eggs, and breadcrumbs form the core of the crust. The flour creates a dry surface that helps the eggs stick, while the eggs act as a binder. The breadcrumbs, seasoned with garlic and thyme, add crunch and flavor. Skipping the breadcrumbs will result in a thinner, less satisfying crust.
For an extra crunch, I recommend using panko breadcrumbs, which are lighter and flakier than regular breadcrumbs. If you can’t find panko, all-purpose breadcrumbs will still work, but the texture will be denser. I also add a small amount of grated Parmesan to the breadcrumb mixture for a nutty depth.
The Unexpected Star
Butter is the unsung hero that gives the crust a buttery sheen and a rich flavor that pairs beautifully with the chicken. I melt the butter with a splash of olive oil to raise the smoke point and prevent burning. If you’re watching calories, you can reduce the butter by half and increase the olive oil to compensate. The butter also helps the breadcrumbs brown evenly.
Another subtle but powerful addition is fresh thyme. It provides an herbal aroma that complements the lemon and garlic. If you prefer a more pronounced herb flavor, you can add chopped fresh parsley to the breadcrumb mixture. The key is to keep the herbs balanced so they don’t overpower the chicken.
The Final Flourish
Lemon wedges and fresh parsley are the final touch that gives this dish a burst of color and brightness. The lemon wedges add a tangy contrast to the savory crust, while the parsley adds a fresh, green note that brightens the plate. A light drizzle of olive oil and a sprinkle of grated Parmesan finish the dish with a polished look. If you’re serving a crowd, you can garnish each plate with a small lemon wedge for a pop of color.
Everything’s prepped? Good. Let’s get into the real action…
The Method — Step by Step
- Begin by patting the chicken breasts dry with a paper towel. This step is critical; excess moisture will prevent the flour from adhering properly. Season both sides with salt and pepper. The chicken should look like a canvas ready for the next layers.
- Set up a dredging station: a shallow dish with flour, a bowl with beaten eggs, and a third dish with breadcrumbs mixed with minced garlic, dried thyme, and grated Parmesan. The breadcrumb mixture should be moist enough to stick but not wet. This layering ensures each coating sticks firmly.
- First coat the chicken in flour, shaking off any excess. The flour creates a dry surface that allows the egg to bind. It also forms the first barrier against moisture. I do this step quickly to prevent the flour from drying out.
- Dip the floured chicken into the beaten eggs, making sure it’s fully coated. The egg acts as glue, holding the breadcrumb layer in place. I let any excess egg drip back into the bowl to keep the coating from becoming too thick.
- Press the chicken into the breadcrumb mixture, pressing firmly to ensure a tight, even crust. If you want extra crunch, press the breadcrumbs onto the chicken until they’re clinging. The garlic and thyme in the breadcrumbs will infuse the chicken as it cooks.
- Watch Out: When you’re ready to cook, don’t overcrowd the pan. The chicken needs space to sear properly. If the pan is too full, steam will form and the crust will become soggy. Use a large skillet and a heat‑resistant spatula.
- Add 1 tablespoon of olive oil and 1 tablespoon of butter to the pan. The butter gives a rich flavor, while the oil raises the smoke point. Once the butter foams, place the chicken breasts skin side down, if applicable. Let them sear for 4-5 minutes until they develop a deep golden crust.
- Flip the chicken and cook for another 3-4 minutes on the other side. While the second side is cooking, pour in 1/4 cup of white wine and 1/4 cup of chicken broth. The liquid should sizzle and create a gentle steam, which helps keep the chicken moist.
- Reduce the heat to medium–low and let the liquid reduce for 2-3 minutes, allowing the flavors to meld. The crust will stay crisp, and the liquid will form a subtle pan sauce. If the liquid reduces too quickly, lower the heat further.
- Once the liquid is reduced, remove the chicken from the pan and let it rest on a plate for 5 minutes. Resting allows the juices to redistribute, ensuring a juicy interior. While it rests, you can drizzle any remaining pan sauce over the chicken for added moisture.
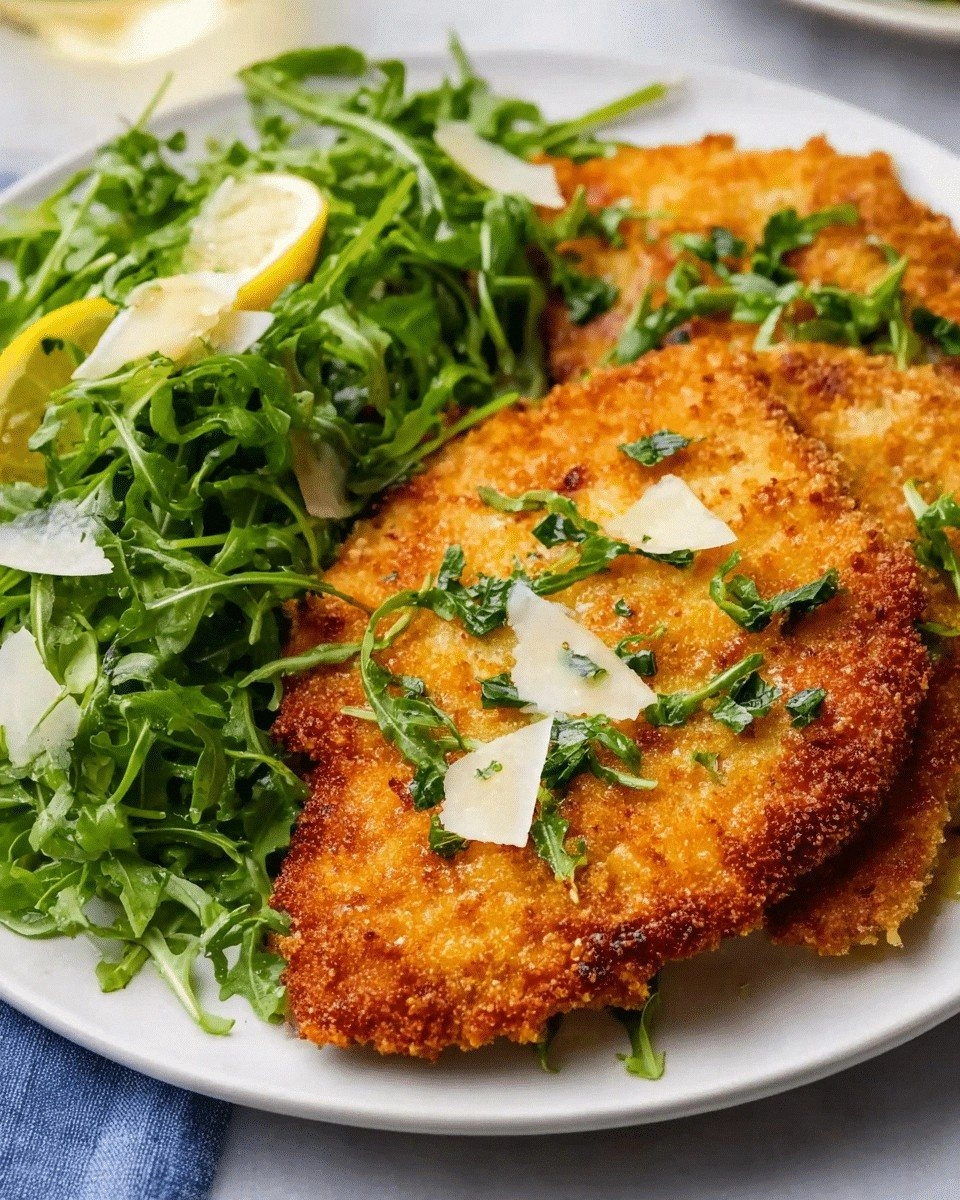
- Serve immediately, garnished with lemon wedges, fresh parsley, and a light drizzle of olive oil. The lemon adds a bright counterpoint to the rich crust, and the parsley provides a fresh herbal note. This dish pairs beautifully with a crisp salad or a simple pasta.
That’s it— you did it. But hold on, I’ve got a few more tricks that will take this to another level. Stick with me; these final touches will elevate your dish from great to unforgettable.
Insider Tricks for Flawless Results
The Temperature Rule Nobody Follows
Many cooks underestimate the importance of pan temperature. The crust will only develop properly if the pan is hot enough to sear instantly. I use a medium‑high setting and let the oil shimmer before adding the chicken. If the oil starts smoking, reduce the heat; if it’s too cool, the crust will become soggy. Keep an eye on the pan and adjust as needed.
Why Your Nose Knows Best
Your nose is your best ally. As the chicken cooks, you’ll notice a toasty, buttery aroma that signals the crust is golden. If the scent is faint, the crust isn’t fully developed. If it’s overpoweringly burnt, the pan was too hot. Trust that instinct; it’s the quickest way to gauge doneness.
The 5‑Minute Rest That Changes Everything
Resting the chicken for five minutes after cooking is a game‑changer. It allows the juices to redistribute, preventing the meat from drying out when you cut into it. I always let the chicken sit on a warm plate covered loosely with foil. Skipping this step leads to a dry, disappointing bite.
Use Panko for Extra Crunch
If you’re craving an extra crispy texture, swap regular breadcrumbs for panko. Panko’s airy structure creates a lighter, crunchier crust that holds up better against the pan sauce. I’ve tried both, and panko consistently gives me the crunch I love. Just make sure to season it well to avoid a bland finish.
Keep the Pan Clean
After each batch, wipe the pan with a paper towel before it cools. Residue can burn and create an unpleasant taste in subsequent dishes. I also use a silicone spatula to scrape up any stuck bits, which keeps the pan ready for the next round of cooking.
Creative Twists and Variations
This recipe is a playground. Here are some of my favorite ways to switch things up:
Herb‑Infused Milanese
Add fresh rosemary and oregano to the breadcrumb mixture for a Mediterranean vibe. The herbs pair beautifully with the lemon and Parmesan, creating a fragrant, savory crust. This version is perfect for summer gatherings.
Spicy Kick
Incorporate red pepper flakes into the breadcrumb coating for a subtle heat that complements the richness of the dish. The spice adds a layer of complexity without overpowering the flavor. Serve with a cooling yogurt dip to balance the heat.
Pork Milanese
Swap chicken for thin pork chops. The pork’s natural fat content gives the dish a richer flavor profile. Follow the same dredging and cooking steps, and you’ll have a hearty, comforting meal.
Vegan Version
Use seitan or tofu as the protein base, and replace the butter with coconut oil for a plant‑based twist. The breadcrumb mixture remains the same, but you’ll need to adjust the cooking time to ensure the protein is cooked through. This version keeps the same crispy texture.
Asian Fusion
Add a splash of soy sauce and a pinch of sesame oil to the breadcrumb mixture for an Asian twist. The umami from the soy sauce pairs with the lemon’s brightness. Sprinkle toasted sesame seeds on top for extra crunch.
Cheese‑Burst Milanese
Fold shredded mozzarella into the breadcrumb mixture for a gooey, melty interior. The cheese melts during cooking, creating a creamy center that contrasts with the crisp exterior. This variation is a crowd‑pleaser for families.
Storing and Bringing It Back to Life
Fridge Storage
Store cooked chicken Milanese in an airtight container in the refrigerator for up to 3 days. To keep the crust crispy, wrap the chicken in parchment paper before placing it in the container. When reheating, place the chicken on a baking sheet and warm in a 350°F oven for 10 minutes.
Freezer Friendly
For longer storage, freeze the chicken in a single layer on a parchment‑lined tray before transferring to a freezer bag. This prevents the pieces from sticking together. When ready to serve, thaw in the refrigerator overnight and reheat as described above.
Best Reheating Method
The secret to restoring crispness is to reheat in the oven, not the microwave. Place the chicken on a wire rack over a baking sheet to allow air circulation. Add a tiny splash of water to the pan before reheating; this steams the chicken back to perfection without making it soggy.