I still remember the day I ruined a perfectly good batch of chocolate chip cookies by trying to get fancy. There I was, standing in my kitchen at 11 PM on a Tuesday, convinced that adding cocoa powder to the dough would create some kind of chocolate-lover's paradise. Instead, I ended up with dry, crumbly disasters that tasted like disappointment and looked like charcoal briquettes. My roommate took one bite, made that face—you know the one—and politely suggested I stick to the basics. Challenge accepted. What followed was three months of obsessive testing, tweaking, and taste-testing (poor me, right?) until I cracked the code to the most outrageously chocolatey, fudgy, can't-eat-just-one chocolate chocolate chip cookies that have ever emerged from an oven.
Picture this: it's 2 AM, the house is quiet except for the gentle hum of the refrigerator, and you're standing over a mixing bowl that's about to become your new obsession. The butter's been sitting out just long enough to be perfectly soft, the cocoa powder smells like a chocolate factory exploded in the best possible way, and you can already imagine that first warm cookie melting on your tongue like a chocolate avalanche. This isn't just another cookie recipe—this is the recipe that'll make you the legend of bake sales, the hero of potlucks, the person everyone secretly hopes will show up with dessert. I've tested these cookies on everyone from sugar-addicted toddlers to chocolate-snobby food critics, and not a single person has managed to eat just one. My neighbor actually hides them from her husband, claiming they're "for the kids' lunches," while I know full well she's been eating them straight from the freezer at midnight.
Here's what makes these cookies different from every other chocolate chocolate chip cookie recipe floating around the internet: we're not just adding cocoa powder and calling it a day. Oh no, we're building layers of chocolate flavor like a symphony conductor builds a crescendo. We're using three different types of chocolate, a technique I borrowed from French pastry chefs, and a method that sounds almost too simple to work but creates the most incredibly fudgy centers with crispy, crackly edges that'll make you weak in the knees. The secret ingredient? A splash of espresso that doesn't make them taste like coffee but somehow amplifies the chocolate to levels that should probably be illegal. Trust me, I've had people beg for this recipe after one bite, and I've seen grown adults fight over the last cookie like it's the last lifeboat on the Titanic.
Let me walk you through every single step—by the end, you'll wonder how you ever made it any other way.
What Makes This Version Stand Out
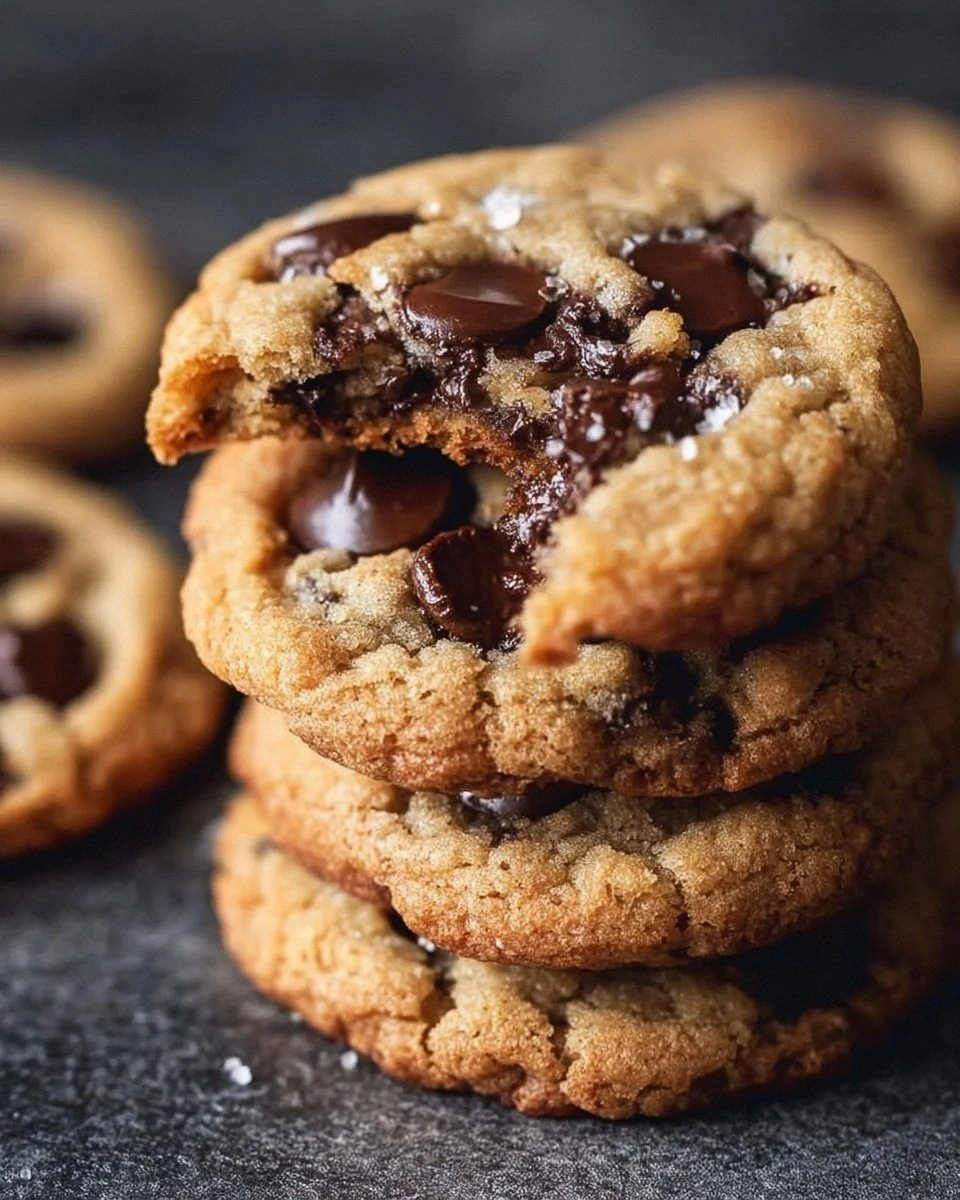
Triple Threat: We're not playing around with chocolate here. Dutch-processed cocoa powder provides deep, complex chocolate notes, while melted dark chocolate creates those fudgy pockets that make your eyes roll back in your head. The chocolate chips add the third layer, ensuring every single bite delivers maximum chocolate impact that'll satisfy even the most intense cravings.
Texture Perfection: Most chocolate cookies end up cakey or hockey-puck dense. Not these beauties. The combination of melted butter and an extra egg yolk creates centers so soft they practically dissolve on your tongue, while the edges crisp up like the top of a crème brûlée. It's the textural contrast that keeps people reaching for "just one more" until the entire batch mysteriously disappears.
Weeknight Simple: Despite tasting like they came from a fancy bakery, these cookies require zero chilling time and come together in one bowl. You can go from craving to warm cookies in under 30 minutes, which is either the best or most dangerous thing I've ever discovered, depending on how you look at it. My jeans have opinions about this timeline.
Crowd Psychology: I've watched these cookies work their magic at office parties where people who "don't really like sweets" suddenly become cookie monsters. There's something about that double dose of chocolate that hits all the pleasure centers in the brain. I've literally seen people sneak them into their purses "for the road" when they think nobody's looking.
Ingredient Integrity: Using real butter (never margarine), good-quality chocolate, and pure vanilla extract makes a difference you can taste. This isn't the place to cheap out with imitation vanilla or bargain-bin chocolate chips. Your taste buds will thank you, and anyone lucky enough to try these will notice the difference immediately.
Make-Ahead Magic: The dough keeps beautifully in the fridge for up to a week, and frozen dough balls mean fresh cookies whenever the craving strikes. I always keep a bag of frozen dough in my freezer for emergencies, which in my house means Tuesday, or whenever I've had a rough day, or when I need to bribe someone into helping me move furniture.
The Espresso Secret: That tablespoon of espresso powder isn't optional—it's transformational. It doesn't make the cookies taste like a latte; instead, it deepens and rounds out the chocolate flavor in ways that'll have everyone asking what your secret ingredient is. I've had people guess everything from cayenne to orange zest, but nobody ever figures it out.
Inside the Ingredient List
The Flavor Foundation
Butter is the canvas we're painting our chocolate masterpiece on, and it needs to be just right—soft enough to leave an indentation when you press it, but not so melty that it's greasy. I learned this the hard way after trying to rush the process with microwaved butter and ending up with cookies that spread into one giant chocolate puddle. The butter carries all those chocolate flavors, creating a rich backdrop that makes the cocoa and chocolate chips sing in perfect harmony. Don't even think about substituting margarine here; you'll lose that magical butter flavor that makes these cookies taste like they're from a Parisian bakery instead of a suburban kitchen.
Brown sugar isn't just for sweetness—it brings molasses notes that complement chocolate like they were destined to be together. The moisture in brown sugar keeps these cookies soft for days (if they last that long), while the slight acidity reacts with the baking soda to create the perfect rise. I use dark brown sugar because I'm a maximalist, but light brown works if that's what you've got. Just promise me you won't use all white sugar unless you want cookies that taste like chocolate cardboard.
Eggs are the binding agents that hold our chocolate dreams together, but we're using an extra yolk for richness that'll make you wonder why all cookies don't include this trick. The yolk adds fat and emulsifiers that create that coveted chewy texture that stretches when you break a warm cookie in half. I've tried this recipe with just whole eggs, and while they're still good, that extra yolk takes them from "these are great" to "holy cow, what is IN these?" Use large eggs, and if you can find pasture-raised ones, the flavor difference is remarkable.
The Chocolate Trinity
Dutch-processed cocoa powder is the unsung hero here, providing deep, complex chocolate flavor without the harsh bitterness of natural cocoa. The Dutch processing neutralizes the cocoa's acids, creating a smoother, more mellow chocolate taste that melts into the butter like they were made for each other. I once ran out and used natural cocoa—never again. The cookies tasted sharp and almost metallic, like they'd been made by someone who'd never actually tasted chocolate before. Splurge on the good stuff; your future self will thank you when you're biting into cookie perfection.
The melted dark chocolate is what creates those gloriously fudgy centers that make people close their eyes when they take the first bite. Use something in the 60-70% range—anything darker and you risk bitterness that fights with the brown sugar's sweetness. I chop up a bar of my favorite eating chocolate because the quality really shines through here. Those little pools of melted chocolate create textural surprises in every bite, like buried treasure waiting to be discovered.
Chocolate chips provide the third chocolate dimension, staying distinct from the cookie dough so you get pockets of pure chocolate joy. I mix semisweet and bittersweet for complexity, but use whatever makes your heart happy. Mini chips distribute more evenly, while regular chips give you those satisfying chocolate bombs. I've even used chocolate chunks when feeling fancy, which create dramatic rivers of melted chocolate that look like modern art when the cookies cool.
The Unexpected Game-Changers
Espresso powder is my secret weapon, the culinary equivalent of adding a bass line to a song—it doesn't stand out on its own, but you'd definitely miss it if it weren't there. Just one tablespoon amplifies the chocolate flavor so dramatically that people will swear you've used some kind of magic chocolate they've never heard of. It's like turning up the volume on your favorite song; everything gets richer and more intense without changing the fundamental flavor. I've had friends try to guess the secret ingredient for years, and nobody ever lands on espresso.
Cornstarch might seem like an odd addition to cookies, but it's the key to that soft, tender texture that makes these disappear faster than free pizza at a college party. Just a teaspoon creates a more tender crumb by inhibiting gluten development, resulting in cookies that stay soft for days instead of turning into chocolate-flavored hockey pucks. This trick comes from Japanese baking, where cornstarch is often used in cakes for an impossibly soft texture. Don't skip it unless you enjoy cookies that could double as building materials.
Flaky sea salt on top isn't just for Instagram photos—it's the contrast that makes the chocolate taste even sweeter and more intense. That hit of salt wakes up your taste buds and makes them more receptive to all the chocolate flavors happening here. I use Maldon because those pyramid-shaped crystals look gorgeous and provide little salty bursts, but any coarse sea salt works. Sprinkle it on right when the cookies come out of the oven so it sticks but doesn't dissolve completely.
The Final Flourish
Vanilla extract might seem basic, but it's the aromatic bridge that connects all these chocolate flavors into one harmonious experience. Use pure vanilla extract, not the imitation stuff that tastes like a vanilla-scented candle. The vanilla enhances the butter's richness and adds floral notes that prevent the cookies from being a one-note chocolate experience. I've started using vanilla bean paste when I'm feeling extra fancy, which adds those beautiful little black specks that make people think you're a professional baker.
All-purpose flour forms the structure of our cookies, but we're using slightly less than traditional recipes to keep them tender and prevent them from becoming cakey. The protein content in all-purpose flour is perfect for cookies—it provides enough structure to hold everything together without making them tough. Spoon and level your flour instead of scooping directly from the bag, or you'll end up with dense, dry cookies that taste like you're being punished for something. I keep my flour in an airtight container and give it a good whisk before measuring to prevent those dreaded flour pockets.
Baking soda is our leavening agent, and it works with the brown sugar's acidity to create the perfect rise and those beautiful crackly tops. Make sure your baking soda is fresh—if it's been sitting in your pantry since the Obama administration, it's probably lost its potency. To test it, drop a pinch into vinegar; if it fizzes enthusiastically, you're good to go. Old baking soda leads to flat, sad cookies that spread into one giant sheet, which is great if you're making cookie brittle, but that's not what we're after here.
Everything's prepped? Good. Let's get into the real action...

The Method — Step by Step
- Preheat your oven to 350°F (175°C) and position the rack in the middle. This temperature is crucial—too hot and your cookies will burn on the bottom while staying raw in the middle, too cool and they'll spread into one giant chocolate puddle. Line two baking sheets with parchment paper because we're not animals who bake directly on pans. The parchment prevents sticking and helps the bottoms brown evenly, plus it makes cleanup a breeze which means more time for important activities like eating warm cookies.
- Melt the butter in a small saucepan over medium heat until it's completely liquid but not bubbling. We're going for melted, not browned, though if you want to take it to the brown butter level, I won't stop you—just know it changes the flavor profile from pure chocolate to something more nutty and complex. Let it cool for about 5 minutes while you prep everything else. Hot butter will scramble your eggs, and nobody wants chocolate chip scrambled eggs, trust me on this one.
- In a large bowl (and I mean large—this dough gets voluminous), whisk together the melted butter and both sugars until the mixture looks like wet sand and smells like caramel heaven. This step is crucial for dissolving the sugar crystals, which helps create that shiny, crackly top we all love. Take your time here—about 2 minutes of vigorous whisking works magic. The sugar should look mostly dissolved, and the mixture should lighten slightly in color as air incorporates.
- Add the eggs, one at a time, whisking each until fully incorporated before adding the next. Then add that extra yolk and watch as the mixture transforms into something that looks like liquid gold. The yolk adds richness and emulsifiers that'll make your cookies impossibly tender. Whisk for about 30 seconds after adding the yolk—you want it fully incorporated but not over-mixed, which can make cookies tough.
- Stir in the vanilla extract and espresso powder, watching as the espresso dissolves and creates dark swirls through the golden batter. The mixture should smell like a chocolate shop had a baby with a coffee roastery. Don't worry if you see tiny espresso flecks—they'll dissolve completely as you continue mixing. This is the moment when you know you're about to create something special, something that'll make people question everything they thought they knew about cookies.
- In a separate bowl, whisk together the flour, cocoa powder, cornstarch, baking soda, and salt. This ensures even distribution of the leavening agents and prevents bitter cocoa pockets. The cocoa should be unsweetened and Dutch-processed for the best flavor—natural cocoa will make your cookies taste harsh and astringent. Whisk for a full 30 seconds; this isn't the place to rush. The mixture should be a uniform chocolate color with no white flour streaks.
- Add the dry ingredients to the wet ingredients all at once, then fold with a spatula until just combined. Here's where most people go wrong—they overmix, developing gluten and creating tough cookies. Stop when you still see a few flour streaks; they'll disappear as you add the chocolate chips. The dough should be thick and fudgy, not runny like cake batter. If it looks like brownie batter, you've nailed it.
- Fold in the chocolate chips with a gentle hand, distributing them evenly without overworking the dough. The dough should be studded with chocolate like a chocolate chip galaxy. If you're using a mix of chips and chunks, save some to press into the tops for that bakery-style appearance. The dough will be thick and slightly sticky—that's perfect. If it's too soft to scoop, refrigerate for 15 minutes, but don't chill longer or the cookies won't spread properly.
- Scoop the dough using a medium cookie scoop or two spoons, forming balls about 2 tablespoons each. Arrange them on the prepared baking sheets with plenty of space—they'll spread more than you think. I fit 8 cookies per standard sheet, arranged in a 3-2-3 pattern. Don't flatten them; they'll spread on their own in the oven. If you want that craggy, bakery-style appearance, tear each dough ball in half and stick it back together with the torn side up.
- Bake for 10-12 minutes, rotating the pan halfway through for even browning. The cookies are done when the edges look set but the centers still appear slightly underbaked—they'll continue cooking on the hot pan. Don't wait for them to look completely done or you'll overbake them. The edges should be firm but the centers should jiggle slightly when you shake the pan. This is the difference between good cookies and life-changing cookies.
- Immediately sprinkle with flaky sea salt while the cookies are still hot, then let them cool on the baking sheet for 10 minutes. This is the hardest part—waiting—but it's crucial for the centers to set properly. The residual heat finishes baking them gently, creating those soft, fudgy centers that'll make you weep with joy. Transfer to a wire rack to cool completely, or just eat them warm with a glass of cold milk like a civilized human being who understands that patience is overrated.
That's it—you did it. But hold on, I've got a few more tricks that'll take this to another level...
Insider Tricks for Flawless Results
The Temperature Rule Nobody Follows
Here's the thing about butter temperature that'll change your cookie game forever: too cold and your sugar won't dissolve properly, creating grainy cookies with less flavor development. Too warm and your cookies will spread into one giant chocolate mess that bakes up thin and crispy. The sweet spot is butter that's soft enough to leave a fingerprint when pressed but still holds its shape. I test by pressing my finger into the butter—it should give way easily but not feel greasy or melted. This usually takes about 45 minutes on the counter, depending on your kitchen temperature. In summer, I cube the butter first to speed up softening without creating a melty disaster.
The same rule applies to eggs—cold eggs won't incorporate as smoothly, leading to broken emulsions and uneven texture. But here's the kicker: slightly warm eggs create more lift because the proteins unwind more easily, trapping air that helps the cookies rise. I submerge cold eggs in warm (not hot) water for 5-7 minutes before using them. The water should feel comfortable to touch, like a warm bath. Too hot and you'll start cooking the eggs, which is a culinary tragedy we want to avoid at all costs.
Why Your Nose Knows Best
Forget timers—your nose is the most reliable tool for knowing when these cookies are perfectly baked. When the chocolate aroma suddenly intensifies and becomes almost intoxicating, that's your cue to check them. The Maillard reaction (that magical browning process) releases hundreds of flavor compounds that you can actually smell before you can see them. I start sniffing around the 9-minute mark, and when my kitchen smells like a chocolate factory exploded in the best possible way, I know we're close to perfection.
This olfactory timing method has never failed me, unlike the timer on my oven which seems to have a personal vendetta against my baking success. The smell should be rich and chocolate-forward, not burnt or caramel-heavy. If you start smelling caramel before chocolate, you've probably overbaked them. Pull them out immediately and consider them a lesson in the school of hard cookie knocks. Your neighbors will probably start knocking on your door around this time, drawn by the chocolate aromatherapy you've created.
The 5-Minute Rest That Changes Everything
After pulling the cookies from the oven, let them rest on the hot baking sheet for exactly 5 minutes before transferring to a cooling rack. This isn't just about preventing breakage—it's about carryover cooking and texture development. The residual heat continues baking the centers gently while the edges set, creating that perfect contrast between crisp edges and soft centers. Move them too early and you'll have broken, sad cookies. Wait too long and they'll stick to the parchment and break when you try to move them.
During these crucial 5 minutes, something magical happens: the chocolate chips settle into the cookie, the centers collapse slightly to create that beautiful wrinkled appearance, and the flavors meld together into something greater than the sum of their parts. I use this time to prepare my milk, find my favorite cookie-eating spot, and mentally prepare for the chocolate experience I'm about to have. It's like a meditation on the art of patience, except the reward is a warm chocolate chip cookie instead of enlightenment.
The Freezer Revelation
Here's a game-changer: freeze the dough balls on a baking sheet for 30 minutes before baking. This creates the most incredibly thick, bakery-style cookies with a texture that's somehow both crisp and chewy. The cold dough spreads more slowly, allowing the edges to set while the centers stay soft and fudgy. I discovered this by accident when I got distracted mid-baking (thanks, Netflix) and found that the frozen dough created superior cookies.
Keep a bag of frozen dough balls in your freezer for fresh cookies on demand. They'll keep for up to 3 months, though in my house they rarely last 3 days. Bake them straight from frozen—just add 2-3 extra minutes to the baking time. The result is cookies that look like they came from a fancy bakery, with those perfect ripples and cracks that make people think you have mysterious baking powers. My friends think I slave over these, but really I'm just pulling frozen dough from my freezer like a dessert wizard.
Creative Twists and Variations
This recipe is a playground. Here are some of my favorite ways to switch things up:
The Rocky Road Remix
Replace half the chocolate chips with mini marshmallows and chopped roasted almonds for a rocky road experience that'll transport you straight to summer camp nostalgia. Add the marshmallows during the last 2 minutes of baking so they get toasted but don't disappear completely. The almonds add crunch that plays beautifully against the soft cookie, while the marshmallows create little pockets of gooey sweetness. I like to use smoked almonds for an unexpected flavor twist that makes people ask questions they can't quite articulate.
The Mexican Hot Chocolate Adventure
Add 1 teaspoon cinnamon and 1/4 teaspoon cayenne to the dry ingredients for cookies with a subtle warmth that builds slowly. The cinnamon enhances the chocolate's complexity while the cayenne provides just enough heat to make your tongue tingle pleasantly. Top with a mixture of cinnamon and sugar before baking for that traditional Mexican hot chocolate experience. These are especially good with a glass of cold horchata, and they've become my go-to for impressing people who think they've tried every cookie variation possible.
The Salted Caramel Indulgence
Press a soft caramel candy into the center of each dough ball before baking, then sprinkle with extra flaky salt. The caramel melts into a molten center that creates the most incredible surprise when you bite into what looks like a regular chocolate chip cookie. Use soft caramels, not the hard kind, or you'll risk dental disasters. The combination of salty and sweet, warm caramel and cold milk is basically a religious experience in cookie form.
The Breakfast Cookie Makeover
Replace half the flour with oat flour and add 1/2 cup of your favorite granola for cookies that are practically health food (don't check the calorie count). The oat flour creates a more tender, almost shortbread-like texture, while the granola adds crunch and makes them feel acceptable to eat for breakfast. I've brought these to early morning meetings and watched people justify eating cookies at 8 AM because "they have oats!" Add dried cranberries for that virtuous fruit serving.
The Mocha Madness
Replace the espresso powder with instant coffee and add 2 tablespoons of very finely ground espresso beans for coffee lovers who want to mainline caffeine through cookies. The ground beans add texture and intense coffee flavor that pairs incredibly with the chocolate. These are dangerous for late-night baking sessions because you might find yourself wide awake at 3 AM, eating cookies and reorganizing your spice cabinet. Don't say I didn't warn you about the productivity boost.
The White Chocolate Contrast
Use white chocolate chips instead of semisweet for a dramatic color contrast and flavor that makes the dark chocolate taste even more intense by comparison. The sweetness of white chocolate against the deep chocolate cookie creates a flavor profile that's complex and addictive. Add some dried cherries for a pop of tartness that cuts through all the richness. These look stunning on a cookie platter and taste like they came from a boutique bakery where everything costs $5 per cookie.
Storing and Bringing It Back to Life
Fridge Storage
Store completely cooled cookies in an airtight container at room temperature for up to 5 days, though I've never seen them last that long. Layer them between sheets of parchment paper to prevent sticking, and add a slice of bread to the container—the cookies will absorb moisture from the bread instead of becoming stale. Replace the bread slice every other day, or it'll mold and ruin everything. The cookies actually taste better on day 2 as the flavors meld together into something even more incredible.
If your cookies do start to dry out (tragedy!), pop them in the microwave for 8-10 seconds with a small glass of water. The steam will revive them to near-fresh status. Don't overdo it or you'll have chocolate-flavored rubber. I keep a small spray bottle handy for misting cookies that need a little TLC—they come back to life like cookie zombies, but in a good way.
Freezer Friendly
Freeze baked cookies in a single layer on a baking sheet, then transfer to a freezer bag once solid. They'll keep for up to 3 months, though why you'd wait that long is beyond me. Thaw at room temperature for 30 minutes, or microwave for 15-20 seconds from frozen. The chocolate chips might be slightly firmer than fresh, but the flavor is identical. I like to freeze them in individual portions so I can practice "portion control" (ha!) by only thawing what I think I'll eat in one sitting.
For maximum freshness, wrap each cookie individually in plastic wrap before freezing. This prevents freezer burn and allows you to grab single cookies without thawing the whole batch. It's like having a secret cookie stash that nobody knows about, which is either sad or genius depending on your perspective. My freezer currently contains more cookies than actual food, which tells you everything about my priorities.
Best Reheating Method
Revive refrigerated cookies by wrapping them in a damp paper towel and microwaving for 10-12 seconds. The towel creates steam that rehydrates the cookie without making it soggy. For oven reheating, wrap in foil and warm at 300°F for 5-7 minutes. The foil prevents them from drying out while the gentle heat warms them through. Never reheat at high temperatures or you'll have chocolate-flavored cardboard.
For the ultimate experience, reheat cookies just until the chocolate chips start to melt again, then serve immediately with cold milk. The contrast between warm, gooey chocolate and cold milk is basically what heaven tastes like. I've been known to reheat cookies at 2 AM using a candle warmer when I didn't want to wake anyone with microwave beeps—desperate times call for desperate measures, and a warm cookie is always worth the effort.