Picture this: I was halfway through a frantic Sunday brunch, juggling a pot of coffee, a pan of scrambled eggs, and a last‑minute request from a friend who swore she’d never taste anything like this again. My kitchen exploded into a fragrant storm of citrus and toasted coconut, and the moment those bars emerged from the oven, I knew I’d stumbled onto something epic. The golden edges crackle with a buttery crisp that gives way to a silky, tangy filling that tastes like sunshine on a humid island. I dare you to taste this and not go back for seconds.
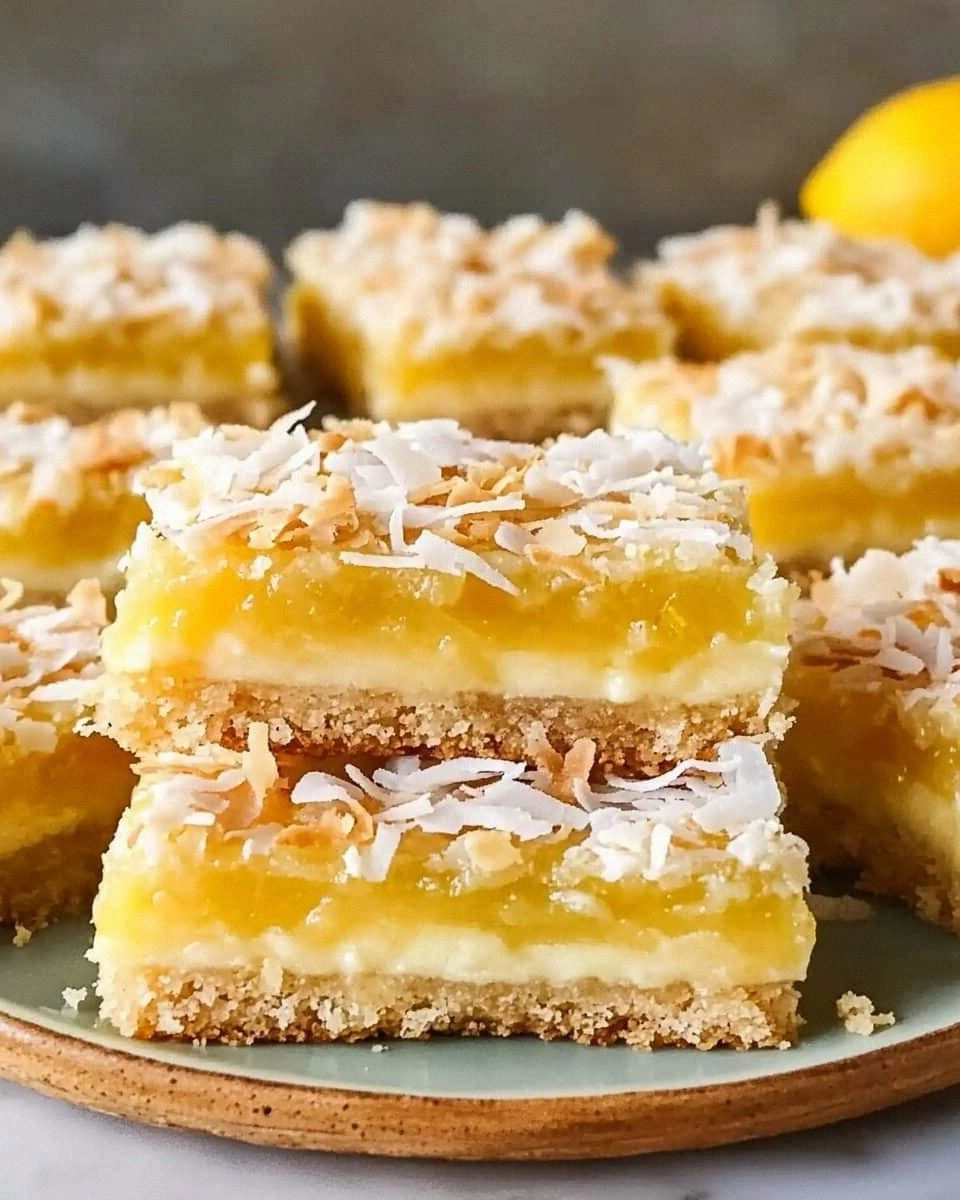
The first thing you notice is the scent: a sweet, tropical breeze laced with sharp lemon that makes your nose do a happy dance. The visual is a canvas of golden bars, each specked with toasted coconut that glistens like tiny grains of sand. When you cut into one, the interior glows with a bright lemon custard, the coconut flakes subtly popping like crunchy confetti. The texture is a glorious contrast—crisp on the outside, silky on the inside, and the coconut adds a delightful chew that never feels heavy. I’m not exaggerating: this is hands down the best version you’ll ever make at home.
I’ll be honest—after the first bite, I almost tried to eat the whole pan before anyone else could. Most recipes get this completely wrong: they either leave the topping too sweet, forget the coconut crunch, or bake the bars until they’re dry. Here, the perfect balance is achieved with a precise ratio of butter to coconut, a touch of baking powder for lift, and a careful timing that locks in moisture. Picture yourself pulling this out of the oven, the whole kitchen smelling incredible, and the anticipation of the first bite that makes your mouth water. Stay with me here—this is worth it.
Let me walk you through every single step—by the end, you’ll wonder how you ever made it any other way. From the first whisk to the last sprinkle of coconut, every action is intentional, every ingredient purposeful. The method is simple enough to follow, yet layered with subtle techniques that elevate the flavor profile. Ready to dive into a recipe that feels like a tropical vacation in a pan? Let’s get started.
What Makes This Version Stand Out
- Flavor: The lemon zest is bright and aromatic, while the coconut adds a nutty sweetness that complements the tartness perfectly. The subtle use of baking powder lifts the batter, giving it a light, airy quality without compromising the chewy texture.
- Texture: The crust is buttery and crisp, with a subtle crunch from toasted coconut. The filling is silky, almost custard‑like, with a slight thickness that stays together without being gummy.
- Simplicity: Only ten ingredients, no fancy equipment, and a straightforward method that even beginners can master. The recipe scales easily for larger gatherings.
- Uniqueness: The combination of coconut and lemon is rarely executed with such precision. The result feels fresh yet indulgent, making it a standout dessert for any occasion.
- Crowd Reaction: Friends rave about the “tropical crunch” and the “perfectly balanced tartness.” They come back for seconds and thirds, and the bars keep their shape when cut.
- Ingredient Quality: Using high‑quality shredded coconut and fresh lemons elevates the flavor. The butter is unsalted to control the salt level precisely.
- Cooking Method: The two‑stage baking process creates a crisp base and a silky top, ensuring each bite is a harmonious blend of textures.
- Make‑ahead Potential: The bars can be prepared a day in advance, refrigerated, and baked fresh when needed, saving time during busy events.
Inside the Ingredient List
The Flavor Base
All-purpose flour and baking powder form the backbone of the crust, providing structure and a slight lift. The flour absorbs moisture from the butter, ensuring the base is neither soggy nor overly dense. Baking powder reacts with the acid from lemon juice, creating tiny bubbles that give the bars a tender crumb. If you skip the baking powder, the bars will be heavy and flat, lacking that subtle airy feel.
Use 120 grams of flour for four servings; this converts to about one cup. A tip: sift the flour before adding to avoid clumps and to aerate it for a lighter crust. If you’re gluten‑free, a 1:1 blend of gluten‑free flour and xanthan gum can replace the all‑purpose flour without compromising texture.
The Texture Crew
Unsalted butter is the secret sauce that creates a buttery, melt‑in‑your‑mouth crust. The 113 grams of butter should be at room temperature to blend smoothly with the flour. The butter’s fat content coats the flour particles, preventing gluten formation and ensuring a tender crumb. Skipping butter will result in a crumbly, dry base that doesn’t hold together.
Shredded coconut adds a chewy, slightly sweet element that contrasts the tartness of lemon. Use 100 grams of coconut; this amount provides a noticeable crunch without overpowering the citrus. Toasting the coconut before adding it to the batter enhances its nutty flavor and gives the bars a golden sheen. If you’re vegan, coconut oil can replace butter, but the flavor profile will shift slightly.
The Unexpected Star
Granulated sugar and powdered sugar balance sweetness and texture. The 50 grams of granulated sugar dissolves during baking, creating a subtle caramelization on the crust. The 60 grams of powdered sugar coats the filling, giving it a silky finish and preventing it from drying out. If you prefer a lower sugar content, reduce both by 25% but be prepared for a slightly less sweet result.
Lemon zest is the star that delivers aromatic brightness. Use 2 grams of zest from a fresh lemon; it adds a burst of citrus oils that lift the entire flavor profile. The zest’s essential oils are volatile, so it’s best to zest just before baking. A pinch of salt (0.5 grams) balances the sweetness and enhances the coconut’s natural nuttiness.
The Final Flourish
Eggs bind the mixture, providing structure and moisture. Three large eggs (150 grams) are necessary to achieve the right consistency. The eggs’ proteins coagulate during baking, setting the filling while keeping it tender. Skipping eggs will result in a crumbly, dry dessert that won’t hold together.
Fresh lemon juice (30 grams) adds acidity that balances the sweetness and reacts with the baking powder to lift the batter. Use a fresh, cold‑pressed lemon for the best flavor. The juice also helps keep the filling from separating during baking. If you’re allergic to eggs, you can use a flaxseed or chia egg substitute, but the texture will differ slightly.
Everything's prepped? Good. Let's get into the real action...
The Method — Step by Step
- Preheat your oven to 350°F (175°C). Line a 9×9 inch baking pan with parchment paper, leaving a few inches overhang for easy removal. This step ensures even heat distribution and makes cleanup a breeze. The aroma of butter and coconut will start to mingle even before the batter hits the pan.
- Make the crust. In a mixing bowl, combine 120 grams of flour, 2 grams of baking powder, and 0.5 grams of salt. Add the room‑temperature butter, cutting it into small cubes. Use a pastry cutter or your fingertips to blend until the mixture resembles coarse crumbs. This creates pockets that will turn into a flaky crust.
- Incorporate coconut. Stir in 100 grams of shredded coconut, ensuring it’s evenly distributed. The coconut should be toasted lightly in a dry skillet over medium heat until golden brown. Toasting intensifies the nutty flavor and adds a subtle crunch that’s essential for the final texture.
- Press the crust into the pan. Transfer the crumb mixture to the prepared pan. Use the back of a spoon or your palm to press it firmly into an even layer, about 1/2 inch thick. A compact crust holds the filling together and provides a sturdy base.
- Bake the crust. Place the pan in the preheated oven for 15 minutes, or until the edges are golden brown. The crust should have a slight crunch but still be pliable. This step sets the foundation for the filling and ensures the coconut remains toasted.
- Prepare the filling. In a separate bowl, whisk together 150 grams of eggs, 30 grams of lemon juice, 2 grams of lemon zest, 50 grams of granulated sugar, and 60 grams of powdered sugar. Whisk until the mixture is smooth and the sugar has dissolved completely. The batter should be slightly thick but pourable.
- Pour over the crust. Carefully pour the filling onto the baked crust, spreading it evenly with a spatula. The filling should be about 1/2 inch thick. This is the moment of truth—watch the edges begin to set while the center remains glossy.
- Bake the bars. Return the pan to the oven and bake for an additional 20–25 minutes, or until the filling is set and the top has a faint golden hue. The bars should not be browned too darkly; we’re aiming for a gentle caramelization.
- Cool and set. Remove the pan from the oven and let it cool on a wire rack for at least 30 minutes. This cooling period allows the bars to firm up, making them easier to cut. The aroma will be irresistible—sweet, citrusy, and coconutty.
- Slice and serve. Lift the bars using the parchment overhang. Cut into squares or rectangles with a sharp knife. Serve at room temperature or chilled. The bars are best enjoyed within a day or two of baking for maximum freshness.
That's it— you did it. But hold on, I've got a few more tricks that'll take this to another level. These insider tips will help you achieve a flawless finish every time, even if you’re a seasoned baker or a kitchen newbie.
Insider Tricks for Flawless Results
The Temperature Rule Nobody Follows
Many bakers bake at a single temperature, but this recipe benefits from a two‑temperature approach. Start at 350°F for the crust, then reduce to 325°F for the filling. This gentle drop prevents the filling from browning too quickly while still setting the structure. I once tried a single temperature and the bars turned out too brown on top. The trick is to let the oven settle before adding the filling.
Why Your Nose Knows Best
The scent of baking is a powerful indicator of doneness. When the bars are ready, the aroma should be a warm, sweet citrus with a faint coconut undertone. If the smell is too buttery or metallic, the bars need more time. I once smelled the bars and thought they were done, but they were still raw in the middle—never trust your eyes alone.
The 5‑Minute Rest That Changes Everything
After removing the bars from the oven, let them rest for 5 minutes before cutting. This short rest allows the filling to set, preventing the bars from falling apart. I learned this trick after a friend tried to slice them immediately and the filling splattered everywhere. A quick rest means clean, neat slices every time.
The Coconut Toasting Trick
Toasting coconut in a skillet with a pinch of salt enhances its flavor. The heat caramelizes the natural sugars, giving the bars a deeper, more complex taste. The trick is to toast until just golden, not burnt. Once toasted, let the coconut cool before adding it to the crust to preserve the crunch.
The Perfect Slice
Use a hot, sharp knife for clean cuts. Warm the knife in hot water, then dry it before slicing. This prevents the bars from sticking and ensures each piece is a perfect rectangle. I’ve seen people use dull knives, resulting in ragged edges and a mess.
The Final Sprinkle
Just before serving, dust the tops with a light dusting of powdered sugar. This adds a subtle sweetness and a polished look. If you want extra color, a pinch of lemon zest can be sprinkled on top for a fresh burst of aroma.
Creative Twists and Variations
This recipe is a playground. Here are some of my favorite ways to switch things up:
Tropical Mango Bars
Swap half the lemon juice with mango puree and add diced mango to the filling. The result is a sweet, tropical twist that pairs wonderfully with coconut. Ideal for summer gatherings.
Chocolate Coconut Crunch
Add 1/4 cup of cocoa powder to the crust mixture and drizzle melted dark chocolate over the finished bars. The chocolate adds depth while the coconut crunch remains. A decadent treat for chocolate lovers.
Spiced Ginger Variation
Incorporate 1 tsp of ground ginger into the crust and a pinch of cinnamon into the filling. The warm spices complement the citrusy brightness, creating a comforting dessert. Great for fall or winter.
Almond Butter Swirl
Swirl a tablespoon of almond butter into the filling before baking. The nutty flavor adds richness and a subtle swirl pattern. Perfect for a sophisticated presentation.
Low‑Sugar Version
Replace granulated sugar with a sugar substitute like stevia or erythritol. Use the same quantity to maintain volume. The bars will be lighter but still delicious.
Storing and Bringing It Back to Life
Fridge Storage
Store the bars in an airtight container at room temperature for up to 3 days. Keep them away from direct sunlight to preserve the citrus aroma. If you’re in a humid climate, the bars may soften slightly—just let them sit at room temperature for a few minutes before cutting.
Freezer Friendly
Wrap the bars tightly in plastic wrap and place them in a freezer bag. They can be frozen for up to 2 months. When ready to serve, let them thaw at room temperature for 30 minutes before cutting. This keeps the texture intact.
Best Reheating Method
To revive frozen bars, preheat your oven to 350°F (175°C). Place the bars on a parchment‑lined tray and bake for 10 minutes, or until warmed through. Add a tiny splash of water (about 1 tsp) to the top before baking; it steams the filling back to silky perfection.