I burnt my first attempt at these wraps so badly that the smoke alarm became my dinner bell. Picture this: it was a Tuesday night, I'd worked late, and my stomach was staging a full-scale rebellion against another sad desk salad. The craving hit like a freight train — something warm, something cheesy, something that would hug my soul from the inside out. But in my hangry haste, I cranked the heat too high, walked away to answer one email (rookie mistake), and returned to find my chicken transformed into charcoal briquettes that could've passed for hockey pucks.
Here's where the magic happened though. Instead of ordering takeout like a sensible person, I became obsessed. I marched back into that kitchen, armed with fresh chicken and a determination that would've impressed a medieval knight. The second attempt? Pure alchemy. The garlic hit the butter and suddenly my tiny apartment smelled like I'd been transported to a rustic Italian kitchen. When that cheddar and Parmesan melted into the sauce, creating this velvety blanket of golden perfection, I knew I'd stumbled onto something dangerous — because I immediately ate three wraps standing at the counter, burning my tongue in the process, unable to wait even thirty seconds for them to cool.
What makes this version different from every other chicken wrap recipe cluttering the internet? We're not just throwing some chicken and cheese into a tortilla and calling it dinner. No, we're building layers of flavor like a symphony conductor — each ingredient plays its part at exactly the right moment. The chicken gets a quick sear that locks in juices while creating those gorgeous caramelized edges. The garlic butter sauce isn't just melted cheese — it's a luxurious béchamel base that could make a French chef weep with joy. And here's the secret weapon: we're treating that tortilla like a blank canvas, not just a vessel for fillings.
I've made these wraps for picky toddlers who declared them "better than pizza," for friends who claimed they don't like garlic (plot twist: they licked their plates), and for my mother who insists nothing will ever beat her meatloaf. Every single person has asked for the recipe before the meal was over. Let me walk you through every single step — by the end, you'll wonder how you ever made it any other way.
What Makes This Version Stand Out
Flavor Explosion: Most chicken wraps taste like, well, chicken in a tortilla. This version creates a garlic butter sauce so aromatic that your neighbors will be knocking on your door asking what you're making. The combination of sharp cheddar and nutty Parmesan creates a depth that store-bought shredded cheese could never achieve.
Texture Paradise: We're talking about tender chicken strips that melt in your mouth, wrapped in a tortilla that's been lightly crisped to achieve that perfect contrast between soft interior and slightly crunchy exterior. The sauce coats every bite like velvet, ensuring no dry mouthfuls.
Weeknight Warrior: From fridge to table in under 45 minutes, this recipe understands that we're all tired and hungry. The ingredients are probably already in your kitchen, and there's minimal cleanup because everything happens in one pan and one baking sheet.
Customizable Canvas: While the base recipe is perfect as-is, it begs for personalization. Want heat? Add jalapeños. Feeling fancy? Caramelized onions. Trying to impress? A handful of spinach wilts perfectly into the sauce, making you look like you planned this all along.
Crowd Control: This isn't one of those recipes where you need to make separate meals for kids and adults. The garlic is present but not overwhelming, the cheese is familiar comfort food, and the chicken is simply seasoned. Everyone cleans their plate.
Leftover Gold: These wraps reheat like a dream. Most cheesy chicken situations become sad and separated upon reheating, but our sauce stays creamy and luxurious. Plus, they freeze beautifully for those nights when even ordering delivery feels like too much work.
Ingredient Integrity: We're not hiding poor-quality ingredients under a mountain of cheese. Every component shines — the chicken is the star, the garlic is fresh, the cheeses are real (none of that powdered cellulose nonsense), and even the tortillas matter.
Alright, let's break down exactly what goes into this masterpiece...
Inside the Ingredient List
The Flavor Foundation
Boneless skinless chicken breasts are our canvas, but not all chicken is created equal. Look for breasts that are plump and pink, not pale and sitting in a pool of liquid. Thinly slicing them against the grain ensures every bite is tender rather than that dreaded dry, stringy texture. The seasoning blend of garlic powder, onion powder, and paprika isn't just randomly thrown together — garlic powder provides that deep, savory backbone, onion powder adds subtle sweetness, and paprika brings both color and a gentle warmth that makes people ask "what's that amazing flavor?"
Olive oil might seem basic, but it's crucial for creating that beautiful sear. We're not drowning the chicken here — just enough to prevent sticking and help those seasonings adhere. The smoke point matters too; extra virgin can burn, so reach for regular olive oil or even avocado oil if that's what you have. This isn't the place for your expensive finishing oil anyway.
The Texture Crew
Butter is non-negotiable for the sauce base. Margarine will not work, I don't care what your aunt says. Real butter creates that luxurious mouthfeel that makes people close their eyes when they take a bite. When it hits the pan and starts foaming, that's your cue that the magic is beginning. The milk solids in butter brown slightly, adding nuttiness that oil alone could never achieve.
Fresh garlic cloves separate the amateurs from the pros. Garlic powder in the seasoning, minced fresh garlic in the sauce — we're hitting it from both angles. The fresh stuff adds that pungent, almost spicy note that makes your mouth water. Mince it fine so it distributes evenly, but don't press it through a garlic press unless you want every bite to punch you in the face with garlic.
The Unexpected Star
All-purpose flour is the secret weapon most recipes skip. We're making a roux here, folks — it's not scary, it's science. The flour toasts in the butter, removing that raw flour taste while creating the thickening power we need. Skip this step and your sauce will be thin and sad, pooling at the bottom of your wrap instead of clinging lovingly to every ingredient.
Whole milk warmed slightly is crucial. Cold milk will seize your roux, creating lumpy sauce that no amount of whisking will fix. Warm milk incorporates smoothly, creating that velvety texture we're after. Anything less than whole milk produces watery sauce that breaks faster than my willpower around fresh bread.
The Final Flourish
Sharp cheddar brings the personality — it's bold, it's tangy, it melts into glorious stretchy strands. Pre-shredded cheddar is coated in cellulose to prevent clumping, which also prevents smooth melting. Buy a block and grate it yourself; your sauce will thank you. The sharper the better here because we're balancing it with creamy elements.
Grated Parmesan is the umami bomb that makes people say "I can't quite identify that flavor, but I need more of it." It melts completely into the sauce, adding depth and complexity that takes this from good to restaurant-quality. Skip the green can — get real Parmigiano-Reggiano if you can, but any decent wedge will transform your sauce.
Everything's prepped? Good. Let's get into the real action...
The Method — Step by Step
- Start by slicing your chicken breasts lengthwise into thin cutlets, about half-inch thick. This isn't just for faster cooking — thinner pieces mean more surface area for seasoning and that beautiful golden sear. Lay them between plastic wrap and give them a gentle pound if they're uneven; we want them all the same thickness so they cook evenly. Season both sides generously with garlic powder, onion powder, paprika, salt, and pepper. Really work the seasonings in with your fingers — this isn't a polite sprinkle, we're creating flavor here.
- Heat olive oil in a large skillet over medium-high heat until it shimmers and moves like water. The oil should coat the bottom thinly — too much and we're frying, too little and the chicken will stick. Lay the chicken in carefully, hearing that satisfying sizzle that means you've nailed the temperature. Don't crowd the pan; work in batches if necessary. Crowded chicken steams instead of sears, and we want those gorgeous caramelized edges that add incredible depth.
- Cook the chicken for 3-4 minutes per side until golden brown and cooked through. Resist the urge to move it around — let it develop that beautiful crust. The chicken is done when it feels firm to the touch and juices run clear. Transfer to a plate to rest; those juices need to redistribute or they'll run out faster than guests when you mention it's time to play charades.
- In the same pan (don't you dare wash it — those browned bits are flavor gold), melt butter over medium heat. Add the minced garlic and cook for exactly 30 seconds — any longer and it burns, any less and it stays harsh. You want it fragrant and just starting to turn golden. The smell should make you close your eyes involuntarily.
- Sprinkle flour over the garlic butter and whisk constantly for 2 minutes. This is your roux, and it's the difference between luxurious sauce and floury disappointment. The mixture should bubble gently and turn slightly golden. If it smells like raw flour, keep going. You're looking for a color like light sand and a toasty aroma.
- Slowly pour in warm milk while whisking constantly. Start with just a splash, whisk until smooth, then add more. Patience here prevents lumps that no amount of whisking will fix. The sauce will thicken dramatically — keep whisking until it's smooth and creamy, about 3-4 minutes.
- Remove from heat and stir in both cheeses a handful at a time. The residual heat melts them perfectly without breaking the sauce. Add the mustard if using — just a pinch adds complexity without announcing its presence. Season with salt and pepper to taste; the sauce should make you want to eat it with a spoon.
- Chop the rested chicken into bite-sized pieces and stir into the sauce. Every piece should be generously coated — this isn't a dry wrap situation. Warm your tortillas briefly in a dry skillet or microwave so they're pliable and won't crack when rolled.
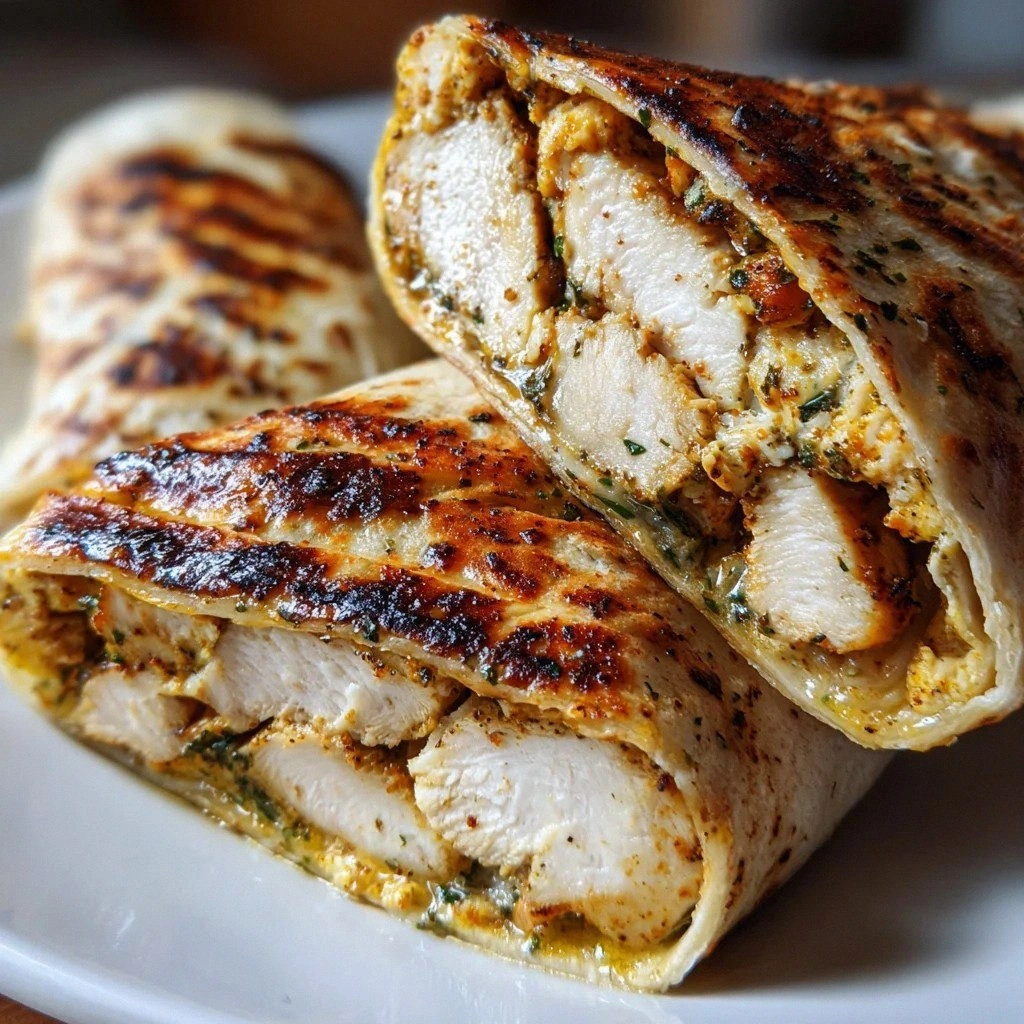
- Divide the chicken mixture among tortillas, add any optional toppings, and roll tightly. Place seam-side down on a baking sheet and bake at 400°F for 10 minutes until golden and crispy. The edges should be slightly crunchy while the inside stays molten and glorious.
That's it — you did it. But hold on, I've got a few more tricks that'll take this to another level...
Insider Tricks for Flawless Results
The Temperature Rule Nobody Follows
Room temperature ingredients aren't just for baking — they matter here too. Cold chicken hitting hot oil seizes up, becoming tough and stringy. Let your chicken sit out for 15-20 minutes before cooking. Same goes for milk in the sauce; cold milk causes thermal shock, creating lumpy sauce that looks like cottage cheese. Warm it in the microwave for 30 seconds or just let it sit on the counter while you prep everything else.
Why Your Nose Knows Best
Trust your senses more than the clock. Garlic should smell fragrant, not sharp or bitter. The roux should smell toasty and nutty, not like raw flour. The cheese sauce should smell so good you consider skipping the wrap entirely and just eating it with a spoon. If something smells wrong, it probably is — adjust heat, add ingredients, or start over. Your nose has been trained by thousands of meals; listen to it.
The 5-Minute Rest That Changes Everything
After baking, let the wraps rest for 5 minutes before serving. I know, I know — they're calling your name, molten and aromatic. But cutting into them immediately causes cheese lava to run everywhere, burning your tongue and making a mess. That brief rest allows the sauce to thicken slightly, ensuring each bite is perfectly combined rather than a cheese explosion. Use this time to set the table, pour drinks, or just admire your handiwork.
Sealing the Deal
The way you roll matters more than you think. Start with the filling slightly below center, fold in the sides first, then roll tightly from the bottom. Place seam-side down on the baking sheet — this prevents them from unrolling in the oven. If you're really concerned, secure with toothpicks, but a tight roll usually does the trick. The goal is a wrap that holds together when you bite into it, not one that dumps its contents all over your shirt.
Creative Twists and Variations
This recipe is a playground. Here are some of my favorite ways to switch things up:
The Buffalo Blitz
Replace half the cheddar with pepper jack and add 2 tablespoons of buffalo sauce to the cheese mixture. Toss in some diced celery for crunch and serve with ranch on the side. It's like your favorite bar food got a sophisticated makeover, and honestly, I dare you to taste this and not go back for seconds.
The Mediterranean Dream
Add chopped sun-dried tomatoes, kalamata olives, and crumbled feta to the chicken mixture. Swap the paprika for oregano and add a handful of fresh spinach. The briny olives and tangy tomatoes create a flavor profile that transports you straight to a Greek island, minus the expensive plane ticket.
The Breakfast Champion
Add scrambled eggs to the chicken mixture and swap the cheddar for smoked gouda. Include crispy bacon bits and serve with hot sauce. I served this at brunch once and people still talk about it like it was a religious experience. Future pacing: picture yourself becoming the brunch legend among your friends.
The Veggie Victory
Replace chicken with roasted cauliflower that's been seasoned with the same spice blend. Add roasted red peppers, caramelized onions, and use a mix of gruyere and white cheddar. Even devoted carnivores have devoured this version, completely forgetting it was vegetarian.
The Tex-Mex Takeover
Add cumin and chili powder to the chicken seasoning, swap cheddar for a Mexican blend, and include black beans and corn in the filling. Top with fresh cilantro and serve with salsa verde. It's like a burrito and a quesadilla had a beautiful, cheesy baby.
The Fancy Friday
Add sautéed mushrooms, use gruyere instead of cheddar, and include a splash of white wine in the sauce. Top with fresh thyme and serve with a side salad. This version is sophisticated enough for company but still delivers that comfort food hug we all need after a long week.
Storing and Bringing It Back to Life
Fridge Storage
Store cooled wraps in an airtight container for up to 4 days. Separate layers with parchment paper to prevent them from becoming a solid cheesy block. If you've got leftover filling (and honestly, why wouldn't you make extra?), it keeps beautifully for 3 days and reheats like a dream. Add a splash of milk when reheating to bring back that creamy texture.
Freezer Friendly
These wraps freeze like champions. Wrap each one individually in plastic wrap, then aluminum foil, and freeze for up to 3 months. When that late-night craving hits, unwrap and bake from frozen at 375°F for 20-25 minutes. The tortilla gets crisp, the inside stays molten, and you look like a kitchen genius who always has delicious food ready.
Best Reheating Method
Skip the microwave unless you enjoy soggy tortillas and separated sauce. Instead, reheat in a 350°F oven for 10-12 minutes, or in a dry skillet over medium heat, turning occasionally. The oven method gives you that fresh-baked texture, while the skillet method creates an almost quesadilla-like crunch. Either way, add a tiny splash of water before reheating — it steams back to perfection, restoring that just-made creaminess.