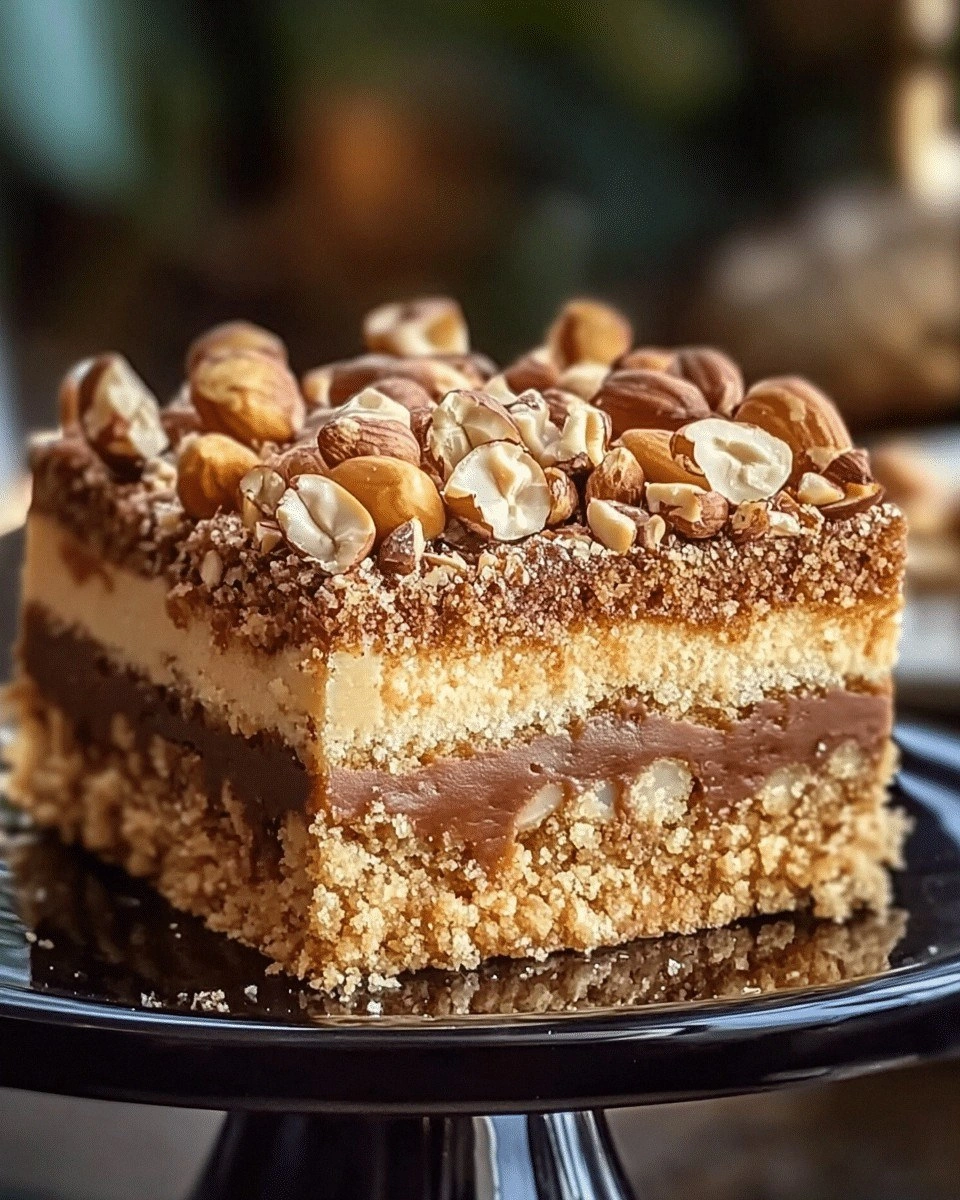
I remember the night I almost ruined my entire dessert lineup because I tried to make a simple chocolate cake and ended up with a sticky, burnt mess that looked like a blackened marshmallow. That disaster was the spark that drove me to search for the ultimate bar recipe, the kind that can be assembled in minutes but delivers the indulgence of a full dessert. The result? A seven-layer bar that feels like a symphony of textures and flavors, from the buttery graham cracker base to the glossy chocolate and butterscotch swirls, all bound together by sweetened condensed milk. I dare you to taste this and not go back for seconds.
Picture yourself pulling this out of the oven, the whole kitchen smelling incredible, and the first bite cracking open with a satisfying crunch that gives way to a chewy, coconut‑laden center, followed by a cascade of chocolate and nuts that melt in your mouth like a warm hug. The layers are not just visual; they’re a sensory journey: the crisp edge that shatters like thin ice, the silky condensation that coats each bite, the nutty crunch that pops against the sweetness, and the buttery finish that lingers. If you’ve ever struggled with creating a dessert that feels both decadent and approachable, you’re not alone, and I’ve got the fix. This is hands down the best version you’ll ever make at home.
What makes this version stand out is not just the ingredients but the precise balance of texture and flavor, the way each layer plays off the next, and the small but crucial tweaks that elevate it from ordinary to unforgettable. I’ve spent hours tweaking ratios, testing textures, and even experimenting with optional butterscotch chips to add a caramelized twist. The result is a bar that is both crowd‑pleasing and simple enough for a weeknight treat. Let me walk you through every single step — by the end, you’ll wonder how you ever made it any other way.
I’ll be honest — I ate half the batch before anyone else got to try it. That’s the power of a recipe that tastes so good it becomes a secret weapon in my pantry. If you’re ready to upgrade your snack game, keep reading. I promise you’ll see why this recipe is a game‑changer.
What Makes This Version Stand Out
- Taste: The combination of sweetened condensed milk and chocolate creates a rich, velvety center that balances the buttery crunch of the graham cracker base. Each bite delivers a layered experience that keeps you coming back for more.
- Texture: The graham cracker crumbs give a satisfying crunch, while the shredded coconut adds chewiness. The chocolate and nuts provide a luxurious melt‑in‑your‑mouth finish.
- Simplicity: No complicated techniques or hard‑to‑find ingredients. Everything is pantry‑friendly, and the assembly takes less than 15 minutes.
- Uniqueness: The optional butterscotch chips add a caramelized depth that sets this recipe apart from the usual chocolate‑nut bars you find online.
- Crowd Reaction: Friends who taste these bars often say they’re “the best bars I’ve ever had” and ask for the recipe right after the first bite.
- Ingredient Quality: Using real butter, high‑quality chocolate chips, and fresh nuts ensures each layer delivers maximum flavor.
- Cooking Method: The method of layering and pressing creates a firm structure that holds together, making it easy to cut and serve.
- Make‑ahead Potential: These bars keep well for up to a week in the fridge or longer when frozen, making them perfect for meal prep or entertaining.
Inside the Ingredient List
The Flavor Base
The graham cracker crumbs are the foundation that provides a buttery crunch and a subtle vanilla undertone. They bind the layers together and offer a neutral backdrop that allows the other flavors to shine. If you skip this component, the bars will lose structure and become mushy.
The Texture Crew
Sweetened shredded coconut and chopped nuts are the texture crew that add chewiness and crunch, respectively. The coconut absorbs the condensed milk, turning into a chewy, tropical center, while the nuts provide a satisfying bite. Replacing the nuts with seeds like pumpkin or sunflower can create a different crunch profile.
The Unexpected Star
Sweetened condensed milk is the unexpected star that turns the layers into a silky, caramelized glaze. It also acts as a natural binder, ensuring the bars hold together. If you prefer a dairy‑free version, try a plant‑based condensed milk made from coconut or almond milk.
The Final Flourish
Chocolate chips give the bars a rich, chocolatey finish, while optional butterscotch chips add a caramelized depth that elevates the flavor profile. The chocolate melts slightly, creating a glossy sheen on top. If you want a darker chocolate experience, use dark chocolate chips instead.
Everything's prepped? Good. Let's get into the real action...

The Method — Step by Step
- Begin by lining an 8‑by‑8‑inch baking pan with parchment paper, leaving a few inches of overhang on each side for easy removal. This step ensures the bars lift cleanly and keeps the edges from sticking. The paper should be snug but not tight, allowing the layers to settle evenly.
- In a medium bowl, combine the graham cracker crumbs and melted butter. Stir until the crumbs are evenly coated and the mixture feels like damp sand. Press the crumb mixture firmly into the bottom of the prepared pan, creating an even, compact layer. This is the first layer that will hold everything together.
- Spread the sweetened shredded coconut over the crumb base, pressing it in lightly so it adheres to the butter. The coconut absorbs the butter, forming a cohesive middle layer that will become chewy once set. Make sure the coconut layer is even to avoid pockets of air.
- Pour the sweetened condensed milk over the coconut, ensuring it covers the layer completely. The condensed milk should coat the coconut like a glaze, creating a silky texture that binds the next layer. Let the mixture sit for about 5 minutes so the coconut can absorb some of the liquid.
- Add the chopped nuts on top of the condensed milk layer. Gently press them in so they are distributed evenly. The nuts will provide a crunchy counterpoint to the chewy coconut, and their oils will help the chocolate layer adhere.
- Sprinkle the chocolate chips over the nuts, ensuring an even spread. If you prefer a deeper chocolate flavor, use a mix of milk and dark chocolate chips. The chocolate will melt slightly when the bars set, creating a glossy finish.
- Optional: If you’re using butterscotch chips, add them in this step. They should be scattered evenly across the chocolate layer. The butterscotch adds a caramelized note that complements the chocolate and coconut.
- Press the entire stack gently with a flat spatula or your palm to ensure all layers are compacted and there are no air pockets. This step is crucial for the bars to hold together when sliced.
- Refrigerate the pan for at least 2 hours, or overnight if possible. The cold temperature allows the layers to set firmly, making the bars easy to cut. When the bars feel firm, remove the parchment overhang and slice into squares.
That's it — you did it. But hold on, I've got a few more tricks that'll take this to another level...
Insider Tricks for Flawless Results
The Temperature Rule Nobody Follows
The secret to a perfect chew is the temperature of the condensed milk. Let it sit at room temperature for 10 minutes before pouring it over the coconut. This ensures it flows smoothly without clumping.
Why Your Nose Knows Best
Smell the layers as they set. A faint buttery aroma indicates the base is firm enough, while a sweet, caramel scent signals the condensed milk has absorbed properly. Trust your nose to tell you when it’s ready.
The 5‑Minute Rest That Changes Everything
After pressing the layers together, let the stack rest for 5 minutes before refrigerating. This brief pause allows the butter to set slightly, reducing the risk of the layers sliding apart when you cut.
Keep the Nuts Crunchy
If you prefer extra crunch, toast the nuts lightly in a dry skillet for 3 minutes before adding them. The toasted nuts will hold their texture even after the bars set.
Use a Light Dusting of Cocoa
Sprinkle a pinch of cocoa powder over the chocolate layer before it sets. This subtle hint of bitterness balances the sweetness and adds depth to the chocolate flavor.
Make a Bar‑Friendly Wrapper
Cut the bars into squares and wrap each in parchment paper or wax paper. This keeps them fresh and makes them easy to transport for picnics or office lunches.
Creative Twists and Variations
This recipe is a playground. Here are some of my favorite ways to switch things up:
Nutty Banana Crunch
Replace the nuts with sliced ripe banana and add a sprinkle of cinnamon. The banana adds natural sweetness while the cinnamon brings warmth, creating a tropical, spicy twist.
Chocolate‑Mint Delight
Add a handful of crushed mint chocolate chips to the chocolate layer. The mint provides a refreshing burst that cuts through the sweetness, making it perfect for summer gatherings.
Almond Joy Fusion
Swap the coconut for shredded sweetened coconut and add toasted almonds. This variation echoes the classic candy bar, offering a chewy coconut center with nutty crunch.
Citrus Burst
Add zest from one orange or lemon to the condensed milk mixture. The citrus brightens the flavor profile and balances the richness of the chocolate and butter.
Vegan Version
Use plant‑based butter, dairy‑free chocolate chips, and a coconut‑milk condensed milk alternative. The result is a fully vegan bar that still delivers the same indulgent layers.
Spiced Pumpkin Bar
Incorporate a teaspoon of pumpkin puree into the condensed milk and sprinkle pumpkin pie spice over the chocolate layer. This gives the bars a warm, autumnal flavor that’s surprisingly versatile.
Storing and Bringing It Back to Life
Fridge Storage
Store the bars in an airtight container in the refrigerator for up to one week. The cold environment keeps the layers firm and prevents the coconut from becoming overly soft. When you’re ready to eat, let them sit at room temperature for a few minutes for the best texture.
Freezer Friendly
Wrap each bar in plastic wrap and place them in a freezer‑safe zip‑lock bag. They’ll stay fresh for up to three months. Thaw in the fridge overnight before serving to maintain the layers’ integrity.
Best Reheating Method
If you prefer a warm, gooey bite, microwave the bars for 10–15 seconds on a low setting. Add a tiny splash of water to the top before heating; this steams the layers back to perfection, restoring that silky center.