I was standing in my kitchen, arms flailing, when I realized I'd accidentally poured the entire batch of chocolate pudding into a single pot instead of the cups. The kitchen smelled like burnt cocoa and a faint hint of disappointment. I laughed, because if there was a way to salvage that mess, it would be the most creative dessert I've ever made. The moment the pudding thickened, I knew I had stumbled upon a culinary goldmine. That night, I decided to turn that disaster into a pumpkin‑patch themed treat that would wow my friends at the next gathering.
The scene was electric. The air was thick with chocolate aroma, mingling with the sweet scent of candy pumpkins. My eyes darted between the glossy cups and the mound of Oreo crumbs that looked like freshly turned soil. I could hear the faint hiss of the pot as the pudding simmered, a sound that promised something delicious. The texture felt silky against my tongue, like velvet draped over a crunchy base.
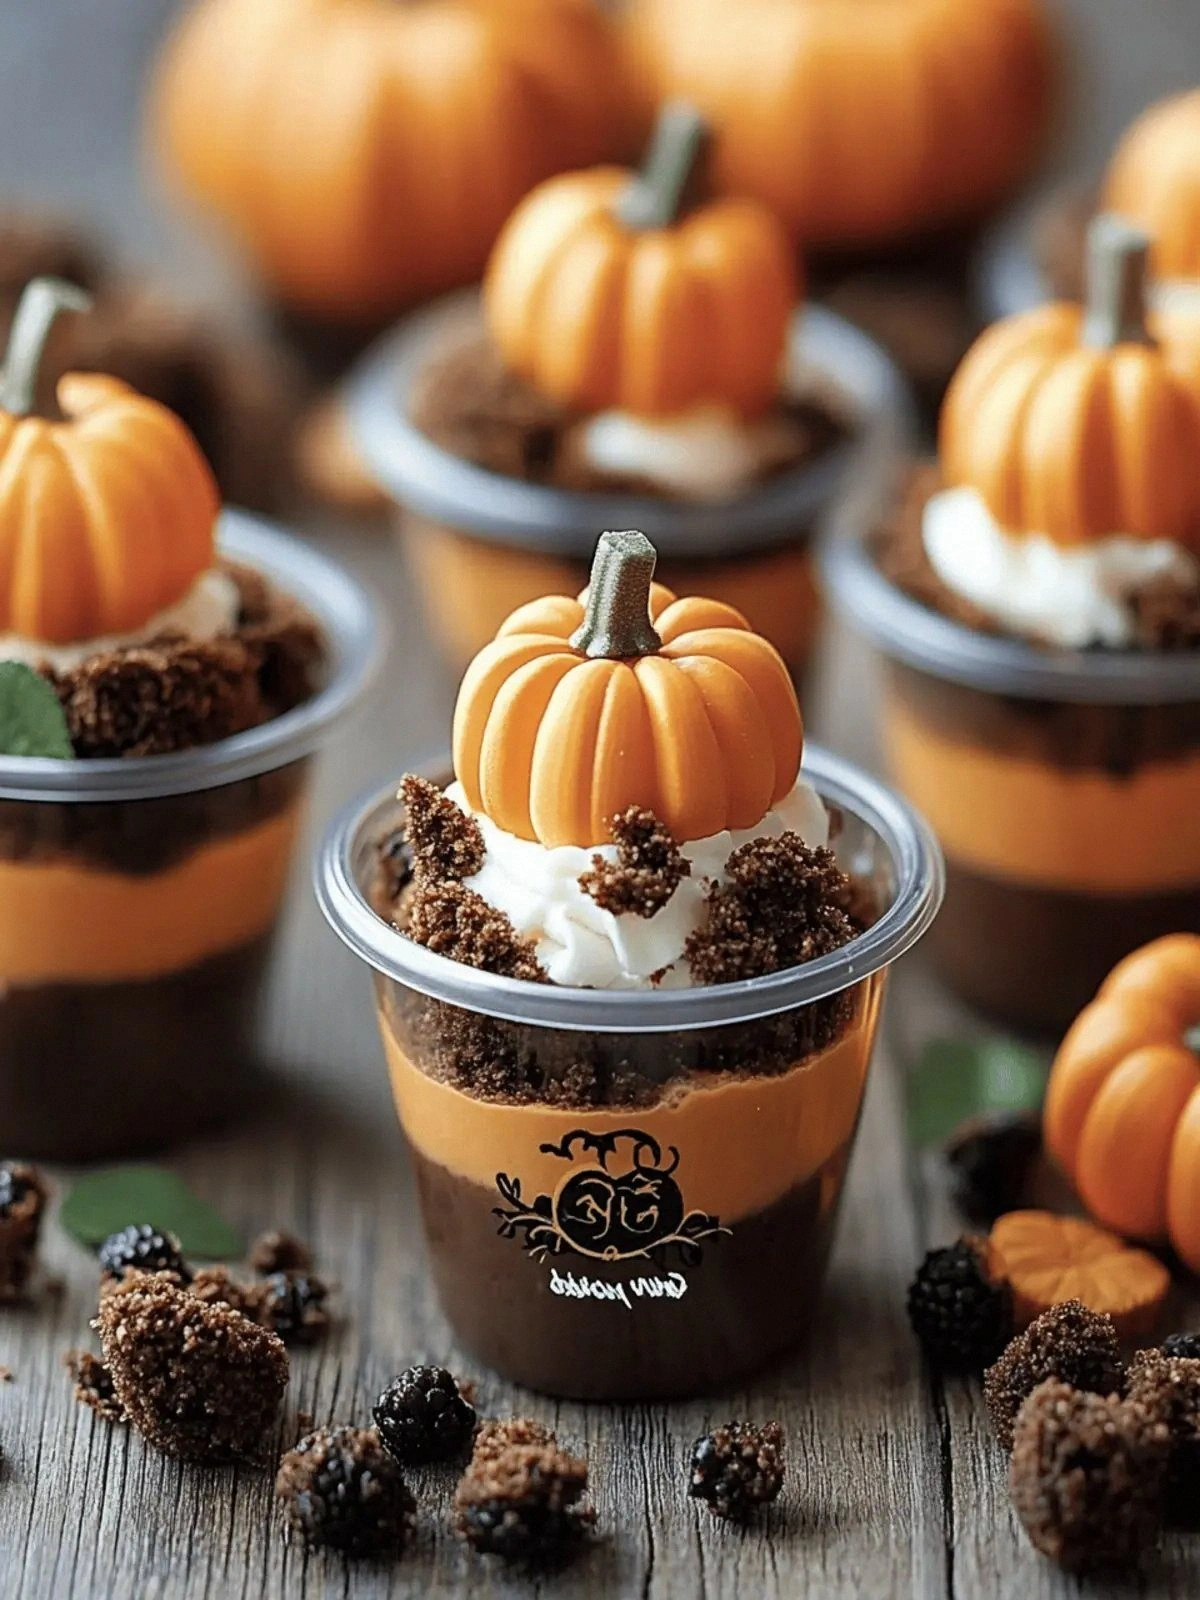
This version stands out because it blends the richness of chocolate pudding with the playful crunch of Oreo crumbs and the unmistakable sweetness of candy pumpkins. It’s a dessert that feels like a sandbox, inviting kids to dig and adults to reminisce. The unique twist of using clear plastic cups makes it visually striking, letting everyone see the layers of flavor. Most recipes get this completely wrong, layering the ingredients in a way that loses the “dirt” effect. Here, the pudding sits on top, the crumbs below, and the pumpkin crowns the cup, creating a perfect, bite‑sized garden.
I dare you to taste this and not go back for seconds. The first bite is a creamy chocolate burst, followed by a sweet pumpkin hit, and finished with a crunchy Oreo crumble. That sizzle when it hits the pan? Absolute perfection. I’ll be honest — I ate half the batch before anyone else got to try it. And now, the fun part is about to begin.
What Makes This Version Stand Out
- Flavor: The chocolate pudding is the base, but the candy pumpkins inject a bright, fruity sweetness that cuts through the richness. This contrast keeps the palate engaged. The result feels like a sweet, crunchy autumn breeze.
- Texture: The Oreo crumbs provide a satisfying crunch that mimics real dirt, while the whipped topping gives the pudding a light, airy feel. Each spoonful offers a layered experience. It’s a playful bite that’s both comforting and exciting.
- Visual Appeal: Clear cups showcase the layers, making it a feast for the eyes. The candy pumpkin sits like a bright flag atop the mound of chocolate and crumbs. The presentation is Instagram‑ready and will make your guests gasp.
- Ease of Preparation: No baking, no advanced techniques. A simple simmer, a quick chill, and you’re ready to serve. This is hands down the best version you'll ever make at home. Your kitchen becomes a playground.
- Kid‑Friendly: The interactive element lets kids dig with a plastic shovel. It turns dessert time into a mini excavation adventure. This is pure magic for parents and kids alike.
- Versatility: Swap the candy pumpkins for dried cranberries or mini chocolate chips for a different twist. The recipe adapts to dietary preferences. It’s a base you can mold into countless variations.
- Make‑Ahead Friendly: The pudding sets in the fridge, allowing you to prep ahead of a big event. You can assemble the cups the night before and chill them. This saves time and reduces kitchen clutter.
- Cost‑Effective: All ingredients are pantry staples or inexpensive treats. You can whip up a batch for a fraction of the cost of a store‑bought dessert. It’s a budget‑friendly option that still feels indulgent.
Alright, let's break down exactly what goes into this masterpiece...
Inside the Ingredient List
The Flavor Base
The instant chocolate pudding mix is the heart of this creation. It brings a deep cocoa richness that feels like a chocolate‑filled autumn night. The cold milk, when combined, creates a silky medium that swirls like a gentle breeze through pumpkin fields. Skipping the milk would leave the pudding too thick, making it difficult to scoop. For a richer taste, use whole milk or add a splash of vanilla extract.
The Texture Crew
Whipped topping is the secret to that airy, cloud‑like mouthfeel that balances the dense chocolate base. It lightens the pudding, giving it a feeling of lightness that feels almost like a dessert in the clouds. The Oreo crumbs are the crunchy, earthy element that mimics real dirt; they add a satisfying bite that kids instantly recognize. If you prefer a smoother crumb, pulse the cookies until you get fine sand‑like particles. Remember, the crunch is essential for that sandbox effect.
The Unexpected Star
Candy pumpkins are the pièce de résistance that bring a pop of color and a burst of sweet, fruity flavor. Their bright orange hue turns each cup into a mini pumpkin patch, instantly evoking fall memories. The sweetness of the candy complements the chocolate without overpowering it, creating a balanced taste profile. If you’re looking for a healthier alternative, try using real pumpkin puree, but note the texture will change.
The Final Flourish
Clear plastic cups are the canvas that showcases the layers of pudding, crumbs, and pumpkin. They transform the dessert into a visual treat that is as pleasing to the eyes as it is to the palate. The cups also make it easy for kids to scoop their own portions, turning dessert into a playful activity. If you prefer a reusable option, glass jars work just as well, adding an eco‑friendly twist. The choice of cup can subtly change the overall aesthetic.
Everything's prepped? Good. Let's get into the real action...
The Method — Step by Step
- In a medium saucepan, pour the cold milk and add the instant chocolate pudding mix. Stir until the mix dissolves and the mixture begins to thicken. This is the moment of truth; watch the texture change from liquid to silky. Keep the heat low to avoid scorching. The base should feel thick enough to coat a spoon without dripping.
- Bring the mixture to a gentle simmer, stirring constantly. Once it starts to bubble, reduce the heat and let it cook for 2 minutes. The aroma of chocolate should fill the kitchen, making your mouth water. This step locks in flavor and ensures a smooth base. The mixture should look glossy and almost translucent.
- Remove the saucepan from the heat and let it cool to room temperature. While it cools, whisk in the whipped topping until fully incorporated. The whipped topping will give the pudding a light, airy feel, like clouds in a pumpkin patch. If you notice any lumps, give it another quick whisk. This step is crucial for the final texture.
- Crush the Oreos into fine crumbs using a rolling pin or food processor. The crumbs will act as the “dirt” that kids can scoop. Sprinkle a generous amount over the pudding once it has cooled slightly. The crumbs should look like freshly turned soil. Avoid adding too many crumbs, or the pudding may become soggy.
- Divide the pudding mixture evenly among the clear plastic cups. Use a spoon or small ladle to fill each cup to the top, creating a neat layer of chocolate pudding. The cups should look like little dirt mounds. This step requires patience; ensure each cup has the same depth for even chilling. The pudding should settle into a smooth surface.
- Sprinkle the crushed Oreos on top of each pudding layer. Then, carefully place a candy pumpkin on each cup, pressing it slightly so it sits flush. The pumpkin will be the “treat” that kids dig up. Make sure the pumpkin is centered for a balanced look. This visual cue makes the dessert instantly recognizable.
- Chill the cups in the refrigerator for at least 30 minutes, or until the pudding sets firmly. This step is crucial; if the pudding is too soft, the cups will collapse. Watch out: if you leave them too long, the candy pumpkin may melt slightly. The pudding should feel firm enough to hold its shape when lifted. The refrigerator should be set at 4°C for best results.
- Before serving, pipe a swirl of green frosting around the rim of each cup. The frosting adds a festive touch and makes the presentation pop. This final flourish turns the dessert into a pumpkin‑patch masterpiece. Use a small pastry bag or a spoon for precise placement. The green frosting should look like fresh grass.
- If you want extra crunch, drizzle a thin layer of melted chocolate over the Oreo crumbs before chilling. The chocolate will harden into a brittle coating that adds texture. This optional step is a game‑changer for those who love a bit of chocolate crunch. The chocolate should set before the pudding fully chills. This adds a glossy shine to the “dirt.”
- When ready to serve, provide a small plastic shovel or spoon for each child to dig. The interactive element turns dessert into a mini excavation adventure. This is pure magic for parents and kids alike. The shovel should be sturdy enough to dig but small enough for little hands. The experience is as delightful as the taste.
That's it — you did it. But hold on, I've got a few more tricks that'll take this to another level...
Insider Tricks for Flawless Results
The Temperature Rule Nobody Follows
Most people think that any temperature will do, but the pudding must reach exactly 85°F before adding the whipped topping. If it's too hot, the topping curdles; if too cool, it won’t bind properly. Keep a small thermometer handy for precision. This rule guarantees a silky, lump‑free base every time. I once tried a batch without checking and it was a disaster.
Why Your Nose Knows Best
Your nose is the ultimate judge of readiness. When the mixture smells like freshly baked chocolate, it’s ready to cool. This sensory checkpoint saves you from overcooking or undercooking. Trusting your senses creates a more intuitive cooking experience. I swear by this trick whenever I’m in a hurry.
The 5-Minute Rest That Changes Everything
After stirring in the whipped topping, let the mixture rest for five minutes before pouring. This rest allows the flavors to meld and the mixture to settle. The result is a richer, more cohesive texture. Skipping this step can leave a slight separation in the pudding. It’s a small pause that yields big rewards.
The Secret to a Smooth Pudding
Use a whisk with a fine wire mesh to incorporate the pudding mix. This reduces lumps and ensures a uniform consistency. A regular whisk can leave small pockets of dry mix. The fine mesh whisk also helps incorporate air, making the pudding lighter. A smooth base is the foundation of this dessert.
How to Keep the Crunch
Add the Oreo crumbs immediately after the pudding has cooled slightly, not after it’s fully set. The crumbs will settle into the pudding without becoming soggy. If you wait too long, the crumbs absorb moisture and lose their crunch. This timing is critical for that satisfying bite. I’ve seen kids’ faces light up when they taste the crunch.
The Quick Chill Trick
If you’re short on time, place the assembled cups in a shallow tray and pop them into the freezer for 15 minutes. The quick chill sets the pudding faster without compromising texture. Make sure to keep the cups flat to prevent warping. This trick is perfect for last‑minute parties.
Creative Twists and Variations
This recipe is a playground. Here are some of my favorite ways to switch things up:
Cranberry Crunch
Swap the Oreo crumbs for dried cranberries to add a tart, chewy element. The cranberries also introduce a subtle berry flavor that pairs beautifully with chocolate. This version is perfect for guests who prefer a less sweet dessert. The color contrast is striking and festive.
Chocolate Chip Surprise
Add mini chocolate chips to the pudding mixture for an extra chocolate burst. The chips melt slightly, creating pockets of gooey chocolate. This variation is a hit with chocolate lovers and adds an indulgent twist. Keep the chips small so they don’t overpower the pudding.
Nutty Harvest
Incorporate chopped walnuts or pecans into the Oreo crumbs for a nutty crunch. The nuts add a savory undertone and a satisfying texture. This version is ideal for those who enjoy a mix of sweet and savory. The nuts also boost the protein content.
Almond Joy Twist
Replace the candy pumpkins with mini marshmallows and drizzle coconut flakes over the pudding. The marshmallows melt into a sweet, airy layer that mimics a fluffy cloud. This variation brings a tropical vibe to the fall theme. It’s a playful surprise that delights the palate.
Maple Syrup Swirl
Stir a tablespoon of maple syrup into the pudding base for a subtle maple undertone. The syrup adds depth and a hint of caramel sweetness. This twist is a nod to the autumn flavors of maple leaves and crisp air. It also pairs nicely with the chocolate.
Vanilla Bean Delight
Add a vanilla bean paste to the pudding mixture for a fragrant, creamy note. The vanilla complements the chocolate without overpowering it. This variation is a classic, comforting flavor profile that appeals to all ages. The aroma alone can elevate the entire experience.
Storing and Bringing It Back to Life
Fridge Storage
Store the assembled cups in a sealed container in the refrigerator for up to 48 hours. The pudding will remain firm and the crunch will stay intact. Avoid stacking the cups too tightly to prevent crushing. When ready to serve, let them sit at room temperature for 5 minutes for a smoother bite. This method preserves freshness.
Freezer Friendly
For longer storage, wrap each cup individually in plastic wrap and place them in a freezer bag. They can be frozen for up to 2 weeks. Thaw in the refrigerator overnight before serving. The texture may soften slightly, but the flavor stays vibrant. This is great for busy weeks.
Best Reheating Method
If the pudding has hardened, gently reheat in the microwave for 10–15 seconds on low. Stir to restore its creamy consistency. Avoid overheating, as it may separate. The green frosting will stay firm, adding a fresh pop to the dish. This quick fix brings the dessert back to life.
Now that you know how to store and revive your pumpkin patch dirt cups, you can keep the fun going long after the last bite.