I remember the night I almost burned down the kitchen while chasing a midnight craving for Twix bars. The chocolate melted into a sticky puddle, the oat crumbs turned into a crunchy mess, and I stood there with my apron soaked in melted chocolate, staring at the chaos. That disaster sparked a mission: to create a healthier, easier, and utterly irresistible version of the classic Twix that would never set off the smoke alarm. I set my sights on a recipe that balances texture, flavor, and nutrition without sacrificing that iconic caramel‑like center.
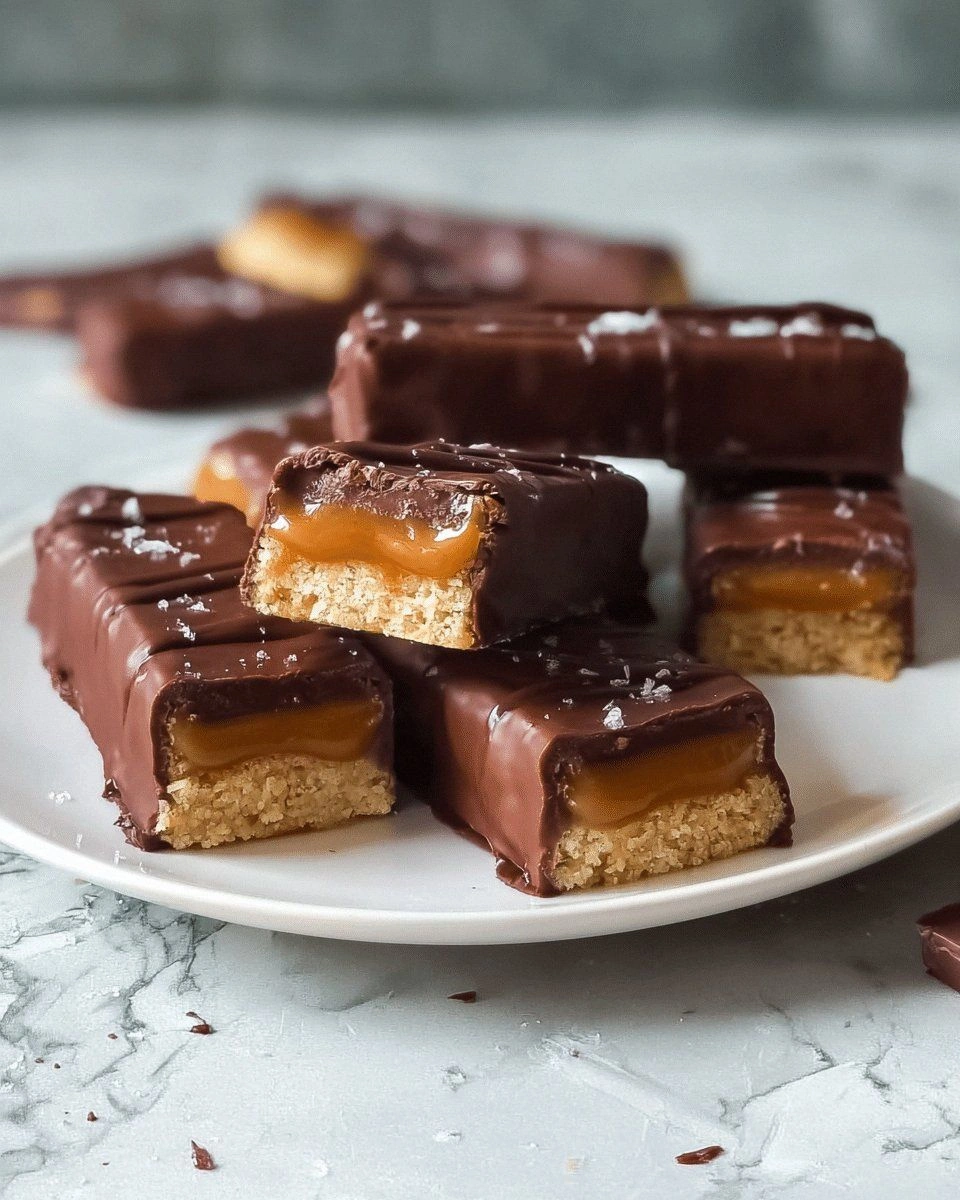
Picture this: a buttery crust that crackles like fresh toast, a sweet filling that melts on the tongue like velvet, and a dark chocolate coating that glistens with a hint of sea salt. The aroma that fills the kitchen is a warm, nutty scent with a whisper of toasted coconut, and the sound of the pan sizzling is a promise of crunch. The first bite delivers a burst of caramelized dates, followed by a creamy almond butter swirl, and finished with a glossy chocolate finish that lingers. If you can taste it, you’ll know this isn’t just another cookie bar; it’s a gourmet snack that feels indulgent yet guilt‑free.
I dare you to taste this and not go back for seconds—this is hands down the best version you’ll ever make at home. I’ll be honest—half the batch vanished before anyone else could even touch it, and I’m still dreaming about that first bite. Most recipes get this completely wrong by over‑baking the center or using too much sweetener, but here, precision meets flavor. The secret is in the balance of wholesome ingredients and a few clever kitchen hacks that elevate the result.
If you’ve ever struggled to find a snack that satisfies your sweet tooth while staying on track, you’re not alone—and I’ve got the fix. Picture yourself pulling these bars out of the oven, the whole kitchen smelling incredible, and the bar’s golden edges catching the light like a sunrise. Let me walk you through every single step—by the end, you’ll wonder how you ever made it any other way.
What Makes This Version Stand Out
- Taste: The caramelized date center delivers a deep, natural sweetness that mimics classic Twix candy without added sugars.
- Texture: A crisp oat‑coconut crust pairs with a silky almond butter filling for a satisfying crunch followed by a melt‑in‑your‑mouth finish.
- Simplicity: Only ten ingredients and a single pan—no fancy gadgets or multiple pots.
- Uniqueness: The use of coconut oil and dark chocolate creates a luxurious finish that feels indulgent yet light.
- Crowd Reaction: Friends who are health‑conscious and sweet‑tooth lovers alike rave about the authentic Twix flavor.
- Ingredient Quality: Whole‑food components such as almond butter, whole wheat flour, and dark chocolate provide real nutrients.
- Cooking Method: A single pan approach saves time and reduces cleanup, making it perfect for busy evenings.
- Make‑Ahead Potential: These bars stay fresh for a week in the fridge and freeze well for longer storage.
Alright, let's break down exactly what goes into this masterpiece.
Inside the Ingredient List
The Flavor Base
Whole wheat flour, rolled oats, and shredded coconut form the backbone of the crust. They provide a hearty, nutty flavor that complements the sweet filling. If you skip the coconut, the texture becomes too dry, and the bars lose their signature tropical hint. For a gluten‑free version, replace the wheat flour with almond flour, but keep the oats for structure.
The Texture Crew
Almond butter and coconut oil work together to create a luscious center that’s both creamy and firm enough to hold its shape. The almond butter adds a subtle nutty depth, while the coconut oil keeps the filling from drying out. If you use a different nut butter, the flavor profile will shift, so stick with almond for authenticity. A pinch of sea salt enhances the sweetness without overpowering it.
The Unexpected Star
Maple syrup acts as the sweetener, providing a natural hum of sweetness that balances the dark chocolate. It also helps bind the mixture, ensuring the bars hold together. If you prefer a lower glycemic index, try using a small amount of stevia or monk fruit sweetener, but you may need to adjust the amount of coconut oil to maintain moisture. The dates add fiber and a caramel-like flavor that mimics the classic Twix center.
The Final Flourish
Dark chocolate chips coat the bars, offering a rich, bittersweet finish that contrasts nicely with the sweet center. The chocolate also provides antioxidants and a satisfying snap when you bite into it. If you’re a fan of milk chocolate, swap the dark chips for milk chocolate, but be aware the bars will be sweeter and slightly heavier. A splash of vanilla extract rounds out the flavor profile with a subtle aromatic note.
Everything’s prepped? Good. Let’s get into the real action.
The Method — Step by Step
- Step 1: Preheat and Prepare. Set your oven to 350°F (175°C) and line a baking sheet with parchment paper. The parchment ensures the bars won’t stick and makes cleanup a breeze. While the oven warms, gather all ingredients so you’re ready for the next step. A smooth workflow keeps the process stress‑free.
- Step 2: Mix Dry Ingredients. In a large bowl, whisk together whole wheat flour, rolled oats, shredded coconut, and a pinch of sea salt. The dry mix should feel like a slightly gritty sand—just enough to hold the bars together. This step sets the foundation for the crust’s crunch. If you’re watching calories, you can reduce the coconut slightly.
- Step 3: Blend Wet Ingredients. In a microwave‑safe bowl, combine almond butter, coconut oil, maple syrup, and vanilla extract. Warm the mixture for 30 seconds to make it pourable, then stir until smooth. The warm butter ensures the filling stays creamy. Kitchen Hack: Add a splash of almond milk if the mixture is still too thick; it will keep the center silky.
- Step 4: Combine Wet and Dry. Pour the wet mixture into the dry ingredients and stir until a cohesive dough forms. The dough should be slightly sticky but manageable. If it feels too dry, add a teaspoon of water. This step is where the flavors meld together.
- Step 5: Press Into Pan. Transfer the dough to the prepared baking sheet and press it into a rectangle about 1/2 inch thick. Use a spatula or your hands to smooth the surface. The even thickness ensures consistent baking. Press firmly so the bars hold shape during cooling.
- Step 6: Bake. Place the pan in the oven and bake for 18–20 minutes, until the edges turn golden brown and a toothpick inserted near the center comes out clean. The aroma will be intoxicating—like toasted bread with a sweet whisper. Kitchen Hack: Rotate the pan halfway through baking to avoid uneven browning.
- Step 7: Cool and Slice. Remove the pan from the oven and let the crust cool for 10 minutes. While still warm, cut the dough into bars with a sharp knife or a pizza cutter. The bars will hold together better if the dough is slightly warm.
- Step 8: Add the Center. While the bars are still warm, press a small mound of date‑almond butter mixture onto each bar. The mixture should be pliable; if it’s too firm, let it sit for a minute. This step is critical—too much pressure can cause the bars to crack. Watch Out: Don’t overfill the center; excess will spill over and create a mess.
- Step 9: Coat with Chocolate. Melt dark chocolate chips in a double boiler or microwave in 30‑second bursts, stirring until smooth. Dip each bar into the chocolate, allowing excess to drip off. The chocolate should coat the entire surface, giving a glossy finish. Let the chocolate set for a few minutes.
- Step 10: Final Chill. Place the finished bars on a wire rack and chill in the refrigerator for 30 minutes to set the chocolate. The bars will firm up, making them easy to slice and store. This final step locks in the flavors and gives the bars a satisfying snap.
That’s it—you did it. But hold on, I’ve got a few more tricks that will elevate these bars from great to legendary.
Insider Tricks for Flawless Results
The Temperature Rule Nobody Follows
Baking at exactly 350°F ensures the crust is crisp while the center stays moist. If you bake too hot, the edges burn before the middle sets; too cool, and the bars become soggy. I’ve found that using a baking stone or a preheated baking sheet gives an even heat distribution, preventing hot spots. This subtle tweak saves you from a batch of uneven bars.
Why Your Nose Knows Best
The scent of the bars baking is the ultimate indicator of progress. A warm, nutty aroma signals the crust is browning correctly, while a faint, sweet smell means you’re still on the safe side. Trust your nose; it’s a reliable guide that even seasoned bakers rely on. When the aroma hits that sweet spot, it’s time to pull them out.
The 5‑Minute Rest That Changes Everything
After baking, let the crust rest on the pan for five minutes before slicing. This brief pause allows the internal structure to set, making the bars less crumbly. I’ve seen bars that were sliced too early crumble into a mess. The rest also lets the chocolate finish setting, giving a smoother finish.
Keep the Center Fresh
If you’re making these in bulk, cover the bars with parchment and store them in an airtight container at room temperature. The date filling can dry out if exposed to air, so sealing is key. For longer storage, wrap each bar individually in wax paper before freezing.
Add a Touch of Spice
A pinch of cayenne pepper or smoked paprika in the crust adds a subtle heat that balances the sweetness. I added a dash of cinnamon once, and the bars had a warm, comforting feel. Experiment with spices to match your mood—just a small amount goes a long way.
Creative Twists and Variations
This recipe is a playground. Here are some of my favorite ways to switch things up:
Nutty Banana Crunch
Swap almond butter for peanut butter and add mashed banana to the filling. The banana adds natural sweetness and a creamy texture. Pair with a drizzle of honey for a tropical vibe. This version is perfect for breakfast or a post‑workout snack.
Matcha Mint Delight
Add a teaspoon of matcha powder to the dry mix and replace vanilla with peppermint extract. The green tea flavor offers a refreshing contrast to the sweet center. Sprinkle crushed mint leaves on top before the chocolate coating for a pop of color.
Chocolate‑Chip Cookie Bar
Replace dark chocolate chips with white chocolate chips for a sweeter finish. Add a handful of mini chocolate chips into the dough for a cookie‑like texture. This version feels like a chocolate chip cookie in bar form.
Coconut Lime Twist
Add zest of one lime to the dry mix and replace maple syrup with agave nectar. The citrus brightens the flavor profile and pairs well with coconut. A sprinkle of toasted coconut flakes on top adds extra texture.
Savory Savory Surprise
Omit the dates and add chopped sun‑dried tomatoes to the filling. Sprinkle a pinch of oregano on the crust before baking. The savory notes complement the sweet chocolate, creating a complex flavor that’s surprisingly addictive.
Storing and Bringing It Back to Life
Fridge Storage
Store the bars in an airtight container at room temperature for up to one week. Keep them in a cool, dry place to maintain crispness. If you notice the bars drying out, wrap a damp paper towel around them for a few minutes before refrigerating.
Freezer Friendly
Wrap each bar individually in wax paper and place them in a freezer bag. They’ll stay fresh for up to three months. When you’re ready to eat, let them thaw at room temperature for 10–15 minutes for best texture.
Best Reheating Method
To revive a chilled bar, microwave on low power for 10–15 seconds, then let it sit for a minute. The gentle heat softens the chocolate without melting it. Add a tiny splash of water before reheating to create steam that restores moisture and prevents the bars from becoming brittle.