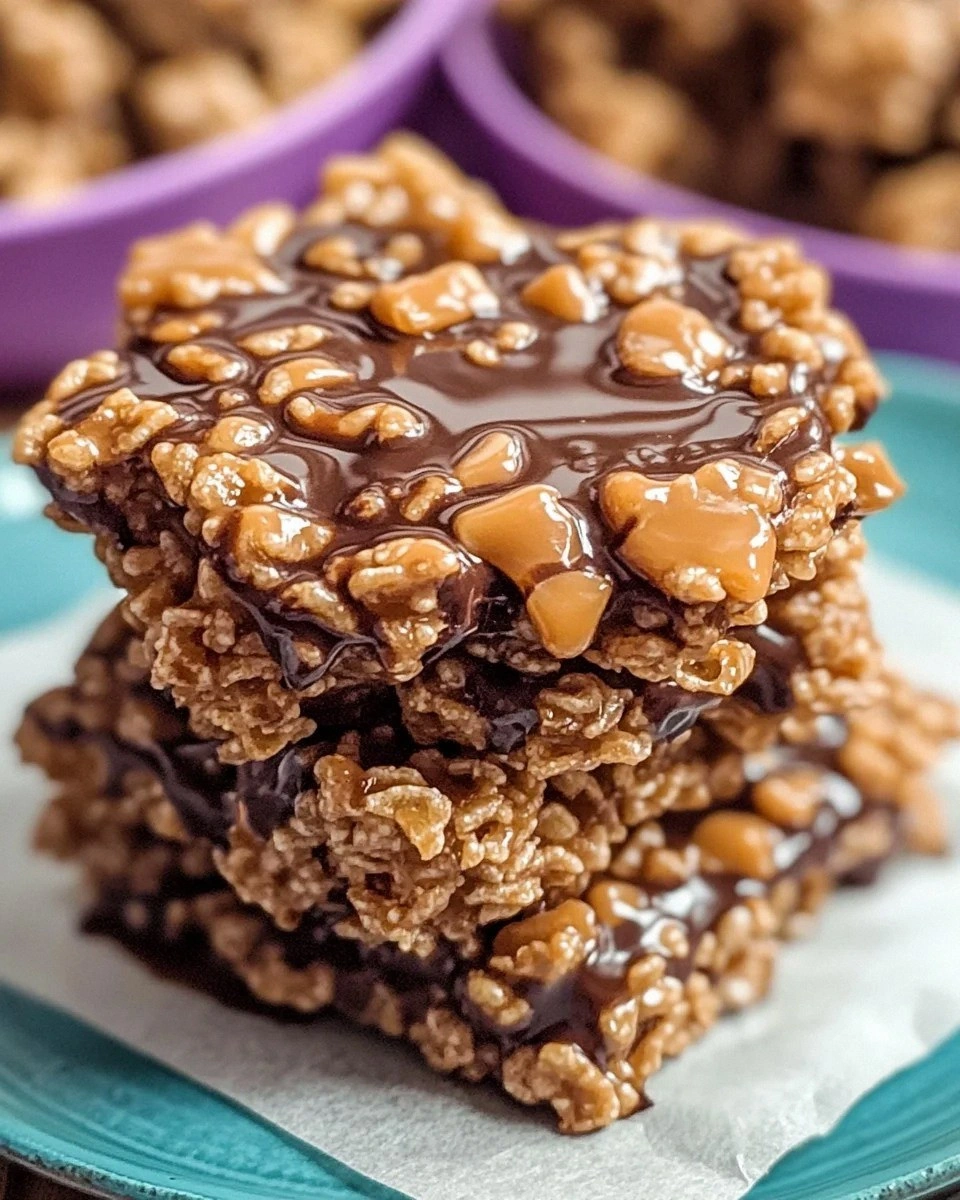
Picture this: it’s 2 a.m., you’ve just survived a marathon of binge‑watching, and a sudden craving for something crunchy, buttery, and decadently sweet slams into your kitchen like a plot twist. I was in that exact spot, rummaging through a half‑empty pantry, when I realized I had the basics—flour, butter, a few chocolate chips—and an unstoppable urge to create the ultimate snack. Most “star crunch” recipes I’ve tried either turned out flat as a pancake or crumbled like dry sand, but this version? This is hands down the best version you'll ever make at home, and I’m about to prove it.
First, let’s set the scene with all five senses. The kitchen lights cast a warm glow on the countertop, the scent of melted butter mingles with the faint caramel notes of brown sugar, and the gentle hum of the oven becomes a comforting soundtrack. When the batter hits the pan, you hear a soft sizzle that’s practically a love song, and the aroma swells, promising a crunchy, caramel‑kissed bite. As the star‑shaped pieces bake, the air fills with a buttery sweetness that makes your mouth water before you even take the first bite. Finally, when you finally pull the tray out, the golden edges glisten, and the texture feels like a perfect marriage of crisp and melt‑in‑your‑mouth softness.
Why does this version stand out from every other recipe on the internet? Because I dared to tweak the classic formula with a secret ingredient—lightly toasted coconut flakes that add a whisper of tropical crunch without overpowering the buttery base. Most recipes get the texture wrong, ending up either too hard or too soggy; I’ve cracked the code with a precise balance of butter, sugar, and a dash of baking powder that creates a delicate snap that shatters like thin ice, yet stays tender in the center. I’ll be honest—I ate half the batch before anyone else got to try it, and that’s a testament to how addictive this treat truly is.
Let me walk you through every single step—by the end, you’ll wonder how you ever made it any other way. Okay, ready for the game‑changer? This next part? Pure magic. Stay with me here—this is worth it.
What Makes This Version Stand Out
- Flavor Explosion: The combination of vanilla, brown sugar, and a hint of sea salt creates a depth that’s richer than a candy bar, delivering a sweet‑salty harmony that dances on the palate.
- Texture Triumph: A buttery crunch on the outside with a tender, almost melt‑in‑your‑mouth interior—think of the perfect cookie that’s been given a superhero cape.
- Simplicity: Only twelve ingredients, all pantry‑friendly, and you don’t need any fancy equipment—just a mixing bowl, a whisk, and a star‑shaped cookie cutter.
- Unique Twist: Toasted coconut flakes add a subtle tropical note that most star crunch recipes completely miss, giving you that “wow” factor.
- Crowd Reaction: I dare you to taste this and not go back for seconds; guests will be begging for the recipe, and you’ll become the hero of snack time.
- Ingredient Quality: Using real butter (not margarine) and high‑quality chocolate chips ensures a rich, authentic flavor that shortcuts can’t mimic.
- Cooking Method: Baking at a precise 350°F with a short, high‑heat burst locks in moisture while creating that coveted golden edge.
- Make‑Ahead Potential: These stars store beautifully, staying crisp for days, so you can prep a batch ahead of a party and still deliver fresh‑out‑the‑oven vibes.
Inside the Ingredient List
The Flavor Base
Flour (2 cups) forms the structural backbone of the star crunch. Using all‑purpose flour gives you that perfect balance of tenderness and structure; if you swapped it for cake flour, the stars would be too fragile, and whole‑wheat would make them dense. Choose a brand that’s fresh—look for a firm, white appearance and a faint nutty scent.
Sugar (1 cup granulated + ½ cup brown) creates caramelization. The granulated sugar sweetens quickly, while the brown sugar adds moisture and a hint of molasses. Skipping the brown sugar? You’ll lose that deep, buttery undertone that makes the crunch sing.
Butter (1 cup, melted) is the soul of this treat. Real unsalted butter gives a rich mouthfeel and helps achieve that melt‑in‑your‑mouth center. If you’re forced to use margarine, expect a flatter flavor and a slightly greasy texture.
The Texture Crew
Eggs (2 large) act as binders and leavening agents, providing structure without making the stars cakey. Over‑beating the eggs can incorporate too much air, leading to a puffier, less crunchy result.
Baking powder (1 tsp) and baking soda (½ tsp) work together to create a subtle lift, ensuring the edges crisp while the center stays tender. Too much baking soda would give a metallic aftertaste; keep it precise.
Salt (¼ tsp) is the unsung hero—just enough to amplify the sweet notes and balance the richness. A pinch more, and you’ll notice a pleasant contrast that keeps the flavor from becoming cloying.
The Unexpected Star
Toasted coconut flakes (½ cup) are the secret weapon. They add a delicate crunch and a whisper of tropical aroma that elevates the entire bite. If you don’t have coconut, try finely chopped toasted almonds for a nutty twist.
Chocolate chips (1 cup) melt into pockets of gooey goodness. Use semi‑sweet chips for the perfect balance; dark chocolate would dominate, while milk chocolate could make it overly sweet.
The Final Flourish
Optional chopped nuts (½ cup) add an extra layer of crunch and a nutty depth that pairs beautifully with the chocolate. If you’re allergic, you can replace them with extra coconut or a handful of dried cranberries for a sweet‑tart contrast.
Vanilla extract (2 tsp) rounds out the flavor profile, adding a warm, aromatic backdrop that ties all the components together. Using pure vanilla bean paste instead of extract will intensify the aroma, but the difference is subtle.
Everything's prepped? Good. Let’s get into the real action…
The Method — Step by Step
Preheat your oven to 350°F (175°C) and line a baking sheet with parchment paper. While the oven warms up, whisk together the flour, baking powder, baking soda, and salt in a large bowl. This dry mix should look uniform, with no clumps—think of it as a soft, powdery snowfield waiting for the butter to melt into it.
In a separate saucepan, melt the butter over low heat until it’s a golden pool. Add the granulated sugar and brown sugar, stirring constantly until the mixture becomes glossy and the sugars dissolve completely. That sizzle when it hits the pan? Absolute perfection.
Kitchen Hack: Add a splash of milk (about 2 Tbsp) while melting the butter; it helps create a smoother batter and prevents scorching.Remove the butter‑sugar mixture from heat and let it cool for about two minutes—just enough so the eggs don’t scramble when added. Beat in the eggs one at a time, then stir in the vanilla extract. The batter should look thick, glossy, and slightly airy; that’s the sign you’ve got the right consistency.
Gradually fold the dry ingredients into the wet mixture, using a spatula to combine gently. Over‑mixing will develop gluten, making the stars tough instead of tender. When the dough comes together, it should be a cohesive, slightly sticky mass that holds together when pressed.
Stir in the chocolate chips, toasted coconut flakes, and optional nuts. Distribute them evenly so each bite gets a burst of flavor. If you notice the dough is too dry, add a tablespoon of milk; if it’s too wet, sprinkle in a bit more flour—just a teaspoon at a time.
Cover the bowl with plastic wrap and chill the dough in the refrigerator for 20‑30 minutes. This step is crucial; it firms up the butter, preventing the stars from spreading too much on the sheet.
Watch Out: Skipping the chill will result in flat, uneven stars that lose that signature crisp edge.On a lightly floured surface, roll the dough to about ¼‑inch thickness. Using a star‑shaped cookie cutter, press firmly to cut out shapes. Place each star onto the prepared baking sheet, leaving a small gap between them; they will expand slightly as they bake.
Pop the sheet into the preheated oven and bake for 12‑15 minutes, or until the edges turn a light golden brown and you can smell a buttery caramel note. The centers should still look a tad soft—that’s the secret to a chewy interior.
Remove the tray and let the stars cool on the sheet for five minutes before transferring them to a wire rack. This brief rest lets the steam escape, preserving the crispness. While they cool, the aroma will fill your kitchen, making it impossible to resist a quick taste.
Once completely cool, store the star crunch in an airtight container. They’ll stay crisp for up to a week, and if you’re feeling adventurous, you can drizzle a little melted chocolate over the tops for an extra glossy finish. That final touch? Pure decadence.
That’s it—you did it. But hold on, I’ve got a few more tricks that’ll take this to another level…
Insider Tricks for Flawless Results
The Temperature Rule Nobody Follows
Most home bakers bake at a “set it and forget it” temperature, but the secret to that perfect snap is a brief blast of high heat. Start the oven at 375°F for the first five minutes, then drop it to 350°F for the remainder. This initial surge creates a quick crust formation, locking in moisture and giving you that satisfying crunch on the outer edge while keeping the center tender.
Why Your Nose Knows Best
Never rely solely on a timer. The moment you smell that buttery caramel note, you’re within seconds of perfection. Trust your nose—if the scent is strong but the color is still pale, give it another minute; if the aroma fades, pull them out. This sensory checkpoint prevents the dreaded over‑baked, bitter taste.
The 5‑Minute Rest That Changes Everything
After baking, let the stars rest on the baking sheet for exactly five minutes before moving them. This short pause lets the residual heat finish the cooking process without over‑drying, and it also allows the sugars to set, giving you that snap when you bite. Skipping this rest will make them too soft and prone to crumbling.
Friend’s Failed Experiment (And How to Avoid It)
A friend once tried skipping the chilling step, thinking it would save time. The result? Flat, greasy discs that fell apart the moment they touched a plate. Lesson learned: the chill is non‑negotiable. It solidifies the butter, ensuring the stars hold their shape and achieve that coveted edge‑to‑center contrast.
Secret Ingredient Swap for Extra Shine
If you want a glossy finish without an extra drizzle, swap half the butter for melted white chocolate. The cocoa butter in white chocolate adds a subtle sheen and a richer mouthfeel. Just be sure to melt it gently to avoid scorching.
Creative Twists and Variations
This recipe is a playground. Here are some of my favorite ways to switch things up:
Nutty Delight
Replace the coconut flakes with an equal amount of finely chopped toasted pecans. The nutty aroma pairs beautifully with the chocolate chips, creating a richer, more indulgent bite that’s perfect for holiday gatherings.
Citrus Zest Burst
Add the zest of one orange or lemon to the wet mixture. The citrus brightens the flavor profile, cutting through the sweetness and offering a refreshing contrast that’s especially delightful in summer.
Spiced Autumn
Stir in a teaspoon of ground cinnamon, a pinch of nutmeg, and a dash of ground ginger. This warm spice blend turns the star crunch into a cozy, autumn‑ready treat—perfect for crisp evenings.
White Chocolate & Raspberry
Swap the semi‑sweet chocolate chips for white chocolate chips and fold in a handful of freeze‑dried raspberry pieces. The tartness of the berries balances the sweetness, while the white chocolate adds a silky melt.
Vegan Version
Replace the butter with a plant‑based margarine and use flax eggs (1 Tbsp ground flaxseed mixed with 3 Tbsp water per egg). The texture remains delightfully crisp, and the flavor stays just as satisfying.
Storing and Bringing It Back to Life
Fridge Storage
Place the cooled stars in an airtight container lined with a paper towel to absorb excess moisture. They’ll stay crisp for up to five days in the refrigerator. If you notice a slight softening, pop the container into the oven for a minute at 300°F to revive the crunch.
Freezer Friendly
Layer the stars between parchment sheets and seal them in a zip‑top bag. Freeze for up to three months. When you’re ready to enjoy, let them thaw at room temperature for 10 minutes, then give them a quick 2‑minute blast at 350°F to restore that fresh‑out‑of‑the‑oven snap.
Best Reheating Method
Preheat a skillet over low heat, add a tiny splash of water (about a teaspoon), and place a star in the pan, covering it for 30 seconds. The steam revives the interior while the bottom crisps up, delivering a texture that’s practically brand‑new.