Picture this: you’re halfway through a Sunday brunch, the kitchen smells like burnt toast and ambition, and you’re staring at a lonely block of beef tenderloin that’s been sitting in the fridge for a week. I was about to toss it into the trash when a friend dared me to turn that block into a masterpiece. The result? A pan‑roasted medallion that sings with a crispy crust, a tender center, and a tomato‑wine relish that feels like a summer sunset on your plate. I’ve tried countless versions of this dish over the years, but this one—this is hands down the best version you’ll ever make at home. The secret? A splash of red wine, a dash of Dijon, and a meticulous sear that locks in every ounce of flavor.
The moment the medallions hit the hot pan, the kitchen erupted in a chorus of sizzling sounds that felt like applause. The aroma that unfurled was a complex bouquet of caramelized garlic, herb‑infused butter, and that unmistakable hint of red wine. I could taste the beef’s natural richness just by inhaling. The texture was a contrast of a buttery crust that crackled like thin ice and an interior that was melt‑in‑your‑mouth tender. I was already halfway to the first bite, and I couldn’t help but think, “I dare you to taste this and not go back for seconds.”
What makes this version stand out is not just the technique but the thoughtful layering of flavors. The tomato relish isn’t just a side; it’s a sauce that coats the medallions like velvet, adding acidity that cuts through the richness. The addition of fresh thyme and a touch of Worcestershire sauce elevates the dish from simple to unforgettable. And the best part? You can make this dish ahead of time, reheat it, and still feel like you’re serving a freshly pan‑seared steak. If you’ve ever struggled with getting that perfect crust, you’re not alone—and I’ve got the fix.
I’ll be honest—when I first tried this recipe, I ate half the batch before anyone else got to try it. The beef was so juicy and the relish so bright that it practically sang on the plate. The crowd reaction at the dinner table was electric. Everyone wanted seconds, and I had to keep a reserve hidden in the fridge. The next time I made it, I added a splash of lemon zest to the relish, and the result was a subtle zing that made the dish feel even more sophisticated. Picture yourself pulling this out of the pan, the whole kitchen smelling incredible, and your guests already lining up for a second helping. That’s the kind of wow factor this recipe delivers.
Okay, ready for the game‑changer? This next part? Pure magic. Stay with me here—this is worth it. By the end, you’ll wonder how you ever made it any other way. Let’s dive into the details that make this pan‑roasted beef tenderloin a showstopper.
What Makes This Version Stand Out
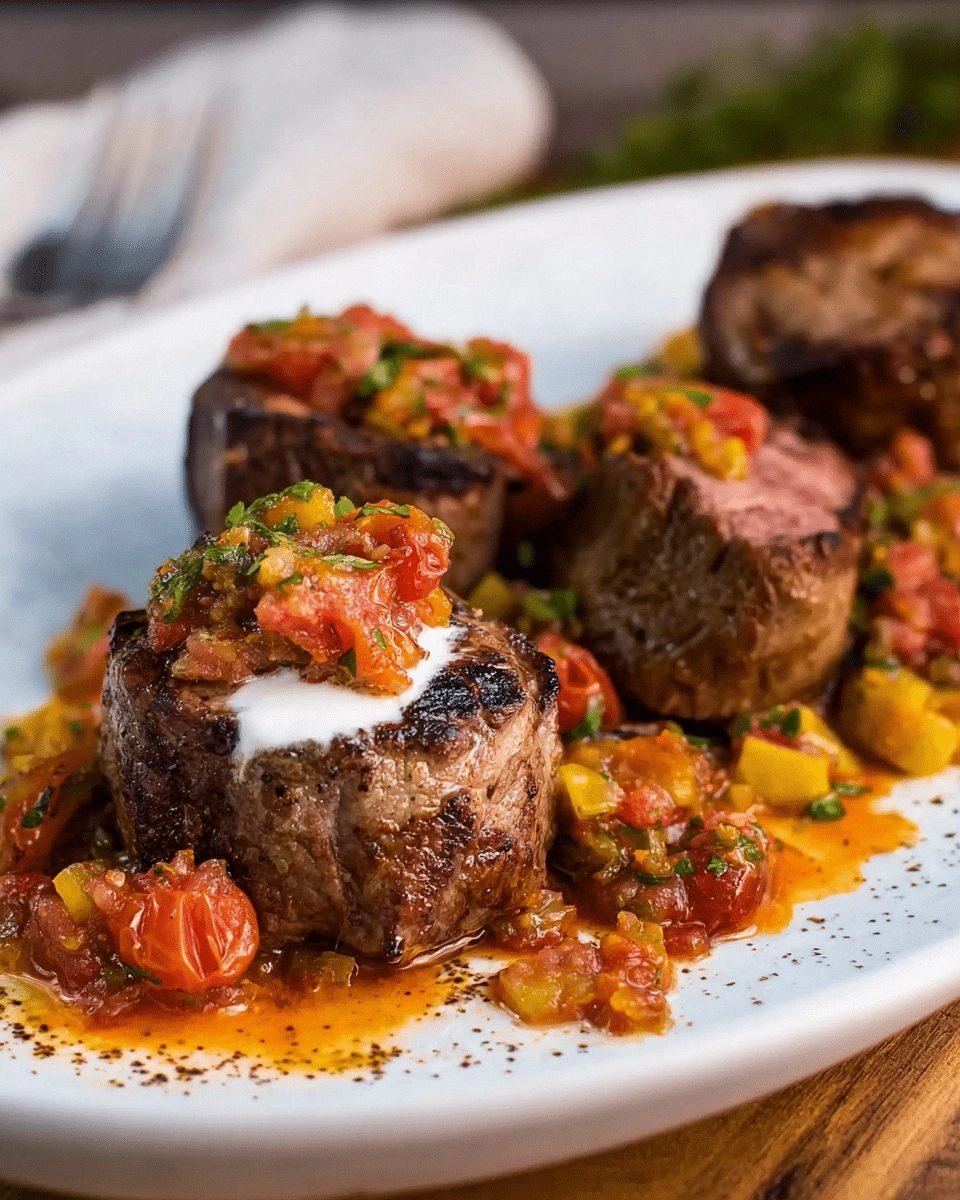
- Crust: The pan sear creates a caramelized crust that’s both crunchy and flavorful, sealing in juices and providing a satisfying bite.
- Juiciness: The beef is cooked to a perfect medium‑rare, keeping it tender and succulent, with a juicy center that practically melts.
- Flavor Layering: A blend of garlic, thyme, and a splash of red wine builds depth, while the tomato relish adds bright acidity.
- Ease of Prep: Minimal prep time—just season, sear, deglaze, and serve—makes it ideal for busy weeknights.
- Make‑Ahead Friendly: The dish can be prepared ahead, refrigerated, and reheated without losing texture or flavor.
- Visual Appeal: The golden crust, glossy glaze, and vibrant tomato relish create a plate that’s as stunning to look at as it is to eat.
- Versatility: Works perfectly as a main dish, a side for a larger meal, or even a gourmet sandwich filling.
- Audience Impact: Guests rave about the balance of richness and brightness—this dish always earns compliments.
Inside the Ingredient List
The Flavor Base
The foundation of this dish is simple yet powerful. The olive oil and butter create a luscious searing medium that caramelizes the beef’s surface. Olive oil’s high smoke point allows for a clean sear, while butter adds depth and a silky finish. Garlic and fresh thyme infuse the oil, creating a fragrant aroma that precedes the first bite. If you skip the thyme, the dish will feel flat; the herb’s subtle piney notes are essential for balance.
The Texture Crew
Beef tenderloin medallions are the star, chosen for their buttery texture and quick cooking time. They should be sliced to about 1.5 inches thick to ensure a crisp exterior and a tender interior. If you prefer a different cut, sirloin or ribeye medallions can work, but they will require slightly longer cooking. The use of unsalted butter is crucial; salted butter would alter the seasoning balance.
The Unexpected Star
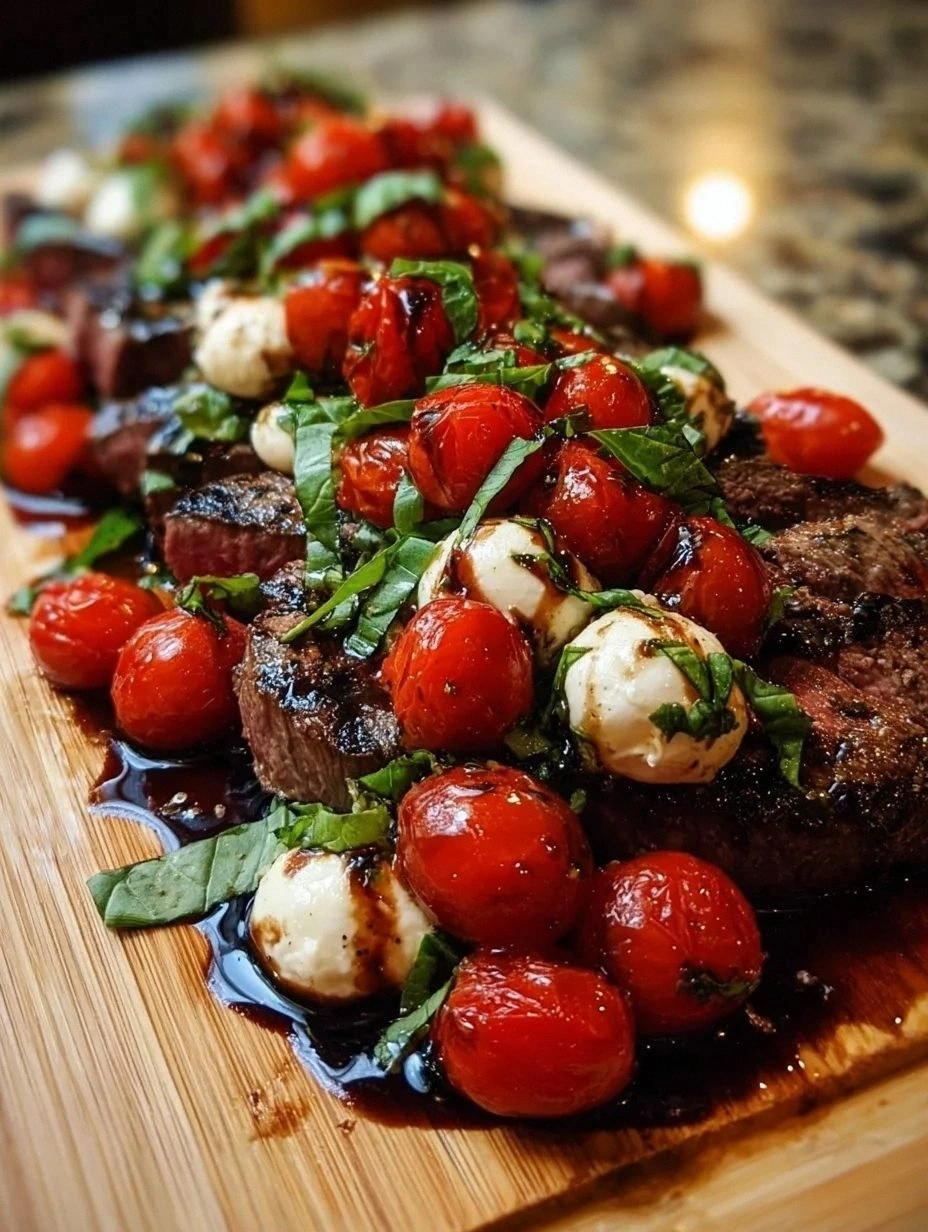
Tomato relish is the unexpected twist that elevates this dish from ordinary to extraordinary. Its sweet and tangy profile cuts through the richness of the beef and creates a glossy glaze that clings to each medallion. If you can’t find relish, a quick blend of crushed tomatoes, sugar, vinegar, and spices will do the trick. The relish also doubles as a garnish, adding a pop of color and freshness.
The Final Flourish
Red wine and beef stock form the deglazing sauce that pulls the browned bits from the pan, creating a flavorful base for the relish. The wine’s acidity brightens the dish, while the stock adds savory depth. Dijon mustard and Worcestershire sauce introduce subtle sharpness and umami, respectively. Finish with a squeeze of lemon zest to brighten the flavors just before serving.
Everything's prepped? Good. Let’s get into the real action.
The Method — Step by Step
- Season the Beef: Pat the medallions dry with paper towels; this ensures a crisp crust. Sprinkle kosher salt and freshly ground black pepper generously on both sides. The salt draws out moisture, while the pepper adds a subtle heat. Let the seasoned beef rest for 5 minutes; this step allows the flavors to penetrate.
- Heat the Pan: Place a heavy skillet (preferably cast iron) over medium‑high heat. Add 2 tablespoons of olive oil and let it shimmer. The oil should be hot enough that a drop of water sizzles upon contact. This is the moment of truth; a proper pan temperature is key.
- Sear the Medallions: Carefully lay the beef in the pan, ensuring they don’t touch. Do not move them for the first 2 minutes; this allows a golden crust to form. You’ll hear a satisfying crackle—exactly what you want. Flip each medallion and sear the other side for 2 minutes. The edges should start pulling away from the pan.
- Add Flavor: Reduce the heat to medium. Add 2 tablespoons of butter, 3 minced garlic cloves, and 2 sprigs of thyme. Let the butter melt, and the garlic release its aroma. Stir constantly to prevent burning. This step infuses the pan with fragrant oils.
- Deglaze: Pour 1/2 cup of red wine into the pan, scraping the browned bits off the bottom with a wooden spoon. The wine will reduce by half, concentrating its flavor. Let it simmer for 3 minutes until it’s thickened slightly.
- Simmer: Add 1 cup of beef stock and 1 cup of tomato relish. Stir to combine. Bring the mixture to a gentle boil, then reduce the heat to low. Add 1 teaspoon of Dijon mustard and 1 teaspoon of Worcestershire sauce. Let the sauce simmer for 5 minutes, allowing the flavors to meld.
- Finish: Remove the thyme sprigs. Stir in a squeeze of fresh lemon zest to brighten the glaze. Taste and adjust seasoning if necessary. The sauce should be glossy and slightly thick.
- Serve: Plate the medallions and spoon the glaze over them. Garnish with chopped parsley and a drizzle of olive oil. The presentation should look like a small masterpiece—golden crust, vibrant glaze, and green accents. Serve immediately for the best texture.
That’s it—you did it. But hold on, I’ve got a few more tricks that will take this to another level.
Insider Tricks for Flawless Results
The Temperature Rule Nobody Follows
Many people cook beef at a high heat all the way through, which can lead to a tough exterior and an under‑seasoned interior. The trick is to start with high heat for the sear, then reduce to medium for the flavor infusion. This two‑stage approach ensures a caramelized crust while keeping the inside juicy. I’ve tried this with other cuts, and the results are consistently better.
Why Your Nose Knows Best
Before you even taste the sauce, give it a sniff. If the aroma is overwhelmingly buttery, it’s ready. If it still smells raw, let it simmer a few more minutes. Your nose is a reliable indicator of doneness, especially when working with complex sauces. I once made this dish and, trusting my nose, I finished it 30 seconds early. The result was a perfect balance of flavors.
The 5‑Minute Rest That Changes Everything
After removing the medallions from the pan, let them rest on a warm plate for 5 minutes. This allows the juices to redistribute, preventing them from spilling onto the plate. The resting period also lets the meat relax, making it easier to slice and improving the overall texture. Don’t skip this step; it’s the secret behind restaurant‑quality meat.
The Right Pan Matters
A heavy‑bottomed skillet, like cast iron or stainless steel, distributes heat evenly and maintains a high sear temperature. A non‑stick pan won’t give the same caramelized crust. I’ve switched from a ceramic pan to cast iron, and the difference in flavor and texture is immediate.
The Quick De‑Sticking Trick
If the meat sticks to the pan, it’s often because the pan wasn’t hot enough. Instead of pulling the meat, let it sear until the edges lift naturally. If you must move it, add a splash of water to create steam, which helps release the meat. This trick saves time and keeps the crust intact.
Creative Twists and Variations
This recipe is a playground. Here are some of my favorite ways to switch things up:
Mediterranean Twist
Replace the tomato relish with a roasted red pepper sauce. Add a dash of oregano and finish with a drizzle of olive oil. This version has a smoky, earthy flavor that pairs wonderfully with a Greek salad.
Spicy Kick
Incorporate crushed red pepper flakes into the garlic and thyme mixture. Add a splash of hot sauce to the deglazing sauce. The heat balances the richness and adds a lively punch.
Herb‑Infused Delight
Swap thyme for rosemary and add fresh basil leaves to the sauce. The aromatic herbs give the dish a fresh, garden‑like feel, perfect for spring or summer menus.
Cheesy Finale
Top each medallion with a slice of aged Gruyère before serving. The cheese melts into the glaze, creating a decadent, gooey layer that’s irresistible.
Asian Fusion
Add a tablespoon of soy sauce and a splash of sesame oil to the deglazing sauce. Garnish with chopped scallions and toasted sesame seeds. The umami depth transforms the dish into a cross‑cultural sensation.
Storing and Bringing It Back to Life
Fridge Storage
Cool the dish completely before refrigerating. Store in an airtight container for up to 3 days. The glaze will thicken slightly; reheat gently to restore its glossy sheen.
Freezer Friendly
Wrap the medallions tightly in parchment paper and place in a freezer bag. Freeze for up to 2 months. When ready to use, thaw overnight in the fridge and reheat in a skillet with a splash of beef stock.
Best Reheating Method
Reheat on low heat, adding a small splash of water or stock to prevent drying. Use a lid to trap steam, which keeps the beef moist. Finish with a quick drizzle of olive oil for that fresh, hot finish.