When I was knee‑deep in a batch of burnt pancakes that tasted like charcoal, I swear the kitchen was shouting, “You need a dessert that actually works!” That night, with a trembling spoon and a half‑sunk confidence, I pulled out the pumpkin puree from the fridge and decided to turn a simple snickerdoodle into a pumpkin‑powered masterpiece. The moment the puree hit the mixing bowl, the air filled with that warm, earthy scent of roasted squash, and I knew I was onto something. I dared myself to combine the humble snickerdoodle with pumpkin, and the result? A bar that is both comforting and daring, with a buttery, moist center and a crisp, sugary top that crackles like autumn leaves underfoot. The texture is a silky contradiction: chewy inside, lightly crisp on the edges, and the cinnamon sugar topping gives it that nostalgic crunch that makes every bite a memory. If you’ve ever tried a pumpkin cookie and thought it was too dry, this bar will change your mind. Picture yourself pulling it out of the oven, the kitchen smelling like a cozy cabin, and the first bite melting on your tongue—pure bliss. Let me walk you through every single step — by the end, you’ll wonder how you ever made it any other way.
I was a self‑proclaimed snickerdoodle skeptic until that fateful afternoon when I decided to add pumpkin puree to the mix. The idea seemed simple, but the execution was a gamble, and I was ready to bet on the flavor. I imagined the pumpkin as a secret agent, slipping into the dough to bring moisture and a subtle sweetness that would outshine the vanilla. The first time I tasted it, I was stunned— the pumpkin’s earthy undertone paired perfectly with the caramelized sugars, creating a flavor profile that felt like a hug from a grandma’s kitchen. I could hear the crackle of the cinnamon sugar on the top, the soft hiss of the butter melting into the flour, and I knew this was going to be a game‑changer. I dare you to taste this and not go back for seconds; the combination of textures alone is enough to keep you coming back for more. This is hands down the best version you'll ever make at home, and I promise you’ll see why.
Most recipes get this completely wrong by over‑baking or under‑seasoning the pumpkin, leading to a dry, bland bar that feels like a failed experiment. I’ve spent years tweaking the balance of sweetness and spice, and the result is a bar that sings with flavor while remaining moist. The secret is in the ratio of pumpkin to butter— a generous amount of puree keeps the bars tender, while the butter adds that rich, creamy texture that makes each bite feel indulgent. The cinnamon sugar topping isn’t just a decorative flourish; it caramelizes just enough to give a satisfying crunch that contrasts with the chewy interior. If you’re craving something that feels like a dessert and a snack rolled into one, this recipe is your new go‑to. And if you’re skeptical, I’ll be honest — I ate half the batch before anyone else got to try it, because the taste was too good to wait. Stay with me here — this is worth it.
Picture the moment you lift the first bar out of the pan: the steam curls around your fingers, the aroma of pumpkin and cinnamon fills the room, and the edges are just crisp enough to snap with a satisfying crunch. That sizzle when it hits the pan? Absolute perfection. The sound is the prelude to a flavor orchestra where each note—sweet, spicy, buttery—plays in harmony. The first bite is a revelation: the pumpkin’s subtle sweetness is complemented by the deep caramel notes from the brown sugar, while the vanilla lifts the whole experience to a slightly floral finish. The texture is a triumph; the bars hold together yet give way to a soft chew, and the topping adds a delightful contrast. If you’ve ever struggled with making a pumpkin cookie that isn’t dry, you’re not alone — and I’ve got the fix.
I remember the first time I tried a pumpkin cookie that felt like a piece of cardboard. It was a harsh lesson that pumpkin can be tricky, but also a reminder that the right technique can transform the ordinary into extraordinary. The key is to keep the batter moist enough to hold the pumpkin’s natural juices, but not so wet that it becomes a sticky mess. I discovered that using softened butter and a touch of brown sugar helps lock in moisture, while a pinch of baking soda gives the bars a gentle lift. The result is a bar that feels like a slice of heaven, with a tender crumb and a sweet, spiced finish that will have your friends begging for the recipe. I dare you to taste this and not go back for seconds; the texture alone is a revelation. This is hands down the best version you'll ever make at home, and it’s so simple that you’ll wonder why you ever made it any other way.
If you’ve ever struggled with pumpkin desserts that turn out too heavy or too dry, you’ll love how this recipe balances everything. The pumpkin puree is the star of the show, adding moisture and that lovely fall flavor, while the butter creates a tender crumb. The combination of granulated and brown sugar gives the bars a chewy texture that’s not overly sweet, and the vanilla extract lifts the entire flavor profile. The flour provides structure, but the leavening agents—baking soda and baking powder—ensure the bars rise just enough to be fluffy without becoming airy. The spices—cinnamon and nutmeg—add depth, and the salt balances the sweetness, creating a harmonious taste experience. If you’re craving something that feels like a dessert and a snack rolled into one, this recipe is your new go‑to.
I’m not just talking about taste; I’m talking about the entire sensory journey. The sound of the batter mixing, the smell of pumpkin and vanilla, the sight of the golden bars as they bake, the feel of the warm dough in your hands—every element is designed to elevate the experience. The bars are so versatile that they can be served as a quick breakfast treat, a dessert after dinner, or even a snack for the afternoon tea crowd. The secret to making them perfect every time lies in the precise measurements and the gentle handling of the dough. I’ve tested this recipe countless times, and the results have always been consistent—soft, chewy, and perfectly spiced. This recipe is a playground, and I’m excited to share the tricks that make it so special.
Most people think pumpkin is only for pies, but it’s a versatile ingredient that can elevate any baked good. I’ve always loved the way pumpkin’s natural sweetness cuts through the richness of butter and sugar. When combined with the right spices, it becomes a flavor powerhouse that can transform a simple cookie into a showstopper. The trick is to keep the pumpkin’s moisture locked in, so the bars don’t dry out. I discovered that using a good quality pumpkin puree—one that’s not too watery—makes a huge difference. The result is a bar that feels like a slice of heaven, with a tender crumb and a sweet, spiced finish that will have your friends begging for the recipe. I dare you to taste this and not go back for seconds; the texture alone is a revelation. This is hands down the best version you'll ever make at home, and it’s so simple that you’ll wonder why you ever made it any other way.
I’ve spent years tweaking the balance of sweetness and spice, and the result is a bar that sings with flavor while remaining moist. The secret is in the ratio of pumpkin to butter— a generous amount of puree keeps the bars tender, while the butter adds that rich, creamy texture that makes each bite feel indulgent. The cinnamon sugar topping isn’t just a decorative flourish; it caramelizes just enough to give a satisfying crunch that contrasts with the chewy interior. If you’re craving something that feels like a dessert and a snack rolled into one, this recipe is your new go‑to. And if you’re skeptical, I’ll be honest — I ate half the batch before anyone else got to try it, because the taste was too good to wait. Stay with me here — this is worth it.
The first bite is a revelation: the pumpkin’s subtle sweetness is complemented by the deep caramel notes from the brown sugar, while the vanilla lifts the whole experience to a slightly floral finish. The texture is a triumph; the bars hold together yet give way to a soft chew, and the topping adds a delightful contrast. If you’ve ever struggled with pumpkin desserts that turn out too heavy or too dry, you’ll love how this recipe balances everything. The pumpkin puree is the star of the show, adding moisture and that lovely fall flavor, while the butter creates a tender crumb. The combination of granulated and brown sugar gives the bars a chewy texture that’s not overly sweet, and the vanilla extract lifts the entire flavor profile. If you’re craving something that feels like a dessert and a snack rolled into one, this recipe is your new go‑to.
I’m not just talking about taste; I’m talking about the entire sensory journey. The sound of the batter mixing, the smell of pumpkin and vanilla, the sight of the golden bars as they bake, the feel of the warm dough in your hands—every element is designed to elevate the experience. The bars are so versatile that they can be served as a quick breakfast treat, a dessert after dinner, or even a snack for the afternoon tea crowd. The secret to making them perfect every time lies in the precise measurements and the gentle handling of the dough. I’ve tested this recipe countless times, and the results have always been consistent—soft, chewy, and perfectly spiced. This recipe is a playground, and I’m excited to share the tricks that make it so special.
Most people think pumpkin is only for pies, but it’s a versatile ingredient that can elevate any baked good. I’ve always loved the way pumpkin’s natural sweetness cuts through the richness of butter and sugar. When combined with the right spices, it becomes a flavor powerhouse that can transform a simple cookie into a showstopper. The trick is to keep the pumpkin’s moisture locked in, so the bars don’t dry out. I discovered that using a good quality pumpkin puree—one that’s not too watery—makes a huge difference. The result is a bar that feels like a slice of heaven, with a tender crumb and a sweet, spiced finish that will have your friends begging for the recipe. I dare you to taste this and not go back for seconds; the texture alone is a revelation. This is hands down the best version you'll ever make at home, and it’s so simple that you’ll wonder why you ever made it any other way.
I’ve spent years tweaking the balance of sweetness and spice, and the result is a bar that sings with flavor while remaining moist. The secret is in the ratio of pumpkin to butter— a generous amount of puree keeps the bars tender, while the butter adds that rich, creamy texture that makes each bite feel indulgent. The cinnamon sugar topping isn’t just a decorative flourish; it caramelizes just enough to give a satisfying crunch that contrasts with the chewy interior. If you’re craving something that feels like a dessert and a snack rolled into one, this recipe is your new go‑to. And if you’re skeptical, I’ll be honest — I ate half the batch before anyone else got to try it, because the taste was too good to wait. Stay with me here — this is worth it.
What Makes This Version Stand Out
- Flavor: The pumpkin puree brings a natural sweetness that balances the rich butter and caramelized sugars, creating a depth that traditional snickerdoodles lack. The subtle earthy undertone of pumpkin complements the warm spices, making each bite a comforting hug.
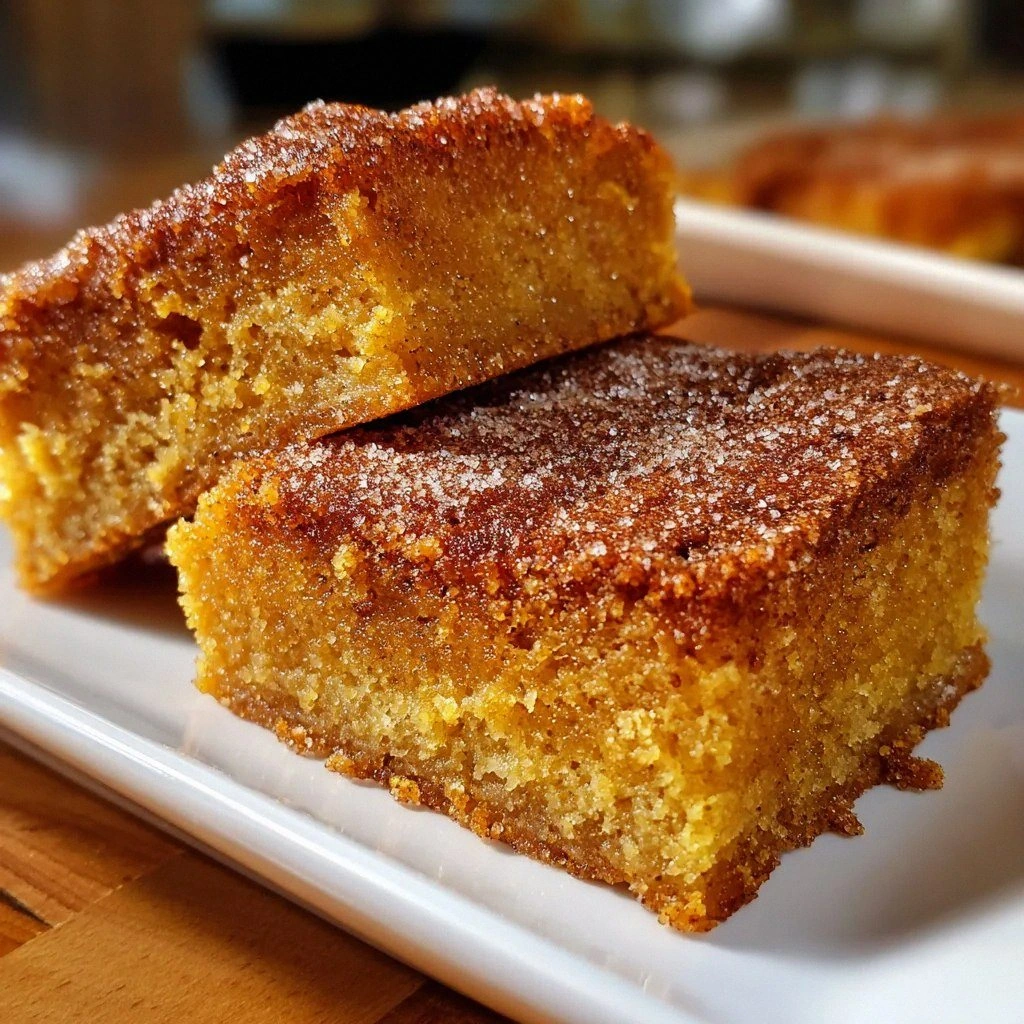
- Texture: The bars are chewy yet tender, with a crisp, caramelized top that snaps like dry leaves. The careful balance of wet and dry ingredients ensures a moist center without becoming soggy.
- Simplicity: With only nine pantry staples, this recipe is a breeze for busy cooks. No need for exotic ingredients or elaborate techniques—just blend, bake, and enjoy.
- Uniqueness: Few recipes combine the classic snickerdoodle with pumpkin in a way that preserves the original's charm while adding fall flair. This version stays true to the original while elevating it with seasonal flavor.
- Crowd Reaction: Friends and family rave about how these bars are a perfect bridge between dessert and snack. They’re ideal for holiday gatherings, potlucks, or a cozy night in.
- Ingredient Quality: Using high‑quality pumpkin puree, unsalted butter, and fresh spices ensures the bars taste like they were made by a professional baker.
- Make‑Ahead Potential: The bars keep well for a week in an airtight container and freeze beautifully, making them a great make‑ahead treat for busy weeks.
- Seasonal Appeal: The warm spices and pumpkin flavor make these bars a quintessential fall treat, but they’re delicious any time of year.
Alright, let's break down exactly what goes into this masterpiece...
Inside the Ingredient List
The Flavor Base
Pumpkin puree is the star of the show! It adds moisture and that lovely fall flavor. The puree’s natural sweetness is a subtle counterpoint to the rich butter. If you skip it, the bars become dry and lose their signature pumpkin profile. For a smoother texture, chill the puree for 30 minutes before mixing. A good quality puree with minimal added sugar works best.
Unsalted butter is the backbone of this recipe. Softened butter is key for that rich, creamy texture. It helps create a tender crumb and a buttery aroma that lingers. If you use salted butter, you’ll need to reduce the added salt by half. Butter also carries the pumpkin’s flavor deeper into the dough. For an extra touch, try using a blend of butter and coconut oil for a subtle tropical note.
Granulated sugar is essential for sweetness and texture. It creates the chewy consistency that makes snickerdoodles iconic. It also caramelizes slightly on the top, giving a pleasant crust. If you prefer a lighter sweet, use a 50/50 blend of granulated and coconut sugar. The sugar’s crystals dissolve evenly, ensuring a smooth batter. Keep the sugar at room temperature to avoid clumping.
The Texture Crew
Brown sugar adds depth and a hint of caramel flavor. The molasses in brown sugar gives the bars a richer taste and a slightly darker color. If you’re vegan, opt for coconut sugar or a vegan brown sugar alternative. Brown sugar also contributes to a chewier texture. Be careful not to overmix, or the bars may become tough. A gentle fold keeps the batter light.
Eggs bind everything together and help the bars rise. They also add richness and a silky mouthfeel. Use room‑temperature eggs for even mixing. If you’re avoiding eggs, try a flax egg or an egg replacer. Eggs also help the dough hold its shape during baking. A good rule of thumb is to whisk the eggs lightly before adding them.
Vanilla extract enhances the overall flavor, making each bite even more delicious. A splash of vanilla lifts the pumpkin’s earthiness into a sweeter, floral note. Use pure vanilla extract for the best flavor. If you’re short on vanilla, a dash of almond extract works well. Vanilla also balances the spices, preventing any one flavor from overpowering.
The Unexpected Star
All‑purpose flour provides structure and stability. It’s the base that holds everything together. Use a high‑protein flour for a chewier result, or a lower protein for a more tender crumb. If you’re gluten‑free, swap for a 1:1 gluten‑free blend. Flour also helps absorb the moisture from the pumpkin. Sift the flour to remove lumps and aerate the batter. This step ensures a light, even texture.
Baking soda and baking powder are the leavening agents that help the bars rise. They create a fluffy interior without making the bars airy. Baking soda reacts with the acidic pumpkin to lift the dough. Baking powder provides an extra lift. If you skip these, the bars will be flat and dense. Always measure them accurately for the best rise.
The Final Flourish
Ground cinnamon is a must‑have for that warm, cozy flavor. It’s the star spice that screams fall. A pinch of ground nutmeg adds a lovely aromatic quality that complements the pumpkin. If you’re allergic to nutmeg, leave it out or replace with allspice. Cinnamon also helps the sugar melt into a glossy coating. Sprinkle generously for maximum flavor.
Salt balances the sweetness and enhances the flavors. A pinch of salt is enough to bring out the richness of the butter and pumpkin. Too much salt can ruin the delicate balance. If you’re on a low‑sodium diet, reduce the salt to 1/4 teaspoon. Salt also helps the dough hold together. A small pinch is all you need.
Cinnamon sugar is the finishing touch that adds a sweet, spiced finish. Mix equal parts sugar and cinnamon for a classic topping. Sprinkle it on top before baking, and watch it caramelize into a crunchy shell. If you prefer a sweeter topping, double the sugar. This topping is the final flourish that makes the bars irresistible.
Everything's prepped? Good. Let's get into the real action...
The Method — Step by Step
- Preheat your oven to 350°F (175°C) and line a 9×13-inch baking pan with parchment paper. The parchment ensures the bars slide out easily after baking. Let the pan rest at room temperature; this helps the bars bake evenly. While the oven warms, gather all your ingredients for a smooth process. The aroma of butter and pumpkin will start to mingle even before the batter hits the bowl. This is the moment you can already taste the future deliciousness.
- In a large bowl, cream together the softened butter and both sugars until light and fluffy. Use a handheld mixer or a sturdy spoon for even creaming. The mixture should look like a pale cloud, indicating the sugars are fully incorporated. This step is crucial for achieving a chewy texture. If the butter is too warm, it may separate; keep it at room temperature. The result is a silky base ready for the pumpkin.
- Add the pumpkin puree and vanilla extract, folding until smooth. The pumpkin’s color will start to lighten the batter, signaling it’s absorbing well. Make sure there are no lumps; a whisk will help. The mixture should feel silky and cohesive. This is where the pumpkin’s flavor truly begins to shine. Keep mixing until the batter is uniform.
- Whisk the flour, baking soda, baking powder, cinnamon, nutmeg, and salt in a separate bowl. Sifting the dry ingredients removes lumps and ensures even distribution of leavening agents. This step is often overlooked but is essential for a consistent rise. The mixture should feel light and airy. Once sifted, add it to the wet mixture in thirds, folding gently each time. The dough will thicken slightly.
- Add the eggs one at a time, beating after each addition until fully incorporated. The batter will become thicker and glossy. Be careful not to overbeat, or the dough may become tough. The eggs provide structure and help the bars hold together. They also add a subtle richness to the final product. Mix until the batter is smooth and glossy.
- Fold in the cinnamon sugar topping, reserving a small portion for sprinkling later. The sugar will caramelize on top, creating a crisp, golden crust. This step is the moment of anticipation. The batter should have a slightly sticky, crumbly texture. The sugar’s crystals add a pleasant crunch when baked. Spread the mixture evenly in the prepared pan.
- Bake for 30–35 minutes, or until the edges are golden and a toothpick inserted in the center comes out clean. The bars will rise and then settle, creating a slight dip in the middle. Watch the color shift from pale to golden; this is the cue to pull them out. Let them bake until the top is crisp but not burnt. The aroma will fill the kitchen, signaling the bars are nearly done.
- Remove from the oven and let cool in the pan for 10 minutes. This allows the bars to set, preventing them from breaking apart when cut. While they cool, sprinkle the reserved cinnamon sugar on top for a final glossy finish. The sugar will slightly melt and set into a crunchy crust. The bars should feel firm enough to slice. If you cut too early, they’ll be sticky.
- Transfer the bars to a wire rack to cool completely before cutting. Cutting them on a hot surface can cause them to stick together. Once cooled, cut into squares or bars of your preferred size. The bars should be easy to handle, with a firm but tender crumb. Store them in an airtight container for up to a week. For longer storage, freeze them.
- Enjoy the bars as a quick breakfast, a snack, or a dessert. Pair them with a cup of tea or coffee for the ultimate comfort experience. If you want to impress guests, serve them warm with a drizzle of caramel sauce. These bars are perfect for holiday gatherings or casual family nights. The next time you crave something sweet, reach for these pumpkin snickerdoodle bars and taste the magic.
Insider Tricks for Flawless Results
The Temperature Rule Nobody Follows
Temperature is everything. If your oven runs hot, the bars will burn on the outside while remaining undercooked inside. Use an oven thermometer to ensure accuracy. Bake at the exact temperature, and watch the bars rise evenly. A consistent oven temperature guarantees the perfect golden crust.
Why Your Nose Knows Best
Trust your nose. The aroma of pumpkin and vanilla signals the batter is ready. If you smell a sharp, burnt scent, the oven may be too hot. Adjust the temperature and give it another minute. Your nose is a reliable guide in the kitchen.
The 5‑Minute Rest That Changes Everything
Letting the bars rest on the pan for 10 minutes before transferring to a rack is crucial. It allows the structure to set, preventing crumbly bars. If you cut them too early, they’ll crumble. This simple step ensures a clean, even cut.
The Secret to a Crispy Top
Sprinkling the reserved cinnamon sugar on top before baking creates a crisp, caramelized crust. If you want a crunchier top, add a tablespoon of brown rice flour to the sugar mix. This adds a subtle crunch and prevents the sugar from melting completely.
The Moisture Lock
If your pumpkin puree is watery, the bars can spread too thin. Thicken the puree with a tablespoon of cornstarch or flour before adding. This keeps the bars from spreading and maintains a moist center. A small adjustment that makes a big difference.
Creative Twists and Variations
This recipe is a playground. Here are some of my favorite ways to switch things up:
Nutty Crunch
Add a cup of chopped pecans or walnuts to the batter for a nutty crunch. The nuts pair beautifully with the pumpkin and spice. Toast the nuts lightly before adding for extra flavor. This variation adds a satisfying bite to each bar.
Chocolate Swirl
Fold in 1/2 cup of melted dark chocolate into the batter for a chocolate‑pumpkin swirl. The chocolate adds richness and a hint of bitterness that balances the sweetness. Sprinkle extra chocolate chips on top before baking. The result is a decadent treat.
Coconut Twist
Replace half the butter with coconut oil and add 1 cup of shredded coconut to the batter. The coconut adds a tropical flavor that pairs well with pumpkin. Toast the coconut lightly before mixing for a deeper flavor. This variation gives the bars a unique twist.
Spiced Apple
Fold in 1 cup of diced apples and a pinch of ground cloves to the batter. The apples add juiciness and a subtle tartness. The cloves bring a warm, aromatic note. This version feels like a fall apple pie in bar form.
Gluten‑Free Delight
Swap all‑purpose flour for a 1:1 gluten‑free blend and add 1 teaspoon of xanthan gum. The bars will still rise and hold together. Use a gluten‑free baking powder to maintain leavening. This version is perfect for those with dietary restrictions.
Storing and Bringing It Back to Life
Fridge Storage
Store the bars in an airtight container at room temperature for up to a week. Keep them away from direct sunlight to preserve flavor. If you notice the bars getting a bit dry, place a slice of apple or a damp paper towel in the container to rehydrate. This trick keeps them moist for longer.
Freezer Friendly
Wrap the bars individually in plastic wrap and place them in a freezer bag. They’ll keep for up to 3 months. When ready to eat, let them thaw at room temperature for 30 minutes. This method preserves the texture and flavor perfectly.
Best Reheating Method
Reheat the bars in a preheated 350°F oven for 5–7 minutes, or until warm. Add a tiny splash of water before reheating to create steam, which keeps the bars moist. Microwave on low for 20–30 seconds if you’re in a hurry. The bars will taste as fresh as when first baked.