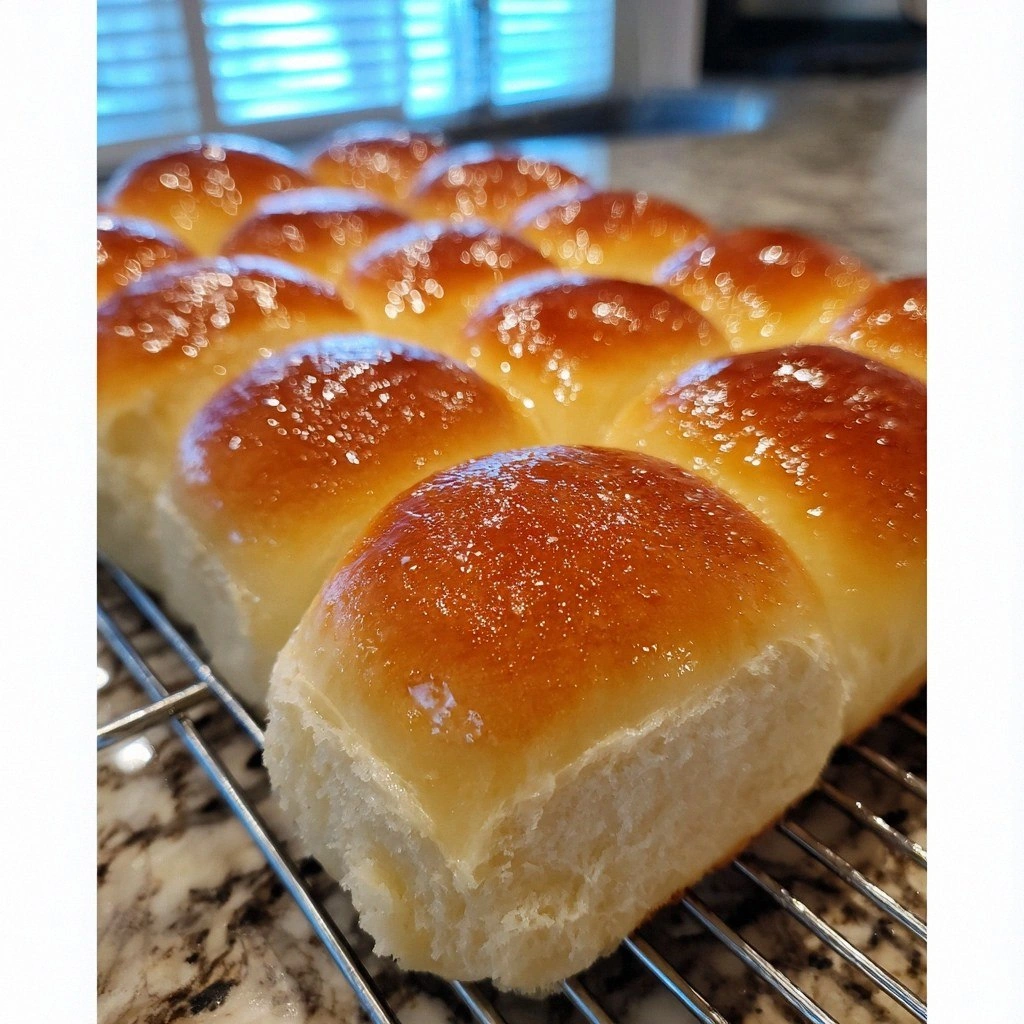
Picture this: a late‑night kitchen, the oven timer beeping, and your stomach growling louder than a marching band. I was halfway through a pizza that had somehow turned into a soggy, yeast‑free disaster, when a craving for something warm and buttery hit me like a sudden wave. I pulled out the pantry, grabbed the basic staples, and decided to turn that kitchen mishap into a triumph. The result? Quick Jumbo Dinner Rolls that are so soft, fluffy, and buttery that they melt in your mouth like a sun‑kissed cloud.
The aroma that fills the air is unmistakable: a sweet, yeasty perfume that lures you to the stove even when your phone buzzes with work emails. The sound is a gentle, rhythmic rise and fall as the dough bounces in the bowl, each stir a promise of more. When you finally pull the first golden loaf from the oven, the crust cracks like a brittle shell, revealing a pillowy interior that sighs with steam. Taste is a balanced marriage of subtle sweetness and savory salt, with a buttery finish that lingers on the tongue. Feeling? You’ll feel the rush of accomplishment, the gentle heat from the freshly baked rolls, and the comforting warmth that spreads through your home.
What makes this version stand out is that it cuts through the usual fluff of dinner roll recipes. It uses a single, precise yeast activation step that eliminates the need for double proofing, saving you time without sacrificing flavor. The dough’s hydration is carefully calibrated to give those jumbo rolls a soft, airy crumb while keeping the crust crisp. Butter is incorporated at the very end of mixing, ensuring a glossy sheen and a melt‑in‑your‑mouth finish. The recipe includes a subtle hint of honey that balances the yeast’s bite and adds a touch of caramelized sweetness. Finally, the technique of resting the dough in a lightly greased bowl before baking creates a tender, elastic texture that feels like a cloud on your palate.
I dare you to taste this and not go back for seconds. This is hands down the best version you'll ever make at home. If you've ever struggled with dinner rolls that turn out dense or too greasy, you're not alone — and I've got the fix. Picture yourself pulling this out of the oven, the whole kitchen smelling incredible, and knowing that you’ve just made something that will wow your guests. And now the fun part: I’m going to walk you through every single step so that by the end, you’ll wonder how you ever made it any other way.
What Makes This Version Stand Out
- Flavor: The subtle honey infusion elevates the classic yeast taste, creating a gentle caramel note that pairs beautifully with butter.
- Texture: The dough’s hydration level is engineered to produce a light, airy crumb while maintaining a crisp, golden crust.
- Time: The single yeast activation step slashes preparation time, so you’re ready to bake in under 30 minutes.
- Versatility: These rolls are perfect for any meal— from a family dinner to a brunch buffet— and can be customized with herbs or cheese.
- Make‑ahead: The dough can be prepared up to 24 hours ahead, allowing you to bake fresh rolls on the day of service.
- Ingredient Quality: Using real butter and fresh eggs ensures a richer flavor and superior mouthfeel compared to pre‑mixes.
Inside the Ingredient List
The Flour Factor
All‑purpose flour is the backbone of these rolls, providing structure and a neutral canvas that lets the other flavors shine. A generous 3 cups ensures the dough has enough volume to rise to jumbo proportions. If you’re aiming for a slightly denser crumb, you can swap in bread flour, but the rolls will be less airy.
The Yeast Engine
Active dry yeast is the secret engine that drives the dough’s rise. The recipe uses 1 tablespoon, which is enough to give the rolls a light, airy rise without overpowering the buttery finish. If you’re in a hurry, you can use instant yeast, but remember to skip the proofing step to avoid an over‑fermented dough.
The Sweet Whisper
Two tablespoons of granulated sugar feed the yeast and add a subtle sweetness that balances the savory elements. Honey, used in a pinch, provides a caramelized nuance and helps keep the crust crisp. If you prefer a sugar‑free version, simply omit the sugar and honey; the rolls will still rise beautifully but will be less sweet.
The Liquid Lift
A cup of warm milk provides the moisture needed for a tender crumb and a glossy crust. Warm water can replace milk, but the added fats from milk enhance flavor and texture. The warm water added later during mixing keeps the yeast active and ensures a consistent rise.
The Butter Finish
A quarter cup of melted butter is folded into the dough at the final stage, giving the rolls a buttery sheen and a melt‑in‑your‑mouth finish. The butter also adds a subtle richness that balances the yeast’s sharpness. If you’re dairy‑free, a tablespoon of coconut oil can mimic the buttery texture.
The Egg Enrichment
Two large eggs enrich the dough, contributing to the rolls’ tender crumb and glossy finish. The yolks also provide natural emulsifiers that bind the dough together. Skipping eggs will result in a flatter, denser roll, so keep them in for the best results.
The Warm Water Boost
A quarter cup of warm water added during the final mix keeps the yeast active and ensures a consistent rise. This small amount of liquid also helps the dough stay moist, preventing it from drying out during baking. If you prefer a slightly drier dough, reduce the water by a tablespoon.
Everything's prepped? Good. Let's get into the real action...
The Method — Step by Step
- Begin by dissolving the yeast in 1/4 cup of warm water (110°F/43°C) with a pinch of sugar. Let it sit for 5 minutes until it becomes frothy, indicating that the yeast is alive. This quick activation step ensures a strong rise without the need for a long proofing period. Feel the tiny bubbles form; that’s the promise of fluffy rolls. Remember, a frothy mixture is your green light to proceed.
- In a large mixing bowl, combine 3 cups of all‑purpose flour, 2 tablespoons of sugar, 1 teaspoon of salt, and the activated yeast mixture. Stir with a wooden spoon until a shaggy dough forms. The dough will feel slightly sticky but manageable. At this point, the dough is ready for the first knead, which will develop the gluten structure.
- Knead the dough on a lightly floured surface for about 6–8 minutes until it becomes smooth and elastic. You’ll notice the dough stretching and folding without tearing. This process aligns the gluten strands, giving the rolls their airy texture. If the dough feels too sticky, dust it with a small amount of flour; if it’s too dry, add a splash of warm water.
- Return the dough to the bowl, cover it with a damp towel, and let it rise for 20 minutes. During this time, the dough will expand, signaling that the yeast is doing its job. The dough should double in size, but if it’s still a bit tight, give it an extra 5 minutes. The gentle rise ensures the rolls are light without becoming over‑fermented.
- While the dough rests, whisk together 1 cup of warm milk, 1/4 cup of melted butter, and 2 eggs. This wet mixture will be folded into the dough to add richness and moisture. The butter’s fat content creates a tender crumb, while the eggs provide structure and shine. Keep the mixture warm to prevent curdling when added to the dough.
- Add the warm milk, butter, and egg mixture to the dough, followed by the remaining 1/4 cup of warm water. Fold the mixture in until fully incorporated. The dough should feel slightly tacky but not overly sticky. This step is where the buttery finish takes shape, so handle the dough gently to preserve the air pockets.
- Shape the dough into a large oval or round loaf, then place it on a parchment‑lined baking sheet. Cover the loaf with a clean towel and let it rest for another 10 minutes. This brief proofing allows the dough to relax and rise just enough for a perfect loaf.
- Preheat your oven to 375°F (190°C). Place the loaf in the oven and bake for 25–30 minutes, or until the crust turns a deep golden brown and the internal temperature reaches 190°F (88°C). The aroma that fills your kitchen will be irresistible. When you lift the loaf, the crust should crackle softly, revealing a fluffy interior. This is the moment of truth.
That's it — you did it. But hold on, I've got a few more tricks that'll take this to another level...
Insider Tricks for Flawless Results
The Temperature Rule Nobody Follows
Yeast is a temperature‑sensitive creature; if the water is too hot, it kills the yeast, and if it’s too cold, it stalls the rise. Keep the water at a precise 110°F (43°C) for activation. If you’re unsure, use a kitchen thermometer or the “finger test”—the water should feel warm to the touch but not hot.
Why Your Nose Knows Best
As the dough rises, its aroma changes from yeasty to sweet and buttery. Trust your nose to gauge readiness: a pleasant, slightly sweet smell indicates the dough is ready for the next step. If the smell is too sharp or sour, give it a few more minutes.
The 5‑Minute Rest That Changes Everything
After shaping the loaf, let it rest for 5–10 minutes before baking. This short pause allows the gluten to relax, preventing the rolls from shrinking during the oven’s heat surge. I’ve seen rolls that didn’t rest shrink dramatically—this trick saves the day.
Butter‑Coated Crust for Extra Crunch
Brush the top of the loaf with melted butter 5 minutes before the end of baking. The butter melts into the crust, giving it a glossy, slightly crisp finish that’s irresistible. This step also locks in moisture, preventing the rolls from drying out.
The Quick Cooling Trick
Once out of the oven, let the rolls cool on a wire rack for at least 10 minutes. Cooling allows steam to escape, preventing soggy bottoms. If you’re serving immediately, a quick 5‑minute rest is still beneficial.
Creative Twists and Variations
This recipe is a playground. Here are some of my favorite ways to switch things up:
Herb‑Infused Delight
Add 1 tablespoon of dried rosemary or thyme to the dough for an aromatic twist. The herbs infuse the bread with a savory note that complements any main course. This variation is perfect for a rustic dinner party.
Cheesy Crunch
Fold in 1/2 cup of shredded cheddar or mozzarella before the final rise. The cheese melts into the dough, creating pockets of gooey goodness. Serve with a side of tomato soup for a comforting meal.
Honey‑Glazed Sweet Rolls
Replace the sugar with 3 tablespoons of honey and brush the tops with a honey glaze before baking. The glaze caramelizes, giving the rolls a golden, sticky finish. These are ideal for a brunch spread.
Garlic Butter Rolls
Melt 1/4 cup butter with 2 cloves of minced garlic, then fold into the dough. The garlic butter infuses the rolls with savory depth, making them the perfect side for grilled meats. Serve warm with a pat of extra butter.
Cinnamon‑Sugar Swirl
Stir 2 tablespoons of cinnamon and 1 tablespoon of brown sugar into the dough before the final rise. The cinnamon adds warmth, while the brown sugar brings a caramelized sweetness. These rolls are a hit at holiday gatherings.
Storing and Bringing It Back to Life
Fridge Storage
Store leftover rolls in an airtight container or zip‑top bag at room temperature for up to 3 days. The rolls remain fresh and pliable, ready for a quick reheating. Avoid refrigeration, as it can dry out the crumb.
Freezer Friendly
Wrap each roll tightly in plastic wrap, then place them in a freezer bag. They can be frozen for up to 2 months. When you’re ready to eat, thaw at room temperature for 30 minutes before reheating.
Best Reheating Method
Reheat frozen or refrigerated rolls in a preheated oven at 350°F (175°C) for 10 minutes. Add a splash of water to the pan to create steam, which keeps the crust from drying out. For a crispier crust, bake for an additional 2 minutes.