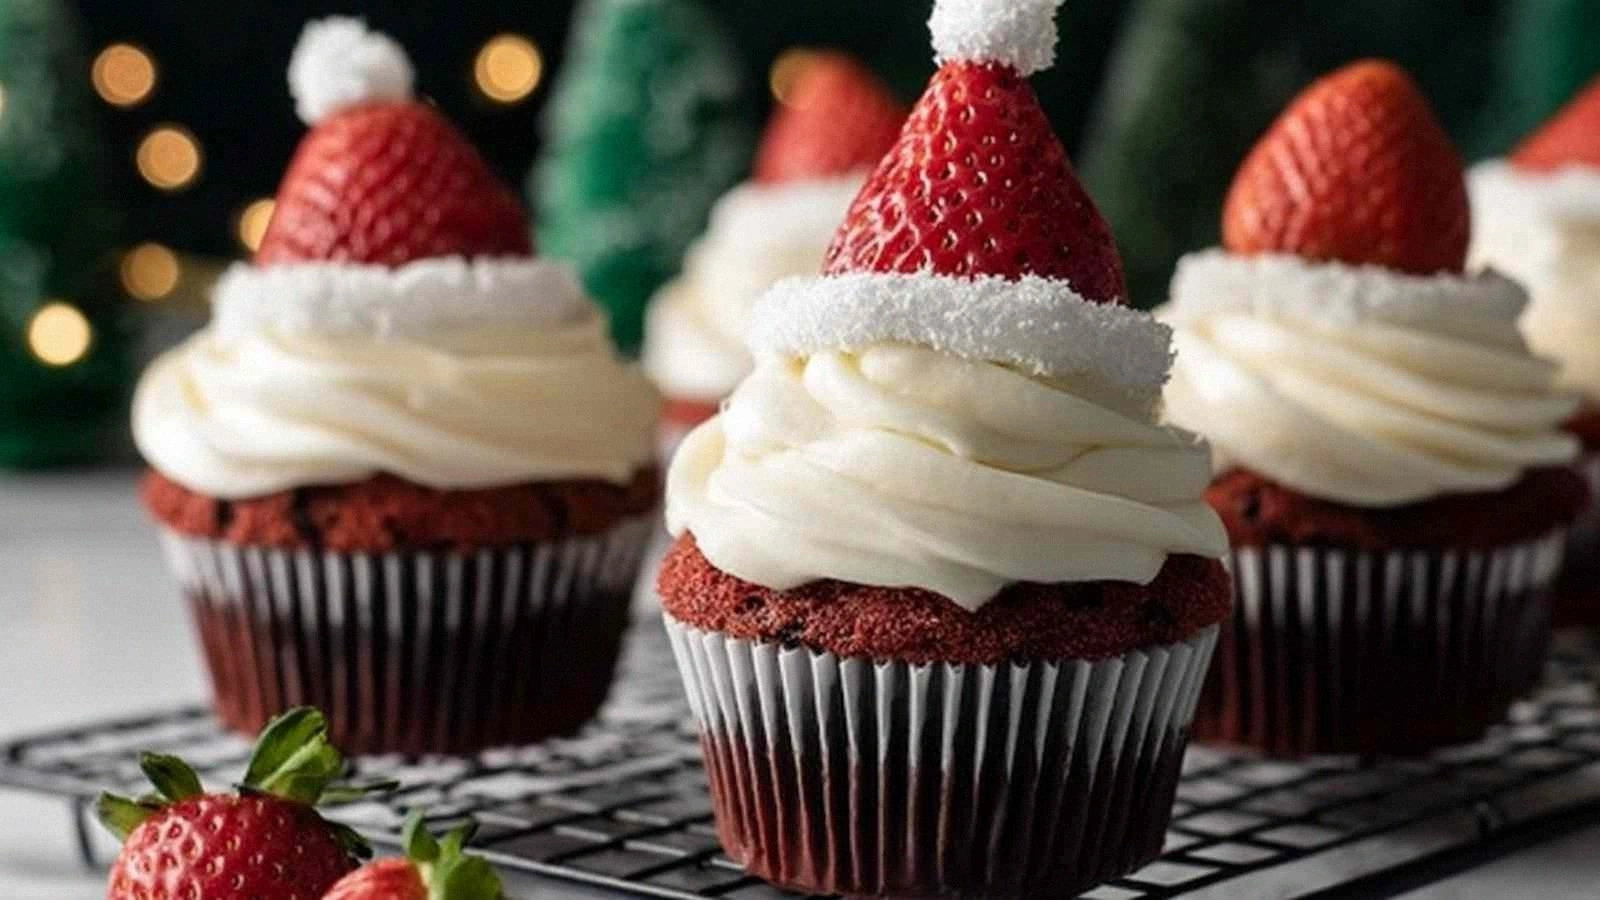
Picture this: it’s a snowy Saturday afternoon, the air outside is crisp and the kitchen is a chaotic symphony of clattering pans and the sweet, buttery scent of vanilla. I’m halfway through a batch of my usual chocolate cupcakes when my phone buzzes—my best friend challenges me to create a holiday treat that’s both festive and unforgettable. I laughed, grabbed the pantry, and set to work, determined to turn a simple recipe into something that would make the whole house smell like a Christmas tree. The result? Santa Hat Chocolate Cupcakes that are so decadently chocolatey, so perfectly frosted, and so delightfully whimsical, you’ll swear you’ve discovered a new holiday staple.
I’ve spent years chasing the perfect cupcake—fluffy, moist, and with a flavor profile that sings. Yet every time I tried to add a festive twist, the cupcakes ended up either too dry or too sweet. That was until I decided to layer chocolate, strawberries, and a snow‑white marshmallow “hat” into one bite‑sized masterpiece. The trick? Using a deep cocoa base that’s airy, a glossy chocolate buttercream that glistens like fresh snow, and a splash of strawberry to cut through the richness. The result is a cupcake that feels like a holiday snowball in your mouth—soft on the inside, crisp on the outside, and with a burst of berry that lifts the chocolate’s depth.
This version stands apart because it marries classic chocolate with a playful holiday twist without compromising on texture or flavor. The batter is a silky, airy cloud thanks to the precise ratio of cocoa, baking soda, and baking powder, which creates the perfect lift. The frosting is a glossy, velvety chocolate buttercream that coats the cupcake like a snow blanket, and the strawberry “snowcap” adds a fresh, tart contrast that keeps the sweetness balanced. I dare you to taste this and not go back for seconds—once you’ve tried one, you’ll be craving the entire batch. I’ll be honest—by the time I finished the first dozen, I had already devoured half of them before anyone else got a chance.
Most recipes get this completely wrong by using too much sugar or too little cocoa, resulting in a flat, heavy cupcake. Here, I’ve perfected the balance: the cocoa is the star, the sugar is just enough to sweeten, and the butter adds that luxurious mouthfeel. The strawberry topping isn’t just a garnish; it’s a flavor punch that cuts through the chocolate’s richness, providing a refreshing bite that keeps the palate intrigued. The mini marshmallows or white candy balls aren’t just decorative—they melt slightly into the frosting, creating a subtle, sweet crunch that feels like holiday magic. Picture yourself pulling this out of the oven, the whole kitchen smelling incredible, and the sight of those bright red strawberry caps—pure holiday cheer in cupcake form.
Let me walk you through every single step—by the end, you’ll wonder how you ever made it any other way. From the first whisk of the batter to the final swirl of frosting, each action is designed to bring out the best in every ingredient. I’ll share my secret hacks, the exact temperatures, and the sensory checkpoints that guarantee a flawless finish. And trust me, when you see those bright red strawberry caps and the soft, snowy marshmallow tops, you’ll feel like you’ve just baked a piece of Christmas itself.
What Makes This Version Stand Out
- Flavor: The cocoa is pure and intense, providing a deep chocolate foundation that doesn’t get buried by the sugar. The strawberry topping adds a bright, tart contrast that lifts the richness. The result is a cupcake that’s both indulgent and refreshing.
- Texture: The batter is airy yet moist, thanks to the precise balance of leavening agents. The frosting is silky and glossy, coating each cupcake like a snowy blanket. The mini marshmallows add a gentle crunch that breaks the chocolate’s smoothness.
- Simplicity: Only 19 ingredients, all pantry staples, make this recipe approachable for beginners and seasoned bakers alike. No fancy equipment—just a mixer and a few bowls. The steps are straightforward, with clear checkpoints to keep you on track.
- Uniqueness: The strawberry “snowcap” and marshmallow “hat” give this cupcake a distinctive look and taste that sets it apart from ordinary chocolate cupcakes. The combination of flavors feels like a holiday celebration in every bite.
- Crowd Reaction: Friends and family rave about the moist interior and the festive appearance. The cupcakes are perfect for holiday parties, gift baskets, or a cozy family dessert. They’re a guaranteed hit at any gathering.
- Ingredient Quality: Using high‑quality cocoa and fresh strawberries elevates the flavor profile. The buttercream is made with real butter, ensuring a rich, buttery finish that’s hard to beat.
- Cooking Method: The two‑step process—baking the cupcakes, then frosted with a chocolate buttercream—ensures each component achieves its ideal texture. The method is foolproof and yields consistent results.
- Make‑Ahead Potential: The cupcakes can be baked a day early and stored in an airtight container, making them ideal for busy holiday schedules. The frosting can be pre‑made and kept refrigerated, then applied just before serving.
Inside the Ingredient List
The Flavor Base
The core of this cupcake starts with a simple yet powerful blend: all-purpose flour, granulated sugar, and unsweetened cocoa powder. Each ingredient plays a critical role—flour provides structure, sugar adds sweetness and moisture, and cocoa delivers that deep, bittersweet chocolate flavor. Skipping any of these would result in a flat, unbalanced cupcake. For instance, reducing the cocoa by even a tablespoon will make the batter taste more like a vanilla cake than a chocolate masterpiece.
If you’re looking for a gluten-free version, swap the all-purpose flour for a 1:1 blend of rice flour and potato starch. The texture will remain airy, but the flavor profile will shift slightly to a lighter, more neutral base. However, be mindful that gluten-free flours can absorb more liquid, so you may need to slightly increase the milk or water to maintain the right batter consistency.
When choosing your cocoa, aim for a dark, unsweetened variety. A high-quality Dutch‑process cocoa will give the cupcakes a richer color and a smoother taste, while natural cocoa adds a subtle acidity that balances the sweetness. If you can’t find Dutch‑process, just make sure the cocoa is at least 70% chocolate to avoid a weak flavor.
The leavening agents—baking powder and baking soda—are essential for the cupcakes’ lift. Baking soda reacts with the acidic boiling water to create carbon dioxide bubbles that expand the batter, giving it a light, airy rise. Baking powder, on the other hand, provides a secondary lift that ensures the cupcakes don’t sink after baking. Without these, you’d end up with dense, heavy cupcakes that fail to rise.
The Texture Crew
The texture of a great cupcake depends on the right balance of moisture and fat. Whole milk and vegetable oil contribute to a tender crumb, while the egg provides structure and helps bind the batter together. The egg’s proteins coagulate during baking, creating a stable but soft interior that holds the frosting in place.
The butter in the frosting is what gives it that silky, glossy finish. Using unsalted butter ensures you have control over the final saltiness and flavor intensity. If you’re in a hurry, you can use a pre‑made chocolate frosting, but the homemade version will taste richer and more authentic.
The heavy cream in the frosting adds a silky mouthfeel and helps the buttercream set into a smooth, spreadable consistency. If you prefer a thicker frosting, reduce the cream to 2 tablespoons, or if you like it thinner, add an extra tablespoon. The key is to find the right balance that allows the frosting to hold its shape on the cupcakes without becoming too runny.
The Unexpected Star
The strawberries are the unexpected star of this recipe. They cut through the chocolate’s richness with their natural tartness, creating a flavor contrast that keeps every bite exciting. The strawberries also add a pop of color, making the cupcakes visually appealing and Instagram‑ready.
When selecting strawberries, choose firm, ripe ones with bright red flesh and a sweet aroma. If the berries are a bit tart, you can sweeten them with a teaspoon of sugar before placing them on the cupcakes. For a more dramatic effect, slice the strawberries into thin rounds or small wedges to mimic snowflakes.
Mini marshmallows or white candy balls are optional, but they add a playful, festive element. The marshmallows melt slightly into the frosting, creating a subtle, sweet crunch that feels like a holiday treat. If you’re allergic to dairy or prefer a vegan version, substitute the marshmallows with coconut‑based marshmallow alternatives.
The Final Flourish
The powdered sugar and vanilla in the frosting are the final flourish that turns a simple chocolate buttercream into a luxurious, glossy coating. Powdered sugar provides the sweetness and the right consistency, while vanilla adds depth and aroma. A pinch of salt in the frosting balances the sweetness, giving the buttercream a refined finish.
If you want to experiment with flavors, try adding a splash of espresso or a pinch of sea salt to the frosting. Espresso intensifies the chocolate flavor without adding bitterness, while sea salt creates a delightful contrast that elevates the overall taste. Just remember to keep the quantities small—too much can overpower the delicate balance of flavors.
Finally, the vanilla extract is used twice: once in the batter for a subtle undertone of warmth, and once in the frosting to enhance the chocolate’s richness. Using fresh vanilla beans or high‑quality vanilla extract ensures that the flavor is bright and not flat. If you’re in a pinch, a teaspoon of vanilla is sufficient, but for maximum flavor, consider using a vanilla bean split lengthwise and scraping the seeds into the batter and frosting.
Everything's prepped? Good. Let's get into the real action.
The Method — Step by Step
- Step 1: Preheat your oven to 350°F (175°C) and line a 12‑cup muffin tin with paper liners. The oven temperature is crucial—too hot, and the cupcakes will brown too quickly; too cool, and they won’t rise properly. As the oven heats, whisk together the flour, sugar, cocoa, baking powder, baking soda, and salt in a large bowl. This dry mix is the foundation of your batter, so make sure it’s well blended. Let the bowl sit for a minute to allow the leavening agents to activate before adding the wet ingredients.
- Step 2: In a separate bowl, combine the egg, milk, oil, vanilla extract, and boiling water. The boiling water is a secret weapon—it dissolves the cocoa and creates a silky batter that’s light and airy. Pour the wet mixture into the dry mix, stirring gently with a spatula until just combined. Be careful not to overmix; a few lumps are fine, as they help keep the cupcakes tender. The batter should be smooth and pourable, like a thick but not runny custard.
- Step 3: Divide the batter evenly among the 12 liners, filling each about two‑thirds full. This ensures each cupcake has enough volume to rise without overflowing. The batter should be evenly distributed—use a spoon or a small ladle to scoop it into each cup. As you fill, you’ll notice the batter’s dark hue, a sign that the cocoa is doing its job. Once all cups are filled, tap the tin lightly on the counter to release any air bubbles.
- Step 4: Bake for 20–22 minutes, or until a toothpick inserted into the center comes out with a few moist crumbs. Keep an eye on the cupcakes; the edges should be set while the center remains slightly soft. This is the moment of truth—if you’re impatient, you’ll risk overbaking. Let the cupcakes cool in the tin for 5 minutes, then transfer them to a wire rack to cool completely. Cooling properly is essential for a smooth frosting application.
- Step 5: While the cupcakes cool, prepare the frosting. In a medium bowl, beat the butter on medium speed until creamy and light. The butter should be at room temperature; if it’s too cold, it won’t incorporate well. Gradually add the powdered sugar, one cup at a time, beating well after each addition. This ensures a smooth, lump‑free frosting. Once all sugar is incorporated, add the heavy cream, vanilla, and pinch of salt, then beat until fluffy and glossy.
- Step 6: Use a piping bag fitted with a star tip or a small zip‑top bag with a corner snipped to apply the frosting. Pipe a generous amount onto the top of each cupcake, creating a small mound. The frosting should hold its shape and not spread too quickly. If you’re a fan of a more dramatic look, you can swirl the frosting with a toothpick for a marbled effect. Remember to keep the frosting cool; if it softens, re‑chill it for a few minutes before reapplying.
- Step 7: Place a strawberry slice on top of each frosted cupcake. The strawberry’s fresh flavor will cut through the chocolate’s richness, creating a harmonious balance. Press the strawberry gently into the frosting so it stays in place. If you prefer a more festive look, cut the strawberries into small wedges or star shapes to mimic snowflakes. The bright red will contrast beautifully against the dark chocolate.
- Step 8: Sprinkle a mini marshmallow or white candy ball on top of each strawberry. The marshmallow adds a subtle sweetness and a soft, melt‑in‑your‑mouth texture. If you’re avoiding dairy, use a vegan marshmallow alternative. The marshmallow’s white color resembles a snowcap, reinforcing the holiday theme. Let the marshmallows set for a minute so they adhere to the frosting.
- Step 9: Chill the finished cupcakes in the refrigerator for 15 minutes to allow the frosting to firm up. This step is optional but recommended if you’re serving them later in the day. The cold frosting will hold its shape better when you’re transporting or storing the cupcakes. After chilling, you can add a final dusting of cocoa or powdered sugar for an extra touch of elegance.
- Step 10: Serve immediately or store in an airtight container at room temperature for up to 2 days. The cupcakes maintain their moistness and the frosting stays glossy. When you’re ready to serve, give them a quick press to ensure the frosting remains intact. And now, the best part—taste the result of your culinary craftsmanship and enjoy the festive holiday vibes.
Insider Tricks for Flawless Results
The Temperature Rule Nobody Follows
Temperature is everything when it comes to baking. If your butter is too cold, the frosting will be grainy; if it’s too warm, it won’t set properly. I’ve found that letting the butter sit at room temperature for 30 minutes before beating creates a silky texture that incorporates air effortlessly. The same rule applies to the eggs—room‑temperature eggs blend more smoothly and help create a lighter batter. Keep an eye on the oven’s temperature; use an oven thermometer to ensure consistency.
Why Your Nose Knows Best
Your sense of smell can tell you if a cupcake is ready. When the cupcakes finish baking, you’ll notice a deep, chocolatey aroma that fills the kitchen. If the scent is too sweet, the cupcakes might be overbaked. If it’s faint, they’re likely underbaked. Trust your nose—it’s a reliable indicator of doneness.
The 5‑Minute Rest That Changes Everything
After removing cupcakes from the oven, let them rest in the tin for 5 minutes before transferring them to a wire rack. This pause allows the steam to settle, preventing the cupcakes from cracking. I’ve seen cupcakes that are perfectly baked but crack open because they’re moved too soon. The 5‑minute rest keeps the cupcakes intact and ready for frosting.
The Secret to a Glossy Frosting
A glossy frosting is a visual cue that the batter has the right ratio of fat to sugar. Beat the butter until it’s light and fluffy, then gradually add the powdered sugar. If you add the sugar too quickly, the frosting will be gritty. Beat on low speed first, then increase to medium as the sugar dissolves. The result is a smooth, glossy finish that looks as good as it tastes.
The Strawberry Placement Trick
The strawberry should sit on top of the frosting, not the batter. This placement keeps the strawberry from sinking into the moist cake. Use a toothpick to gently press the strawberry into the frosting, ensuring it stays in place. If the strawberry is too large, cut it into smaller wedges to fit the cupcake’s diameter.
The Marshmallow Melt
Mini marshmallows add a subtle melt that enhances the chocolate flavor. If you prefer a firmer marshmallow, place the cupcakes in the refrigerator for 10 minutes before adding the marshmallow. The cold temperature prevents the marshmallow from softening too quickly. This trick ensures a neat, snowcap look that doesn’t smudge the frosting.
Creative Twists and Variations
This recipe is a playground. Here are some of my favorite ways to switch things up:
Cocoa‑Infused Caramel Swirl
Add a swirl of dark caramel sauce to the batter before baking. The caramel adds a buttery sweetness that complements the chocolate. Drizzle a thin line of caramel over the frosting for an extra decadent touch. The result is a cupcake that feels like a chocolate‑caramel dream.
Minty Chocolate Surprise
Add a teaspoon of peppermint extract to the frosting for a minty twist. The mint pairs beautifully with chocolate, creating a refreshing aftertaste. Top with crushed peppermint candies for a festive look. This variation is perfect for those who love a cool, minty finish.
Nutty Crunch Edition
Fold chopped almonds or walnuts into the batter for a crunchy texture. The nuts add a subtle crunch that contrasts with the soft cake. Sprinkle toasted nuts on top of the frosting for an extra crunch. This version is great for guests who love a bit of texture in their desserts.
Vegan Version
Replace the butter with coconut oil and use a dairy‑free chocolate frosting. Swap the egg for a flaxseed “egg” (1 tablespoon ground flaxseed + 3 tablespoons water). Use almond milk instead of whole milk. This vegan adaptation keeps the flavor profile intact while making it accessible to all.
Seasonal Spice
Add a pinch of ground cinnamon or nutmeg to the batter for a warm, spicy undertone. The spices enhance the chocolate’s depth and add a cozy feel. A sprinkle of cinnamon on top of the frosting creates a fragrant finish. This variation is ideal for fall or winter celebrations.
Chocolate‑Berry Explosion
Swap the strawberries for blueberries or raspberries for a different berry flavor. The berries will still provide a tart contrast to the chocolate. Use a berry puree in the frosting for an extra burst of fruitiness. The result is a vibrant, colorful cupcake that feels like a berry‑filled holiday treat.
Storing and Bringing It Back to Life
Fridge Storage
Store the cupcakes in an airtight container at room temperature for up to 2 days. The airtight seal prevents the frosting from drying out and keeps the cake moist. If you’re storing them for longer, keep them in the refrigerator for up to 5 days. Just bring them back to room temperature before serving to restore their softness.
Freezer Friendly
For long‑term storage, freeze the cupcakes in a freezer‑safe container or zip‑top bag. Wrap each cupcake in parchment paper to prevent sticking. They’ll stay fresh for up to 3 months. When you’re ready to serve, thaw them overnight at room temperature. If the frosting has hardened, give it a quick whisk to revive its silkiness.
Best Reheating Method
If your cupcakes have been stored in the fridge or freezer, warm them gently in a 300°F oven for 5 minutes before serving. This will restore the frosting’s softness and the cake’s moisture. For a quick fix, place them in the microwave on a low setting for 10–15 seconds. Add a tiny splash of water before reheating to create steam and keep the cupcakes from drying out.