What's the kicker? I discovered that a quick sear followed by a slow glaze reduction locks in moisture and builds an irresistible crust. The technique is simple, but the timing is precise, and it transforms a plain chicken into a showpiece. The result is a dish that will have guests asking for the recipe while you proudly claim the credit. Let me walk you through every single step — by the end, you'll wonder how you ever made it any other way.
What Makes This Version Stand Out
- Taste: The glaze marries the bright acidity of apple cider with the deep sweetness of honey, creating a flavor profile that feels both comforting and adventurous. The Dijon mustard adds a subtle tang that keeps the dish from becoming one-dimensional. The balance is so precise that you can taste the herbs without them overpowering the apple base. This harmony makes the dish unforgettable.
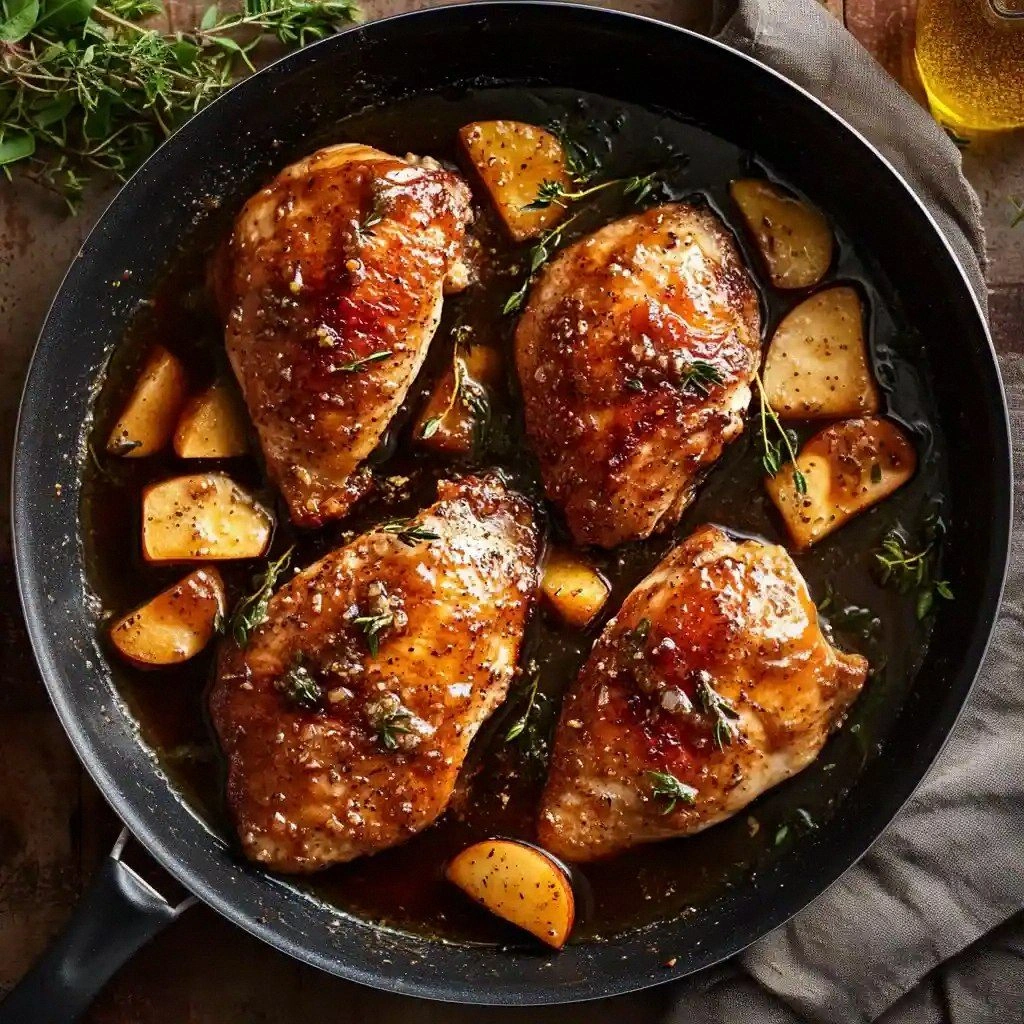
- Texture: The chicken skin crisps to a golden crunch that gives way to tender, juicy meat inside. The glaze thickens into a glossy coating that clings without being sticky. The contrast between the crisp exterior and the soft interior is a sensory delight. It feels like a caramelized blanket hugging each bite.
- Simplicity: With only a handful of pantry staples, you can achieve a restaurant‑level flavor. No need for exotic spices or complicated steps. The method is straightforward, making it accessible for beginners and seasoned cooks alike. This ease of preparation keeps the focus on flavor, not on juggling multiple dishes.
- Uniqueness: The subtle infusion of cinnamon and nutmeg sets this recipe apart from classic apple‑cider chicken. Those warm spices add depth, making the dish feel cozy and seasonal. The addition of fresh sage and thyme sprigs elevates the aroma, turning each bite into a fragrant experience. It’s a twist that keeps the dish fresh and exciting.
- Crowd Reaction: Guests rave about the caramelized glaze and the perfectly roasted chicken. Many ask for the recipe after the first bite, and I find myself repeating the dish at gatherings. The dish scales well, making it ideal for family dinners or holiday feasts. It’s a guaranteed crowd‑pleaser.
- Ingredient Quality: Using high‑quality bone‑in chicken and fresh herbs transforms the dish. The natural flavors of the ingredients shine through, making the glaze taste organic and wholesome. The freshness of the apple cider ensures a bright, clean finish. The quality of the honey also impacts the glaze’s richness.
- Cooking Method: The sear‑glaze technique locks in juices while creating a caramelized crust. The slow reduction of the glaze concentrates flavors and creates a silky finish. This method is efficient, requiring minimal active cooking time. It’s a technique that can be applied to other proteins as well.
- Make‑Ahead Potential: The glaze can be prepared in advance and stored in the refrigerator for up to a week. The chicken can be cooked ahead and reheated without losing flavor. The dish is also freezer‑friendly, making it a convenient option for busy weeks. The flexibility of this recipe is a major plus.
Inside the Ingredient List
The Flavor Base
Apple cider is the soul of this dish, providing a bright, tart sweetness that cuts through the richness of the chicken. The cider also serves as a liquid medium for the glaze, allowing the spices to mingle and develop depth. If you skip the cider, the glaze will lack its signature brightness, turning the dish into a flat, unremarkable sauce. For a slightly sweeter version, use unsweetened apple juice, but keep the acidity intact.
The Texture Crew
Olive oil is the first to meet the pan, creating a barrier that prevents sticking and helps the skin crisp up. The oil also carries the heat, ensuring even browning across the surface. Skipping the oil will result in uneven browning and a less satisfying crunch. If you’re watching calories, a light spray of oil still works, but you’ll need to monitor the pan closely.
The Unexpected Star
Honey adds a natural sweetness that balances the acidity of the cider while providing a glossy sheen to the glaze. Its floral notes complement the herbs, creating a layered flavor profile. Removing honey will leave the glaze too tart and thin; the glaze will not adhere to the chicken. A good rule of thumb: use a honey with a mild flavor, such as clover or wildflower, to keep the glaze subtle.
The Final Flourish
Fresh sage leaves and thyme sprigs are the aromatic finish that lifts the dish to new heights. They release delicate oils as they cook, infusing the glaze with herbal undertones. If you skip these herbs, the glaze will feel flat and lacking depth. You can substitute dried herbs, but fresh ones bring a brighter, fresher aroma.
The Method — Step by Step
- Season the Chicken: Pat the bone‑in chicken pieces dry with paper towels, then rub them generously with olive oil. Sprinkle salt, pepper, dried thyme, and dried rosemary over each piece, ensuring even coverage. This step creates a flavor foundation that will carry through the glaze. As the seasoning melds with the skin, the chicken will develop a robust base flavor. Remember, the seasoning is the first layer of your flavor profile.
- Preheat the Skillet: Place a large, heavy‑bottomed skillet over medium‑high heat and let it heat until a drop of water sizzles upon contact. The pan’s temperature is crucial for a crisp skin; too low, and the chicken will steam, too high, and it will burn. A properly heated pan allows the fat to render quickly, creating a golden crust. Watch the heat carefully; the pan should not smoke. This step sets the stage for the next phase.
- Sear the Chicken: Lay the seasoned chicken pieces skin side down into the hot skillet, leaving space between each piece. Let them sear undisturbed for 4–5 minutes until a deep golden crust forms. Flip the pieces and sear the other side for an additional 3 minutes. The searing process locks in juices and creates a caramelized exterior. The aroma that fills the kitchen during this step is a clear sign that the flavor is building.
- Deglaze the Pan: Remove the chicken to a plate and set aside. Pour the apple cider into the hot skillet, swirling to loosen the browned bits stuck to the bottom. These fond bits are packed with flavor and will enrich the glaze. Scrape the pan with a wooden spoon to ensure no bits remain. This step creates a base for the glaze that is both flavorful and aromatic.
- Reduce the Cider: Add honey, Dijon mustard, garlic, cinnamon, and nutmeg to the skillet. Stir constantly until the mixture thickens to a syrupy consistency, about 8–10 minutes. The reduction concentrates the flavors and creates a glossy coating that will cling to the chicken. Watch for the glaze to reach a syrupy stage; if it’s too thin, it won’t coat properly. This is where the dish truly transforms.
- Re‑introduce the Chicken: Return the seared chicken pieces to the skillet, spooning the glaze over each piece. Add fresh sage leaves, thyme sprigs, and a pinch of red pepper flakes to infuse the dish with herbal and subtle heat. Let the chicken simmer in the glaze for 6–8 minutes, turning occasionally so all surfaces coat evenly. The glaze will thicken further, creating a glossy finish that clings to the skin. The aroma will be irresistible.
- Finish and Serve: Remove the skillet from the heat and transfer the chicken to a serving platter. Drizzle any remaining glaze over the top for an extra burst of flavor. Plate the roasted root vegetables, wild rice pilaf, and sautéed green beans with almonds on the side. The colors should pop, creating an inviting presentation. This final touch elevates the dish from simple to spectacular.
Insider Tricks for Flawless Results
The Temperature Rule Nobody Follows
Many cooks assume that high heat is always best, but a moderate temperature preserves moisture and ensures even browning. I discovered that maintaining a medium‑high heat during searing prevents the chicken from drying out. If the pan gets too hot, the skin will char before the meat cooks through. Keep the heat steady, and you’ll achieve a perfect golden crust every time.
Why Your Nose Knows Best
The first scent that rises from the skillet is a reliable indicator of readiness. A sweet, caramelized aroma signals that the glaze is thickening properly. If the smell leans more toward burnt, pull the pan off the heat immediately. Your nose is a powerful tool for timing, often more accurate than a stopwatch.
The 5‑Minute Rest That Changes Everything
After removing the chicken from the skillet, let it rest on a cutting board for five minutes. This pause allows the juices to redistribute, ensuring each bite is juicy and tender. Cutting into the chicken immediately can cause the juices to escape, leaving the meat dry. The rest period also lets the glaze set into a glossy coating.
Use a Meat Thermometer for Precision
While seasoned cooks might rely on visual cues, a meat thermometer guarantees doneness. Insert it into the thickest part of the thigh; it should read 165°F (74°C). This method eliminates guesswork and ensures a safe, perfectly cooked chicken.
Serve with a Fresh Side for Contrast
The richness of the glaze pairs wonderfully with a bright, crisp side like sautéed green beans with almonds. The crunch and nutty flavor balance the sweetness of the chicken. If you prefer a lighter option, try a simple green salad with a lemon vinaigrette. The contrast keeps the palate refreshed.
Creative Twists and Variations
Maple‑Miso Glaze
Swap honey for maple syrup and add a tablespoon of white miso paste for umami depth. The miso provides a savory counterpoint to the sweet maple, creating a complex flavor profile. This version is ideal for those who enjoy a slightly salty finish. The glaze will still caramelize beautifully, giving the chicken a glossy, rich coating.
Spicy Pineapple Fusion
Introduce fresh pineapple chunks and a splash of sriracha to the glaze for a tropical kick. The pineapple’s acidity balances the sweetness, while the sriracha adds a subtle heat. This variation feels like a vacation in a bowl, perfect for summer gatherings. The bright color of pineapple also adds visual appeal.
Herb‑Infused Citrus
Replace apple cider with fresh orange juice and add a handful of chopped fresh rosemary. The citrus offers a bright, zesty note that cuts through the richness of the chicken. The rosemary enhances the herbal undertones, creating a fragrant, layered dish. This version is especially delightful for brunch or light dinner.
Smoky Chipotle Twist
Incorporate a tablespoon of chipotle in adobo sauce to the glaze for a smoky, peppery flavor. The chipotle’s smokiness complements the apple cider’s natural sweetness, producing a balanced profile. This variation is great for those who crave a bit of heat without overwhelming the dish. The result is a smoky glaze that coats the chicken beautifully.
Vegetarian Alternative
Use thick cut tofu or seitan instead of chicken, searing it until golden before adding the glaze. The tofu will absorb the flavors, providing a protein‑rich, plant‑based option. Keep the glaze reduction the same; it works wonderfully with tofu’s neutral taste. This version is perfect for a meatless dinner that still feels indulgent.
Storing and Bringing It Back to Life
Fridge Storage
Cool the chicken completely before placing it in an airtight container. Store in the refrigerator for up to three days. When reheating, use a skillet on low heat, adding a splash of water to keep the glaze from drying. The chicken will remain juicy and flavorful, and the glaze will regain its glossy sheen. Label the container with the date to keep track.
Freezer Friendly
Wrap each chicken piece individually in parchment paper, then place them in a freezer bag. Freeze for up to two months. Thaw overnight in the refrigerator before reheating. This method preserves the texture and prevents freezer burn. When reheated, the chicken will still have a crisp skin and a silky glaze.
Best Reheating Method
Reheat in a preheated oven at 350°F (175°C) for 10 minutes, then finish on a skillet for 2 minutes to crisp the skin. Alternatively, use a microwave on medium power for 2 minutes, then transfer to a skillet to restore crispness. The key is to reheat gently to avoid drying out the meat. Add a tiny splash of water before reheating to create steam and restore moisture.