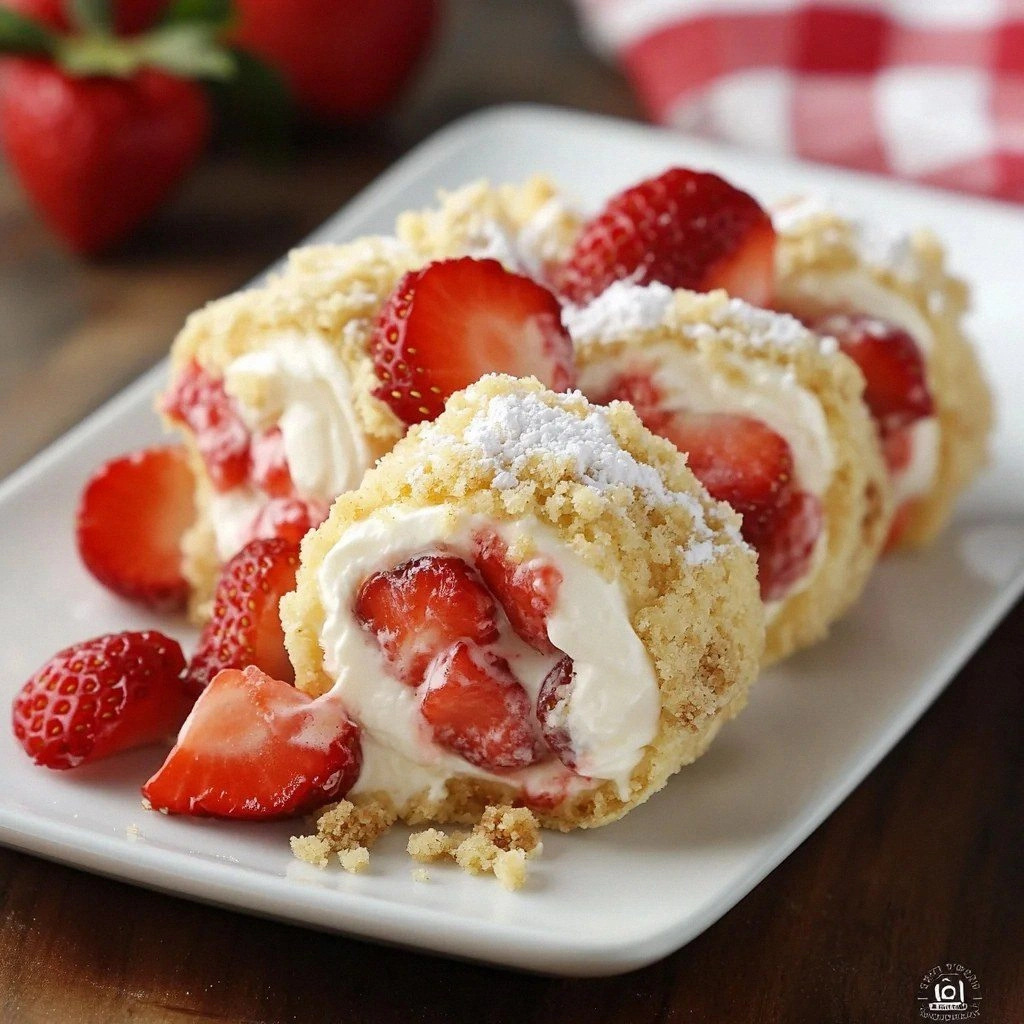
I still remember the day I nearly set my kitchen on fire trying to make strawberry shortcake the old-school way. There I was, biscuit dough stuck to every surface, whipped cream deflating faster than my ego, and a smoke alarm serenading the neighborhood. Fast forward three months of obsessive testing (and more failures than I'll publicly admit), and I finally cracked the code. These Sweet Strawberry Shortcake Cheesecake Rolls aren't just another dessert — they're what happens when strawberry shortcake and cheesecake have a beautiful, swirl-y love child that actually works on the first try.
Picture this: tender, buttery dough wrapped around a cloud-like cheesecake filling, studded with ruby-red strawberries that burst with summer sweetness in every bite. The aroma that fills your kitchen? It's like someone bottled up a June farmers market and let it loose in your oven. That first bite gives you the crackle of golden pastry, the creamy tang of cheesecake, and the bright pop of fresh berries — all in perfect harmony. I dare you to taste this and not go back for seconds (spoiler: I've never seen anyone succeed at that challenge).
What makes these rolls absolutely irresistible is how they solve every problem that usually plagues strawberry desserts. No more soggy bottoms, no more strawberries sliding off into a sad puddle, no more waiting hours for layers to set. These beauties come together in under an hour, and they're designed to impress without stress. The secret? We're flipping the script on traditional assembly and rolling everything into individual portions that stay crisp, creamy, and fresh until the moment they hit your plate.
Stay with me here — this is worth it. I'm about to show you how to create bakery-worthy rolls that'll have your friends texting you for the recipe before they even finish chewing. The technique I'm sharing today is pure magic, and once you master it, you'll wonder how you ever made it any other way.
What Makes This Version Stand Out
Let me be brutally honest — most strawberry shortcake recipes get this completely wrong. They give you either dry, flavorless biscuits or soggy, sad cakes that collapse under the weight of their own ambition. These rolls? They're the game-changer you've been waiting for. Here's why this version will ruin all other strawberry desserts for you forever.
- Texture Revolution: Instead of the usual dense cake or crumbly biscuit, you get layers of flaky pastry that shatter like thin ice when you bite into them, revealing a creamy cheesecake center that's silkier than your favorite silk scarf. The contrast between crisp and creamy is so addictive, you'll find yourself making these weekly.
- Strawberry Distribution Magic: Traditional shortcake leaves you hunting for fruit like it's buried treasure. These rolls ensure every single bite contains perfectly distributed strawberry goodness, no geological excavation required. Each roll is a perfect spiral of fruit and cream.
- Make-Ahead Champion: Here's where most recipes fail miserably — they demand immediate serving or face certain textural doom. These rolls can be prepped, rolled, and frozen for up to three months. Pop them in the oven straight from frozen when unexpected guests arrive, and you'll look like a domestic superhero.
- Cheesecake Filling That Actually Works: I've tested countless cream cheese fillings that either leak out like molten lava or become rubbery disasters. This filling stays put, stays creamy, and develops the most gorgeous golden top as it bakes. It's cheesecake perfection wrapped in pastry perfection.
- Beginner-Friendly Technique: If you've ever struggled with finicky pastry or temperamental fillings, you're not alone — and I've got the fix. The rolling method I'm sharing eliminates all the usual pitfalls. No special equipment, no advanced techniques, no culinary school degree required.
- Flavor Bomb Strategy: Most strawberry desserts taste like sugar with a hint of red. These rolls actually taste like strawberries — real, honest, picked-this-morning strawberries. The secret lies in how we treat the berries before they hit the oven, concentrating their flavor without turning them into jam.
- Portion Control (Sort Of): Each roll is a perfect individual serving, which means no awkward cutting or fighting over the corner piece. Although I'll be honest — I ate half the batch before anyone else got to try it, so maybe portion control is more of a suggestion than a rule here.
- Year-Round Versatility: While peak strawberry season is obviously ideal, this recipe works with frozen berries, summer strawberries, or even those sad winter berries that usually taste like disappointment. The technique enhances whatever fruit you have access to.
Alright, let's break down exactly what goes into this masterpiece. The ingredient list is shorter than you think, but each component pulls serious weight in the flavor department.
Inside the Ingredient List
Great desserts start with understanding exactly why each ingredient matters. No mystery boxes here — I'm breaking down the role of every component so you know what happens if you skip, substitute, or get creative. Trust me, I've made all the mistakes so you don't have to.
The Flavor Base
All-purpose flour forms the backbone of our pastry, but not all flours behave equally. I'm picky about using a mid-protein flour (around 10-11%) because it gives us enough structure without turning our rolls into hockey pucks. Cake flour makes them too delicate, bread flour makes them tough — regular AP flour is the Goldilocks choice here. The flour's protein content determines how much gluten develops, and we want just enough to hold everything together without creating that unpleasant chewiness that ruins so many pastries.
Unsalted butter does double duty in these rolls. In the pastry, cold butter creates steam pockets as it melts, producing those coveted flaky layers. In the filling, softened butter helps create a silky texture that melts in your mouth rather than sitting heavy on your tongue. I always splurge on European-style butter with higher fat content (82% versus 80%) because the difference in flavor is immediately noticeable. Your taste buds will thank you, even if your wallet initially protests.
Cream cheese is obviously crucial for the cheesecake component, but here's what most recipes miss — the temperature matters more than the brand. Room temperature cream cheese blends smoothly without lumps, while cold cream cheese creates a curdled mess no matter how much you beat it. I leave mine on the counter for at least two hours before starting. If you're in a rush (been there), cube it and microwave on 50% power for 30-second bursts, stirring between each burst.
The Texture Crew
Heavy cream brings richness to both the pastry and the filling, but its fat content is what we're really after. Don't substitute half-and-half or milk here — you need the fat to create that luxurious mouthfeel that makes cheesecake so addictive. The cream also helps keep our pastry tender by shortening gluten strands. I use cream with at least 36% fat content, and I always check the expiration date because older cream can curdle when mixed with acidic ingredients.
Eggs provide structure and richness, but we're using them strategically here. One whole egg in the filling helps set the cheesecake component, while an egg wash on the outside creates that gorgeous golden-brown finish that makes these rolls look professional. I always use large eggs (not medium or extra-large) because baking is chemistry, and the liquid ratio matters. Room temperature eggs incorporate more easily and create better texture — plan ahead or submerge cold eggs in warm water for 10 minutes.
Powdered sugar in the filling creates smooth sweetness without the graininess that granulated sugar can leave behind. The cornstarch in powdered sugar also helps stabilize the filling, preventing it from weeping or separating during baking. I make my own by blitzing granulated sugar with cornstarch in a food processor when I run out — it's cheaper and you never have to worry about those hard lumps that form in old powdered sugar.
The Unexpected Star
Fresh strawberries seem obvious, but here's where most recipes go wrong — they add them raw. I quick-roast mine with a touch of sugar and lemon juice for ten minutes before rolling. This concentrates the flavor, removes excess moisture that would sog out our pastry, and creates that intense strawberry taste that makes people close their eyes in bliss. The berries maintain their shape but become flavor bombs that don't water down our filling.
Lemon zest might seem like an afterthought, but it's the secret weapon that makes everything taste brighter and more strawberry-like. Strawberries and lemon are best friends in the flavor world — the acid enhances the berry flavor while the citrus oils add complexity. I zest directly over the bowl to catch the essential oils that spray into the air. One lemon, one teaspoon of zest, infinite flavor enhancement.
The Final Flourish
Vanilla extract rounds out all the flavors and adds depth that makes these taste bakery-made rather than home-baked. I use real vanilla extract (not imitation) because the flavor compounds are more complex and don't fade during baking. For special occasions, I'll scrape a vanilla bean into the filling — those tiny black specks are like flavor confetti that tell everyone you mean business.
Coarse sugar on top creates a sparkly, crackly finish that adds textural interest and visual appeal. Regular granulated sugar melts and disappears, but coarse sugar (sometimes called sanding sugar or pearl sugar) maintains its shape and creates tiny sweet crunches throughout the top. It's purely optional but takes these from homemade to bakery-case gorgeous in seconds.
Everything's prepped? Good. Let's get into the real action...
The Method — Step by Step
Okay, ready for the game-changer? This method combines French pastry techniques with American convenience, giving you professional results without requiring a culinary degree or three days of your life. I've streamlined every step to eliminate the usual pitfalls while maximizing flavor development. Follow these steps exactly the first time — once you've nailed the technique, you can start experimenting.
- Make the quick strawberry concentrate: Preheat your oven to 400°F. Hull and quarter 2 cups of strawberries, toss them with 2 tablespoons of sugar and 1 teaspoon of lemon juice on a parchment-lined baking sheet. Roast for exactly 10 minutes — no more, no less. The berries should look slightly collapsed and glossy, with concentrated ruby-red juices pooling around them. This step removes excess moisture that would sog out your pastry while intensifying the strawberry flavor tenfold. Let them cool completely while you prepare everything else.
- Mix the foolproof pastry: In your chilled mixing bowl, whisk together 2 cups of flour, 2 tablespoons of sugar, and 1/2 teaspoon of salt. Cut 1 cup of very cold butter into small cubes and toss them into the flour mixture. Using a pastry cutter (or your fingertips if you're fast), cut the butter into the flour until you have pieces ranging from pea-sized to hazelnut-sized. This irregular cutting creates different layers of flakiness — the bigger pieces create steam pockets, the smaller ones tenderize the dough. Work quickly to keep everything cold.
- Add the cream and form the dough: Make a well in the center of your flour-butter mixture and pour in 1/2 cup of cold heavy cream plus 2 tablespoons of ice water. Using a fork, gently fluff the mixture just until it starts coming together in large, shaggy clumps. Resist the urge to overmix — those dry patches are your friends. Turn everything out onto a lightly floured counter and gently knead just 2-3 times to bring it together. The dough should look marbled with butter and feel slightly tacky but not sticky.
- Roll and fold for maximum flakiness: Roll the dough into a rough 12x8-inch rectangle. Fold it into thirds like a business letter, then rotate 90 degrees and roll again. Repeat this process 2 more times — these folds create those gorgeous, distinct layers that make professional pastries so irresistible. Wrap the dough in plastic wrap and refrigerate for at least 30 minutes. This resting period allows the gluten to relax and the butter to rechill, preventing shrinkage and ensuring maximum flakiness.
- Prepare the cheesecake filling: In a separate bowl, beat 8 ounces of room temperature cream cheese until completely smooth and creamy — about 2 minutes on medium speed. Add 1/4 cup powdered sugar, 1 egg yolk, 1 teaspoon vanilla extract, and 1 teaspoon lemon zest. Beat until light and fluffy, scraping down the bowl as needed. The mixture should be thick but spreadable, like slightly softened cream cheese frosting. If it's too thick, add cream a teaspoon at a time until it reaches spreading consistency.
- Assemble the rolls: Roll the chilled dough into a 14x10-inch rectangle, about 1/4-inch thick. Spread the cream cheese filling evenly over the dough, leaving a 1-inch border on all sides. Scatter the cooled roasted strawberries over the filling, pressing them gently into the cream cheese. Starting from the long edge, roll the dough into a tight log — but not too tight or the filling will squeeze out. Pinch the seam and ends to seal, then wrap in plastic wrap and chill for 15 minutes. This makes slicing much cleaner.
- Slice and arrange: Using a sharp serrated knife (or unflavored dental floss for zero squishing), slice the log into 12 equal pieces, about 1 inch thick. Place them cut-side up in a greased 9-inch round cake pan or on a parchment-lined baking sheet, spacing them about 1 inch apart. They'll spread and puff during baking, creating individual rolls that are connected but distinct. If any strawberries fall out during slicing, just tuck them back in — waste not, want not.
- Final touches before baking: Beat the remaining egg white with 1 tablespoon of water to make an egg wash. Brush this lightly over the exposed pastry parts (avoid the filling if possible — it will brown too quickly). Sprinkle generously with coarse sugar for that professional bakery sparkle. This is the moment of truth — everything should look gorgeous and tempting already, but the real magic happens in the oven.
- Bake to golden perfection: Bake at 400°F for 22-25 minutes, until the pastry is deep golden brown and the filling is set with just a slight jiggle in the center. The strawberry juices will bubble up and caramelize around the edges — this is exactly what you want. Don't walk away from the oven in the last 5 minutes — they can go from perfect to burnt in the blink of an eye. The smell? Absolute perfection, like someone opened a strawberry shortcake shop in your kitchen.
- Cool and serve: Let the rolls cool in the pan for 10 minutes — this allows the filling to set and prevents molten cheese burns (learn from my pain). They'll still be warm and gooey, but firm enough to remove from the pan. Serve them warm or at room temperature, dusted with powdered sugar if you're feeling fancy. These are best the day they're made, but leftovers reheat beautifully in a 350°F oven for 5-7 minutes.
That's it — you did it. But hold on, I've got a few more tricks that'll take this to another level...
Insider Tricks for Flawless Results
After making these rolls approximately 47 times (yes, I counted), I've discovered some game-changing techniques that separate good rolls from mind-blowing ones. These aren't in any cookbook — they're the hard-won secrets that come from slightly obsessive testing and one too many late-night baking sessions.
The Temperature Rule Nobody Follows
Here's the thing that drives me crazy about most recipes — they give you temperatures but don't explain why they matter. For these rolls, every ingredient needs to be at the right temp for maximum success. Your butter should be cold enough to hold its shape but not frozen solid (frozen butter tears through dough). Your cream cheese should be genuinely room temperature — not just slightly less cold. I leave mine out overnight, and the difference in texture is incredible. Even your eggs should be room temp for better incorporation. Cold eggs can seize up the cream cheese, creating lumps that no amount of mixing will fix.
Why Your Nose Knows Best
Don't trust the timer blindly — your nose is the most reliable doneness indicator for these rolls. When they're perfectly baked, your kitchen will smell like a strawberry shortcake factory with hints of caramelized sugar and toasted butter. If you still smell raw flour or uncooked dough, give them another 3-4 minutes. The moment you catch that perfect aroma, start checking for visual cues: deep golden brown pastry, bubbling strawberry juices, and set centers. A friend tried skipping this step once — let's just say it didn't end well for anyone involved (especially the rolls).
The 5-Minute Rest That Changes Everything
After baking, resist the urge to immediately dig in. I know, I know — warm strawberry cheesecake rolls are basically impossible to resist. But those 5 minutes of cooling time allow the filling to set properly, the pastry to finish crisping, and the flavors to meld. It's like letting a steak rest — everything redistributes and intensifies. Plus, you won't burn your tongue on molten strawberry lava, which trust me, is not the fun experience it sounds like. Use this time to make coffee, set the table, or just stand there inhaling the incredible aroma.
The Overnight Advantage
Here's where this recipe really shines — you can prep everything the night before, then bake fresh in the morning for an impressive breakfast or brunch. After slicing and arranging in your pan, cover tightly with plastic wrap and refrigerate overnight. The next morning, let them sit at room temperature while your oven preheats, then bake as directed. The overnight rest actually improves the flavor as the strawberry juices meld with the cream cheese, creating deeper, more complex tastes. It's like the difference between a quick chat and a long conversation — the results are infinitely richer.
The Freezer-Friendly Strategy
These rolls freeze beautifully at every stage. Freeze the unbaked rolls on a baking sheet, then transfer to a freezer bag for up to 3 months. Bake from frozen, adding 5-7 extra minutes to the cooking time. Or freeze already-baked rolls and reheat in a 350°F oven for 10-12 minutes until warmed through. I always make a double batch and freeze half — future me is constantly grateful for past me's foresight. Pro tip: flash-freeze individually on a baking sheet first, then you can grab exactly as many as you need without them sticking together.
The Presentation Secret
Want to make these look like they came from a fancy bakery? It's all in the finishing touches. Once cooled, dust with powdered sugar using a fine-mesh sieve for that professional snow-fall effect. Or make a simple glaze with powdered sugar and cream, drizzle it in a zigzag pattern, and watch people think you're secretly a pastry chef. The coarse sugar on top before baking gives that artisanal sparkle, but a light dusting of gold luster dust (available at baking supply stores) takes these into celebration territory.
Creative Twists and Variations
This recipe is a playground. Once you master the basic technique, you can switch up the flavors based on season, occasion, or whatever's lurking in your fridge. Here are some of my favorite ways to remix these rolls that'll keep you coming back to this recipe year after year.
Peaches and Cream Dream
Swap the strawberries for 2 cups of diced fresh peaches tossed with 1 tablespoon of brown sugar and 1/2 teaspoon of cinnamon. Add 1/4 teaspoon of almond extract to the cream cheese filling. The combination of peaches, cream cheese, and almond tastes like summer in the South, even if you're baking in December with frozen fruit. Top with a bourbon-caramel drizzle for an adults-only version that'll make you look like a culinary genius.
Chocolate Raspberry Decadence
Replace strawberries with raspberries and add 1/4 cup of mini chocolate chips to the filling. The tart raspberries balance perfectly with the sweet chocolate, creating a sophisticated flavor profile that tastes like you spent way more time on it than you did. Dust with cocoa powder and serve with chocolate sauce for the chocoholics in your life. I've made these for Valentine's Day three years running — they're relationship gold.
Apple Pie Meets Cheesecake
Use diced apples sautéed with butter, brown sugar, and cinnamon until just tender. Add a pinch of nutmeg to the cream cheese filling and swap the vanilla for bourbon. These taste like someone wrapped apple pie in cheesecake in pastry — it's basically all the best desserts in one handheld package. Serve warm with vanilla ice cream for a fall dessert that'll make you forget pumpkin exists.
Lemon Blueberry Bliss
Fresh blueberries tossed with lemon zest and a touch of honey create lighter, brighter rolls perfect for spring brunches. The blueberries burst during baking, creating little pockets of jammy fruit throughout the filling. Add extra lemon zest to the cream cheese and top with a lemon glaze made from powdered sugar and lemon juice. They're sunshine in pastry form.
Savory Brunch Version
Skip the sugar in the dough and filling, add herbs to the cream cheese (chives, dill, garlic powder), and use roasted vegetables like cherry tomatoes, zucchini, and bell peppers. These become savory pinwheels perfect for brunch or lunch boxes. They're like the sophisticated older cousin of the sweet version — equally addictive but in a completely different way.
Tropical Escape
Diced mango and pineapple with coconut extract in the filling transport you straight to the beach. Add shredded coconut to the top before baking and serve with a rum-coconut glaze. These taste like vacation and are particularly fantastic in winter when you need a reminder that warm weather exists somewhere in the world.
Storing and Bringing It Back to Life
Let me be real — these rarely last long enough to need storage in my house. But on the rare occasion when you have leftovers (or you're smart enough to make a double batch), proper storage makes all the difference between sad, soggy rolls and ones that taste almost as good as fresh-baked.
Fridge Storage
Cooled rolls keep in an airtight container in the refrigerator for up to 4 days. Line the container with paper towels to absorb excess moisture, and place another paper towel on top before sealing. The paper towel trick prevents condensation from making the pastry soggy — it's like giving your rolls their own personal dehumidifier. For best results, bring them to room temperature before reheating, or enjoy them cold if you're into that cheesecake-firm texture thing.
Freezer Friendly
These rolls freeze beautifully either baked or unbaked. For unbaked rolls, flash-freeze them on a baking sheet until solid, then transfer to freezer bags with parchment paper between layers. They'll keep for up to 3 months and can go straight from freezer to oven, adding 5-7 minutes to the baking time. For already-baked rolls, cool completely, wrap individually in plastic wrap, then freeze in bags. Reheat from frozen at 350°F for 10-12 minutes until warmed through. They'll taste almost as good as fresh — I'm not exaggerating when I say I always have a batch in my freezer for emergencies.
Best Reheating Method
The oven is your friend here — microwaves turn the pastry rubbery and sad. Reheat in a 350°F oven for 5-7 minutes (from the fridge) or 10-12 minutes (from frozen). Add a tiny splash of water to the baking sheet before reheating — it creates steam that revives the pastry without making it soggy. If you're in a rush, a toaster oven works too, but avoid the microwave at all costs unless you enjoy eating leather-textured pastry. For an extra special touch, brush with a little melted butter before reheating for that fresh-baked shine.