I was standing in my kitchen, surrounded by a mountain of flour, when the oven timer went off and the whole house smelled like burnt sugar and disappointment. I’d been trying to make a holiday cookie that would bring the whole family together, but the batch I pulled out looked more like a sad, soggy crumb than a festive treat. I stared at the cookie sheet, the dough sticking to my fingers, and I thought, “This is not the eggnog cookie I dreamed of.”
So I rolled up my sleeves, grabbed a fresh batch of butter, and decided to rewrite the recipe from scratch. I wanted a cookie that would melt in your mouth, leave a lingering warm spice, and carry that unmistakable eggnog flavor without the cloying sweetness that often plagues holiday cookies. I experimented with a precise ratio of butter to flour, a splash of spiced rum, and a generous dusting of nutmeg that would make your nose do a happy dance. The result? A cookie that’s buttery, slightly crisp on the edges, and utterly unforgettable.
This version stands out because it balances the classic eggnog taste with a modern texture that feels both nostalgic and fresh. I dared myself to add a small amount of eggnog to the dough—just enough to infuse flavor without turning the cookies into a soggy mess. The spiced rum adds a subtle depth that elevates the whole experience. The final result is a cookie that feels like a holiday hug, with a hint of cinnamon and allspice that lingers on your tongue.
I’ll be honest, I ate half the batch before anyone else got to try it. Most people think that eggnog cookies are just a variation of gingerbread, but this one has a distinct personality that sets it apart. Picture yourself pulling this out of the oven, the whole kitchen smelling incredible, the cookie sheet glinting with a golden sheen. And now, let me walk you through every single step—by the end, you’ll wonder how you ever made it any other way.
What Makes This Version Stand Out
- Flavor: The subtle infusion of eggnog and spiced rum creates a complex profile that feels like a holiday cocktail in cookie form.
- Texture: The cookies are crisp at the edges, chewy in the center, and have a buttery mouthfeel that melts in seconds.
- Sweetness: Brown sugar grounds the sweetness, preventing the eggnog from becoming overpowering.
- Ease: The recipe uses pantry staples and requires minimal prep time—perfect for a last‑minute holiday treat.
- Make‑ahead: The dough can be frozen for up to two weeks, and the frosting is ready to use whenever you need a quick finish.
- Presentation: Holiday sprinkles add a festive pop, and the frosting’s airy texture makes each cookie look like a tiny edible ornament.
- Versatility: The base can be adapted for vegan or gluten‑free versions with a few simple swaps.
- Impact: Guests rave about the unique flavor, making this the talk of every holiday gathering.
Alright, let's break down exactly what goes into this masterpiece...
Inside the Ingredient List
The Flavor Base
The heart of these cookies is the buttery dough that carries the eggnog flavor. Butter at room temperature creates a tender crumb and a glossy finish when baked. If you use cold butter, the cookies will spread less and stay thicker, but you’ll lose that silky melt‑in‑your‑mouth texture. For the best results, let the butter sit out until it’s soft enough to press between your fingers.
Brown sugar is the sweetener that balances the richness of the butter and the slight bitterness of nutmeg. It also contributes to the golden crust that forms as the cookies bake. If you prefer a lighter cookie, you can swap half the brown sugar for white sugar, but the caramel notes will be less pronounced.
Egg yolks are the binder that holds everything together and adds a silky, rich flavor. They also help the dough hold its shape, preventing it from becoming too crumbly. If you’re looking for a vegan version, you can replace the yolks with a tablespoon of unsweetened applesauce or a flaxseed “egg” mixed with water.
The Texture Crew
All‑purpose flour provides the structure that keeps the cookies from falling apart. The amount of flour is critical; too much will make them dry, too little will make them too soft. We use 3 cups, which is a standard measurement for a batch of about 24 cookies. If you’re working with a different flour, adjust the quantity by 1/4 cup per 1/2 cup of flour used.
Baking powder and salt are the leavening and flavor enhancers, respectively. Baking powder ensures a slight lift, while salt balances the sweetness and brings out the spices. A pinch of allspice adds depth without overpowering the main flavors. The combination of nutmeg and cinnamon creates a warm, aromatic profile that’s quintessentially holiday.
The Unexpected Star
Eggnog is the secret sauce that gives these cookies their signature flavor. Adding 1/4 cup of eggnog to the dough infuses the dough with a subtle, creamy vanilla note and a hint of nutmeg. If you’re worried about the dough becoming too wet, you can chill it for 30 minutes before rolling to help it firm up.
Spiced rum is the subtle kick that elevates the flavor profile. A tablespoon is enough to add depth without making the cookies taste like a cocktail. If you prefer a non‑alcoholic version, replace the rum with a tablespoon of vanilla extract or a splash of bourbon‑free vanilla syrup.
The Final Flourish
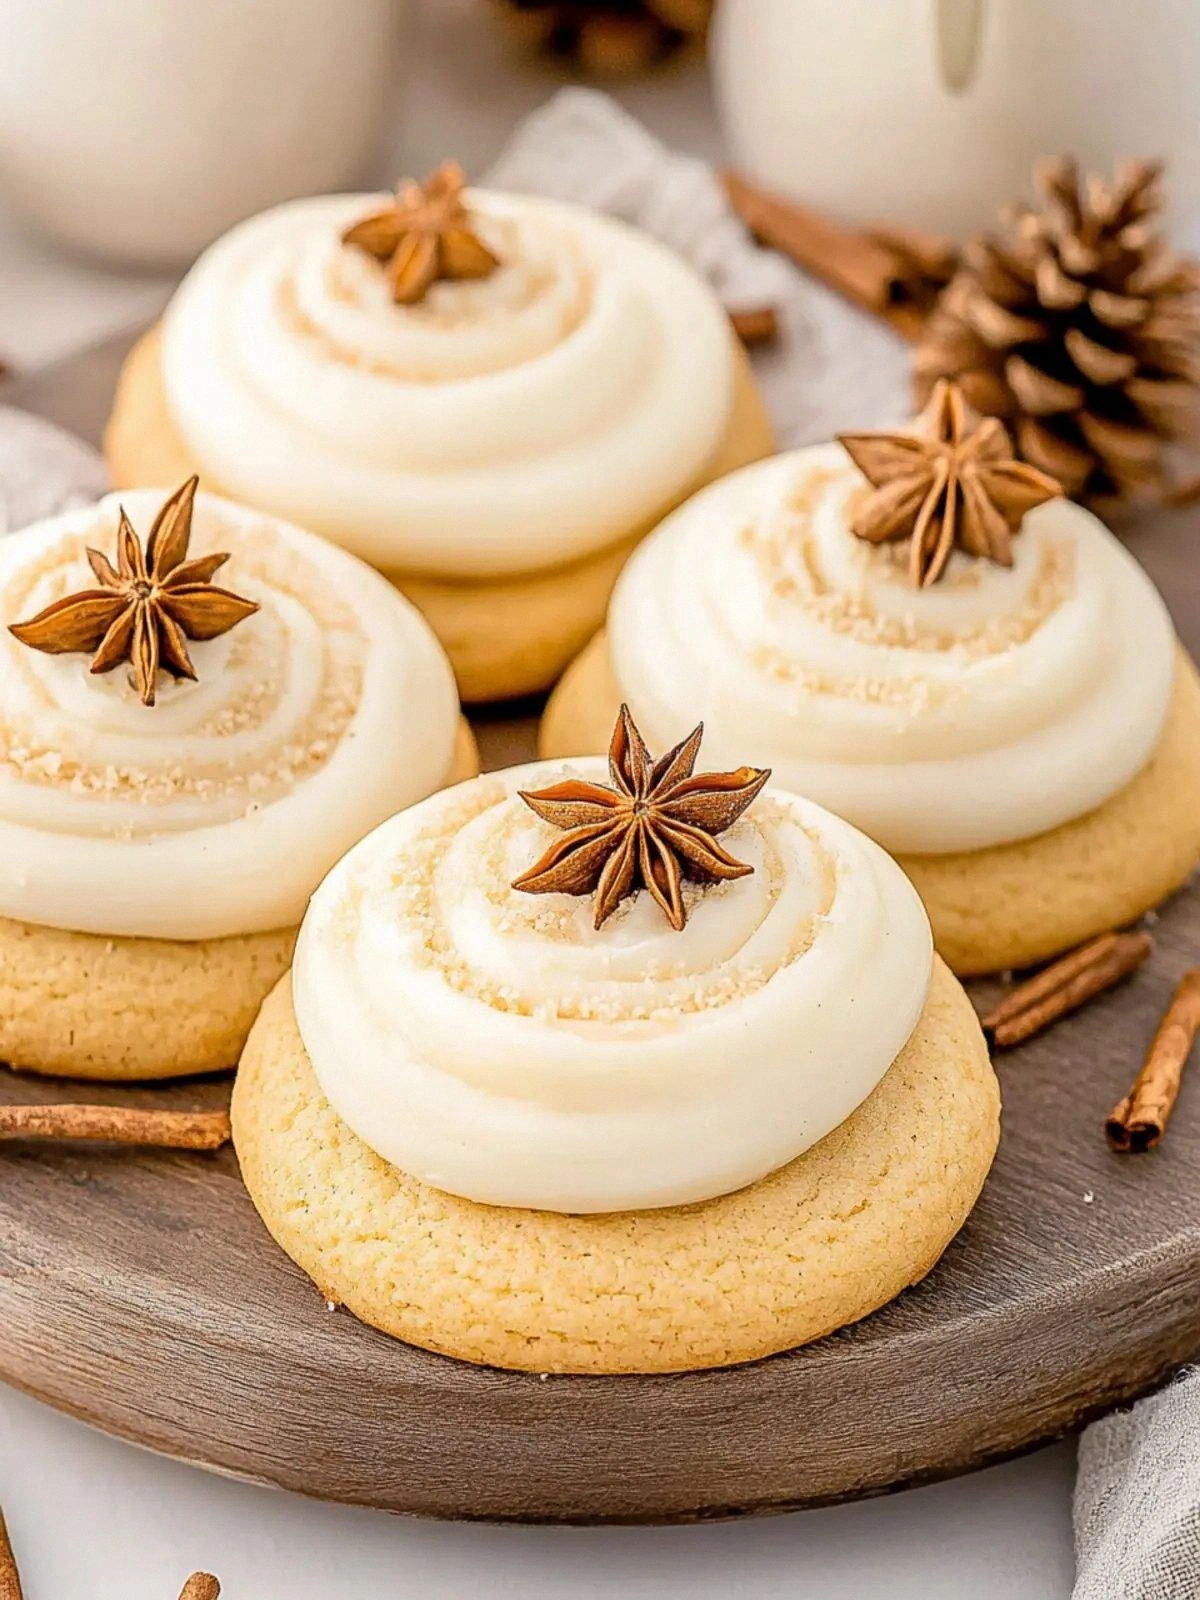
The frosting is what turns these cookies into edible ornaments. A combination of confectioner’s sugar, eggnog, and spiced rum creates a light, airy glaze that coats the cookies like a cloud. The frosting’s airy texture is achieved by whisking the mixture until it’s light and fluffy, similar to a meringue. A pinch of nutmeg and cinnamon in the frosting adds a final aromatic touch.
Holiday sprinkles are the finishing touch that gives the cookies a festive look. They’re not just decorative; they add a slight crunch and a pop of color that makes the cookies Instagram‑ready. If you’re allergic to certain dyes, simply use a natural food coloring or omit the sprinkles entirely.
Everything’s prepped? Good. Let’s get into the real action...
The Method — Step by Step
- Preheat your oven to 350°F (175°C). Line a baking sheet with parchment paper to prevent sticking. In a medium bowl, combine 2 1/2 sticks of softened butter with 1 cup of packed brown sugar. Cream them together until the mixture is light, fluffy, and slightly pale. This step is crucial for a tender crumb and a beautiful golden finish.
- Add the 4 large egg yolks one at a time, mixing well after each addition. The yolks will bind the dough and add richness. Stir in 1/4 cup of eggnog, letting the liquid integrate smoothly. The dough should feel slightly sticky but hold together when pressed. If it’s too wet, chill it for 15 minutes before rolling.
- Whisk 3 cups of all‑purpose flour, 1 teaspoon baking powder, 1/4 teaspoon salt, 1/2 teaspoon nutmeg, 1/2 teaspoon cinnamon, and a pinch of allspice in a separate bowl. Gradually add the dry mixture to the wet batter, mixing until just combined. Overmixing can lead to a tough cookie, so stop as soon as the flour is incorporated.
- Fold in 1 tablespoon of spiced rum. The rum adds depth and a subtle warmth. Once incorporated, transfer the dough onto a floured surface and roll it out to about 1/2 inch thickness. Use a cookie cutter to cut out shapes—classic round or festive stars work best for the holiday theme.
- Place the cut dough onto the prepared baking sheet, spacing them about 2 inches apart. Bake for 12–14 minutes, or until the edges are lightly golden and the centers still look slightly pale. The cookies should emit a warm, buttery aroma that makes everyone in the house smile.
- Remove from oven and let them cool on the sheet for 5 minutes before transferring to a wire rack. This short cooling period helps the cookies set, preventing them from becoming too soft. While they cool, you’ll start working on the frosting—this step will make the cookies sparkle.
- To make the frosting, whisk 6 tablespoons of softened butter with 2 1/4 cups confectioner’s sugar until smooth. Add 1 1/2 teaspoons spiced rum, 2 tablespoons eggnog, 1/4 teaspoon nutmeg, and a pinch of cinnamon. Beat the mixture until it’s light, airy, and fluffy—about 3 minutes with an electric mixer. If the frosting is too thick, add a teaspoon of milk to reach the desired consistency.
- Dip each cooled cookie into the frosting, ensuring the top is fully coated. Let the excess drip off, then sprinkle with holiday sprinkles. Place the frosted cookies on a parchment‑lined tray and refrigerate for 10 minutes to set the frosting. The result is a cookie that’s both beautiful and delicious.
That's it— you did it. But hold on, I've got a few more tricks that'll take this to another level...
Insider Tricks for Flawless Results
The Temperature Rule Nobody Follows
Many bakers think room temperature ingredients are enough, but the real secret is the exact oven temperature. Setting your oven to 350°F (175°C) ensures the cookies bake evenly. If your oven runs hot, lower the temperature by 25°F to avoid over‑browning. Conversely, a cooler oven will give you a longer baking time, but the cookies will be softer.
Why Your Nose Knows Best
Your nose is the best judge of doneness. As the cookies bake, the scent of toasted butter and cinnamon will fill the kitchen. If the aroma is sweet and buttery, the cookies are ready to come out. If it’s still raw, give them an extra minute or two.
The 5-Minute Rest That Changes Everything
Letting the cookies rest on the sheet for 5 minutes before transferring to a wire rack is a game‑changer. This rest period allows the cookies to set, making them less likely to crumble when you apply frosting. It also gives the butter in the dough a chance to firm up slightly, improving the final texture.
Frosting Consistency Matters
If your frosting is too thick, it will clump on the cookies and not spread. Whisk in a teaspoon of milk or a splash of eggnog until you reach a smooth, pourable consistency. A too‑thin frosting will run off and leave the cookies looking dull.
Sprinkle Timing
Apply holiday sprinkles while the frosting is still wet. This ensures they stick and create a bright, festive look. If you wait until the frosting sets, the sprinkles may fall off or leave a dull ring.
Storage Tip for Freshness
Store the finished cookies in an airtight container at room temperature. They’ll stay fresh for up to a week. If you need to keep them longer, freeze them for up to 3 months. When ready to eat, let them sit at room temperature for 10 minutes before serving.
Creative Twists and Variations
This recipe is a playground. Here are some of my favorite ways to switch things up:
Chocolate Eggnog Cookie
Add 1/2 cup of cocoa powder to the dry mix for a rich chocolatey twist. The cocoa pairs beautifully with the nutmeg, creating a decadent holiday treat. This variation is perfect for chocolate lovers and pairs well with a glass of eggnog.
Vegan Eggnog Cookie
Replace the butter with coconut oil and the egg yolks with a flaxseed “egg.” Use a vegan vanilla extract instead of rum. The result is a chewy, buttery cookie that’s completely plant‑based.
Gluten‑Free Eggnog Cookie
Swap the all‑purpose flour for a 1:1 gluten‑free blend. Add 1 teaspoon xanthan gum to maintain structure. The cookies will have a slightly different texture but still deliver the same festive flavor.
Nutty Eggnog Cookie
Stir in 1/2 cup of chopped pecans or walnuts before baking. The nuts add a delightful crunch and a nutty aroma that complements the spices. Sprinkle a few extra nuts on top for a crunchy finish.
Spiced Rum Cake Cookie
Increase the spiced rum to 2 tablespoons for a stronger kick. Add a pinch of sea salt to balance the sweetness. These cookies are great for a holiday party where guests enjoy a spirited treat.
Mini Eggnog Cookie Thumbprint
Roll the dough into small balls and press a thumbprint into each. Fill the indent with a dab of caramel or a small piece of dark chocolate. These bite‑size cookies are perfect for a cookie platter.
Storing and Bringing It Back to Life
Fridge Storage
Place the cookies in a single layer in an airtight container. They’ll stay fresh for up to 5 days. If you need them to stay crisp, add a slice of bread to absorb moisture. Replace the bread every 2 days.
Freezer Friendly
Pack the cookies in a freezer‑safe bag, separating them with parchment paper. Freeze for up to 3 months. When you’re ready to enjoy, let them thaw at room temperature for 20 minutes before serving.
Best Reheating Method
Reheat frozen or chilled cookies in a 350°F oven for 5 minutes. For a quick snack, microwave on low for 15 seconds. Add a tiny splash of water before reheating to steam back to perfection and restore moisture.