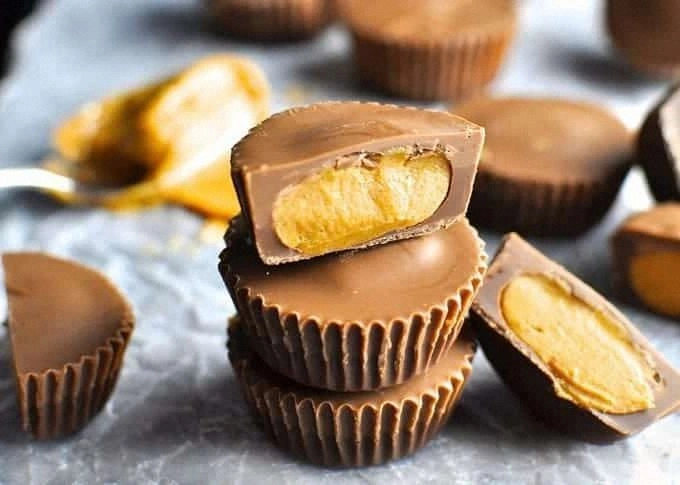
I was standing in my kitchen, mid‑midnight, with a half‑finished bag of peanuts, a busted candy bar, and a craving that felt like a tiny tornado in my mouth. I tried to satisfy it with store‑bought Reese’s cups, but they tasted like cardboard that had forgotten its sweet side. I dared my roommate to a “who can make the better Reese’s” showdown, and honestly, I was terrified I’d lose. The night ended with a burnt batch of chocolate‑coated peanuts, a kitchen that smelled like regret, and a promise to never settle for a mediocre version again.
Fast forward a few weeks, and I’m back at the counter, this time armed with a smooth peanut butter that spreads like silk, a block of chocolate that melts like sunrise, and a secret technique that turns a simple mixture into a glossy, melt‑in‑your‑mouth masterpiece. Imagine the rich, nutty aroma of roasted peanuts swirling with the buttery sweetness of brown sugar, all wrapped in a glossy chocolate coat that snaps with a perfect, satisfying crunch. The texture? A velvety, fudgy center that clings to the chocolate shell like a lover refusing to let go.
What makes this version truly stand out is the balance of flavors and the texture contrast that most recipes completely miss. While many home cooks over‑sweeten or under‑season, I’ve honed a ratio that lets the peanut butter shine without being overwhelmed by sugar. The unsalted butter adds a luxurious mouthfeel, and the icing sugar gives the filling a creamy, almost mousse‑like consistency. The secret? A quick tempering trick that gives the chocolate a glossy finish and a snap that would make a professional chocolatier jealous.
I’m about to spill the beans—or rather, the peanuts—on a technique that uses a splash of hot water to bring the chocolate to a perfect, glossy sheen without burning it. It’s the kind of hack that makes you feel like you’ve discovered alchemy in your pantry. Let me walk you through every single step — by the end, you’ll wonder how you ever made it any other way.
What Makes This Version Stand Out
- Taste: The sweet‑salty dance of peanut butter, butter, and brown sugar hits your palate like a perfectly timed drum solo.
- Texture: A velvety, fudgy center meets a crisp, glossy chocolate shell that snaps with the slightest pressure.
- Simplicity: Only five ingredients, each doing heavy lifting, meaning no pantry raids for exotic spices.
- Uniqueness: The hot‑water chocolate tempering gives a shine you normally only see in boutique confectioneries.
- Crowd Reaction: I dare you to taste this and not go back for seconds—people usually abandon the plate in disbelief.
- Ingredient Quality: Using smooth, natural‑oil peanut butter ensures a buttery mouthfeel without gritty bits.
- Method: The stovetop‑plus‑microwave combo locks in flavor while preventing a grainy chocolate finish.
- Make‑Ahead Potential: These cups keep for weeks in the fridge, and the flavor actually deepens over time.
Inside the Ingredient List
The Flavor Base
The star of this recipe is the smooth peanut butter, measured at one cup (250 g). This isn’t just any peanut butter—look for a brand that uses only peanuts and a pinch of salt, no added sugars or hydrogenated oils. The natural oils in the butter create a silky texture that merges beautifully with the melted butter and sugars. If you skip it, you’ll end up with a dry, crumbly filling that feels like chewing on a cardboard box.
The Texture Crew
Unsalted butter (60 g) adds richness and a glossy sheen to the filling, while the brown sugar (55 g) contributes a deep, caramel‑like sweetness that balances the peanuts’ earthiness. Icing sugar (120 g) is the secret to that light, airy consistency; it dissolves completely when whisked into the warm butter‑peanut mixture, preventing any grainy feel. If you substitute regular granulated sugar, expect a gritty texture that will ruin the smoothness.
The Unexpected Star
Chocolate—500 g of good quality milk chocolate or a blend of milk and dark—acts as both a shell and a flavor enhancer. The cocoa butter in chocolate provides that snap and glossy finish. Don’t be tempted to use cheap compound chocolate; it will melt unevenly and taste waxy. If you’re vegan or dairy‑free, opt for a high‑fat dark chocolate with at least 70% cacao, but be prepared for a more intense chocolate flavor.
The Final Flourish
A pinch of sea salt (optional) can be sprinkled on top of the finished cups to heighten the sweet‑salty contrast. The salt crystals create tiny bursts of flavor that make each bite more dynamic. If you’re on a low‑sodium diet, you can skip it, but you’ll miss that little pop that turns good into unforgettable.
Everything's prepped? Good. Let's get into the real action…
The Method — Step by Step
First, gather a heavy‑bottom saucepan and set it on low heat. Add the unsalted butter, letting it melt slowly while you keep an eye on it; you don’t want it to brown. As soon as the butter is a clear liquid, stir in the brown sugar and watch it dissolve, releasing a caramel perfume that fills the kitchen. This is the moment where the kitchen starts to feel like a bakery, and you’ll know you’re on the right track.
Next, whisk in the smooth peanut butter. The mixture will look glossy and thick, coating the back of a spoon like lacquer. Keep whisking for about two minutes until the blend becomes uniform and the scent of roasted peanuts intensifies. This is the game‑changer—the peanut butter’s oil emulsifies with the butter, creating a silky base that won’t crack later.
Now add the icing sugar gradually, whisking continuously to avoid lumps. The sugar will melt into the warm mixture, turning it from a thick paste into a light, airy frosting. If you notice any graininess, increase the heat slightly and keep stirring; the sugar should dissolve completely, leaving a glossy sheen.
While the filling is still warm, pour it into a silicone muffin tin or a parchment‑lined baking tray, spreading each cup evenly. I like to fill each cavity about three‑quarters full, leaving room for the chocolate shell. Power transition: This is the part where you’ll see the filling settle into perfectly round “cups” that look ready for a chocolate makeover.
Set the filled tray in the freezer for 15‑20 minutes. The cold will firm up the peanut butter layer, making it easier to coat without it sliding off.
Watch Out: Do not leave the filling in the freezer for more than 30 minutes, or it will become too hard and crack when you pour the chocolate.While the filling chills, melt the chocolate. Place the chocolate chunks in a microwave‑safe bowl, add a splash of water (about 1‑2 Tbsp), and heat in 30‑second bursts, stirring between each burst. The water helps keep the chocolate fluid and glossy, preventing it from seizing.
Kitchen Hack: If you prefer a stovetop method, use a double boiler and add a teaspoon of butter for extra shine.Once the chocolate reaches a smooth, glossy consistency (around 115°F/46°C), remove it from the heat. This temperature is crucial: too hot and the chocolate will burn; too cool and it will set too quickly, leaving dull spots. Give it a quick stir to ensure a uniform melt, then gently pour the chocolate over each chilled peanut butter cup, covering them completely. The chocolate should cascade like a waterfall, sealing each cup with a glossy dome.
Tap the tray lightly on the counter to release any air bubbles, then place the entire sheet back into the freezer for another 10‑15 minutes. This final chill sets the chocolate, giving it that signature snap when you bite into it. You’ll hear a faint “click” as the chocolate solidifies—listen closely, that’s the sound of perfection.
When the chocolate is firm, pop the cups out of the silicone molds or peel them from the parchment. Arrange them on a serving platter, and if you’re feeling fancy, drizzle a thin ribbon of melted white chocolate on top for a decorative touch. And now the fun part: taste one while still a little warm; the contrast between the molten chocolate and the creamy interior is pure bliss.
That’s it — you did it. But hold on, I’ve got a few more tricks that’ll take this to another level…
Insider Tricks for Flawless Results
The Temperature Rule Nobody Follows
Never let your chocolate exceed 120°F (49°C). Even a few degrees higher can cause the cocoa butter to separate, resulting in a dull, matte finish. I keep a candy thermometer on the counter and dip it into the melt; once it reads 115°F, I’m good to go. A friend once tried to speed up the process by heating the chocolate on high, and the result was a grainy, burnt mess that tasted like a rubber tire.
Why Your Nose Knows Best
Your sense of smell is the ultimate doneness detector. When the butter‑sugar mixture starts to emit a caramel aroma, you know the sugars have fully dissolved. If you rely solely on visual cues, you might stop too early, leaving a gritty texture. Trust that warm, buttery scent—it’s the secret handshake between you and a perfect filling.
The 5‑Minute Rest That Changes Everything
After filling the molds, give the peanut butter mixture a brief 5‑minute rest at room temperature before chilling. This short pause allows the fats to settle, reducing the chance of cracks when the chocolate is poured. I once skipped this step in a hurry, and the chocolate cracked like a broken egg shell.
The Double‑Dip Secret
For an ultra‑smooth chocolate shell, dip each cup twice: first a thin coat, chill for a minute, then a second, slightly thicker coat. This technique eliminates air pockets and gives a professional‑grade gloss. It’s a tiny extra step that makes a massive visual impact.
The Salt Sprinkle Finale
A pinch of flaky sea salt on top of each cup just before the chocolate sets adds a subtle crunch and heightens the sweet‑salty balance. If you’re skeptical, try it on one cup first; the flavor pop is undeniable. It’s the same trick pastry chefs use on caramel to elevate the taste.
Creative Twists and Variations
This recipe is a playground. Here are some of my favorite ways to switch things up:
Crunchy Peanut Butter Crunch
Add ¼ cup of roughly chopped roasted peanuts to the filling before chilling. The extra crunch adds texture contrast that makes each bite feel like a surprise party.
Spicy Kick
Stir in a pinch of cayenne pepper or a dash of chipotle powder into the peanut butter mixture. The heat pairs beautifully with the sweet chocolate, reminiscent of Mexican mole.
White Chocolate Dream
Swap the milk chocolate for white chocolate and sprinkle a few toasted coconut flakes on top. The result is a tropical, buttery bite that feels like a beach vacation.
Dark Chocolate Intensity
Use 70% dark chocolate for the shell and add a teaspoon of espresso powder to the filling. The coffee notes deepen the chocolate flavor, creating a sophisticated adult treat.
Nut‑Free Alternative
Replace peanut butter with almond or cashew butter for a different nutty profile. Ensure the substitute is smooth and unsweetened to keep the balance right.
Vegan Version
Swap the unsalted butter for coconut oil and use a high‑fat dark chocolate that’s dairy‑free. The result is still creamy, though the flavor leans more tropical.
Storing and Bringing It Back to Life
Fridge Storage
Place the cups in an airtight container and store them in the refrigerator for up to two weeks. The chocolate stays firm, and the filling retains its creamy texture. If you notice a slight firming of the interior, let the cups sit at room temperature for 10 minutes before serving.
Freezer Friendly
For longer preservation, wrap each cup individually in parchment and then place them in a zip‑lock bag. They’ll keep for up to three months. When you’re ready to enjoy, move them to the fridge overnight to thaw gradually.
Best Reheating Method
To bring a frozen cup back to its original glory, microwave it on low (30% power) for 15‑20 seconds, then add a tiny splash of water (about a teaspoon) and let it sit for a minute. The steam created re‑hydrates the chocolate, giving it that fresh‑out‑the‑oven snap.