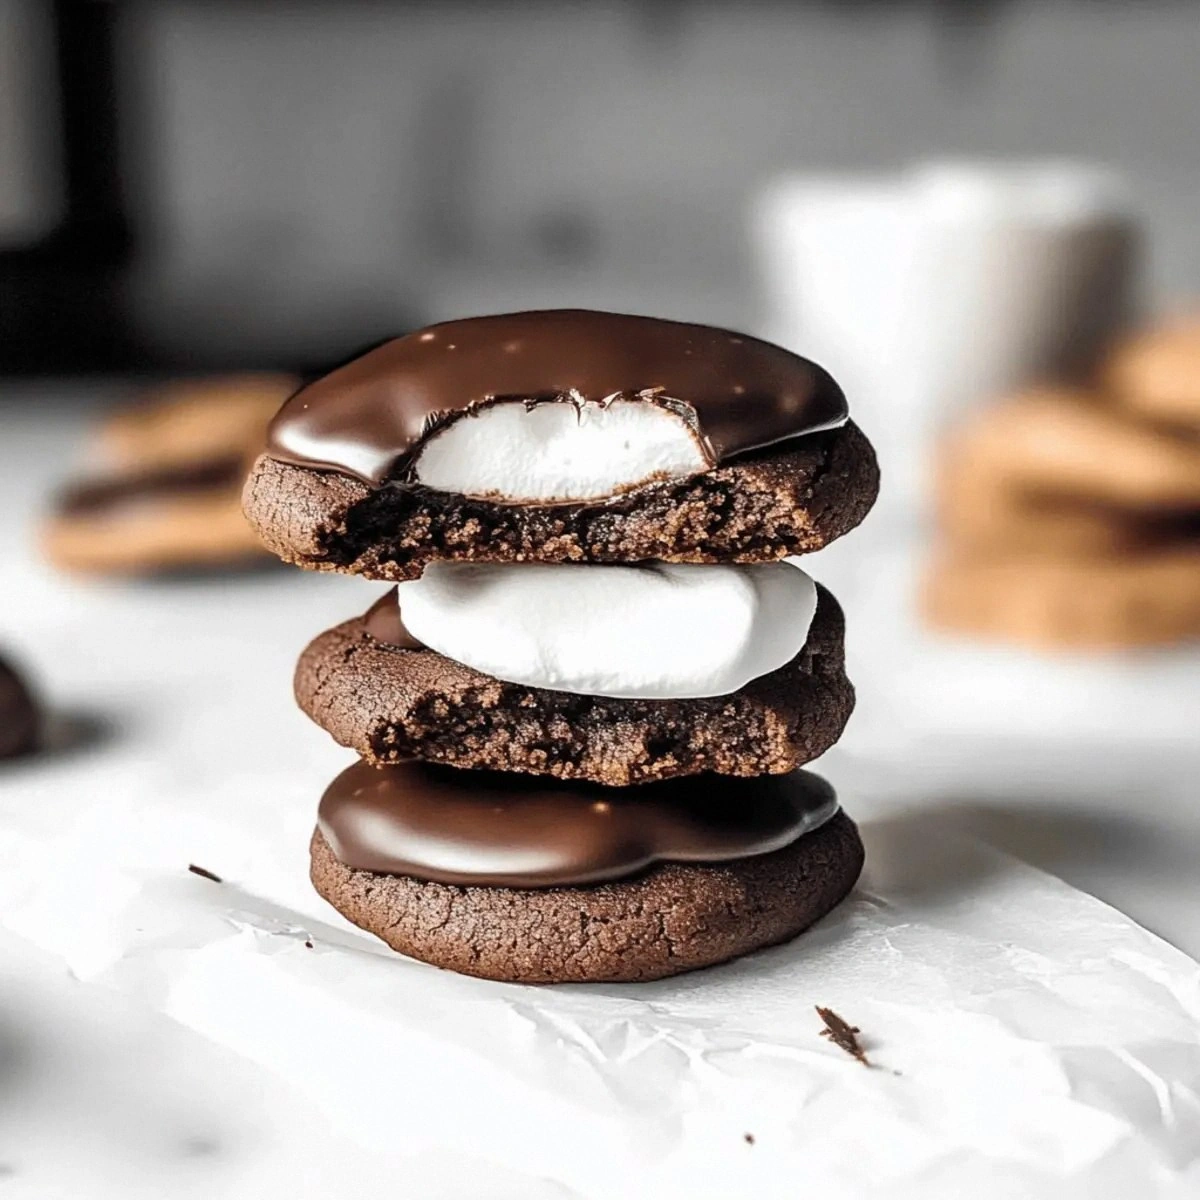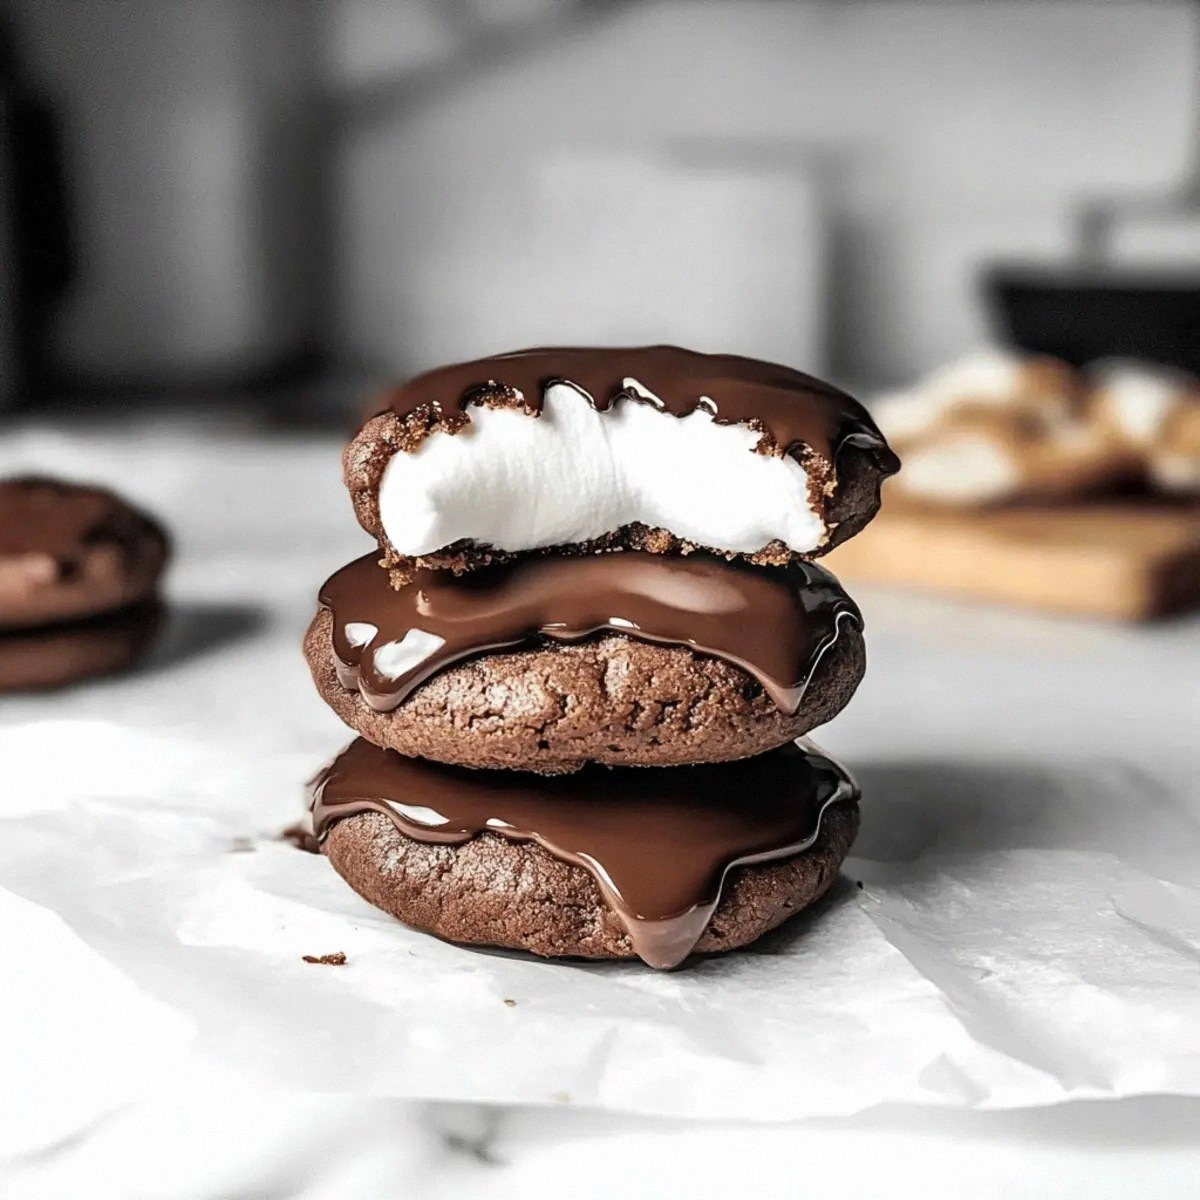
I was in the middle of a typical Tuesday night, staring at an empty pantry and a gnawing sweet tooth that refused to be ignored. I tried to settle for a boring bowl of cereal, but the craving was louder than a marching band, demanding something chocolatey, fluffy, and downright addictive. In a moment of reckless optimism I grabbed the last bag of dark chocolate chips, a tub of marshmallow fluff, and a half‑hearted promise to “just make something quick.” What came out of the oven was nothing short of a revelation – a cookie that feels like a bite‑sized cloud wrapped in a decadent chocolate blanket, and I swear I heard a tiny applause from the kitchen cabinets.
Picture this: the moment you open the oven, a warm, buttery aroma rolls out, instantly turning the whole house into a chocolate factory. The scent of cocoa mingles with the sweet perfume of toasted marshmallow, and you can almost hear the faint crackle of the edges as they begin to set. When you finally break a cookie in half, the interior is soft and gooey, the marshmallow fluff stretching like caramel, while the chocolate chips melt into silky ribbons that glisten in the light. The exterior? A delicate crisp that snaps with a satisfying “pop” that reminds you of fresh sugar cookies, only richer, deeper, and impossibly more comforting.
Most cookie recipes either over‑bake the center, leaving you with a dry, crumbly bite, or they drown the flavor in too much sugar, making the whole thing taste like a candy bar gone rogue. This version flips the script by balancing the bitterness of unsweetened cocoa with the mellow sweetness of marshmallow fluff, creating a harmony that sings on the palate. I’m daring you to taste this and not go back for seconds – it’s that good. And the secret? A simple technique that most home bakers skip: chilling the dough just long enough to let the butter firm up, which gives you those coveted crisp edges while keeping the middle ultra‑soft.
Let me walk you through every single step — by the end, you’ll wonder how you ever made cookies any other way. Okay, ready for the game‑changer? This next part? Pure magic. Stay with me here — this is worth it.
What Makes This Version Stand Out
- Flavor Fusion: The marriage of dark chocolate and marshmallow fluff creates a sweet‑bitter balance that dances on your tongue, never overwhelming you.
- Texture Contrast: Crispy, caramelized edges give way to a molten, marshmallow‑filled center that stretches like a perfect dessert dream.
- Simplicity: Only ten pantry staples are needed, and the method is straightforward enough for a beginner but satisfying for a seasoned baker.
- Unique Ingredient Play: Marshmallow fluff isn’t just a topping; it’s woven into the dough, turning each bite into a fluffy surprise.
- Crowd Reaction: These cookies have a proven track record of clearing plates in seconds, earning you the title of “Dessert Hero” at any gathering.
- Ingredient Quality: Using high‑quality unsweetened cocoa and real dark chocolate chips amplifies depth without added sugar.
- Cooking Method: A brief chill followed by a high‑heat bake locks in moisture while creating that coveted edge‑to‑center contrast.
- Make‑Ahead Potential: Store them in an airtight container and they stay soft for days; freeze for up to a month without losing flavor.
Inside the Ingredient List
The Flavor Base
All‑Purpose Flour forms the structural backbone, providing the necessary gluten network that holds the cookie together. Using a cup of flour that’s been sifted ensures a light, tender crumb and prevents those dreaded flour pockets. If you’re gluten‑intolerant, a 1‑to‑1 substitution with a blend of rice flour and tapioca starch works, but expect a slightly different texture.
Unsweetened Cocoa Powder is the dark horse here – its deep, earthy notes balance the sugary marshmallow fluff, preventing the cookie from becoming cloyingly sweet. Choose a Dutch‑process cocoa for a smoother, less acidic flavor, or a natural cocoa if you prefer a bit of brightness. Skipping cocoa altogether would turn this into a plain sugar‑marshmallow cookie, which is delicious but not the legendary experience we’re after.
The Texture Crew
Unsalted Butter, softened to room temperature, adds richness and creates that melt‑in‑your‑mouth mouthfeel. When butter is too hot, the cookies spread too much; too cold, and they stay dense. For a dairy‑free version, try equal parts coconut oil and a neutral oil, but expect a faint coconut hint.
Granulated Sugar and Light Brown Sugar work together to give both crispness and chew. The granulated sugar caramelizes, forming those golden edges, while the brown sugar adds moisture and a subtle molasses undertone. If you only have one type, you can substitute the missing half with the other, but the final texture will shift slightly.
Marshmallow Fluff is the star that turns this cookie into a cloud. It adds moisture, sweetness, and that stretchy pull you crave. In a pinch, you can replace it with a homemade marshmallow mixture (equal parts sugar, corn syrup, and gelatin), but the texture won’t be as airy.
The Unexpected Star
Dark Chocolate Chips bring bursts of intense chocolate that melt into glossy rivers as the cookies bake. Opt for chips with at least 60% cacao for the best flavor contrast. If you’re allergic to chocolate, chopped toasted nuts or dried cherries can provide a similar pop, though the flavor profile will shift dramatically.
The Final Flourish
Baking Powder and Salt are the silent conductors. Baking powder gives the cookies a subtle lift, preventing them from becoming flat, while a pinch of salt amplifies every other flavor, making the chocolate taste richer. Skipping the salt is a common mistake that leaves cookies tasting bland.
Everything's prepped? Good. Let's get into the real action...
The Method — Step by Step
Preheat your oven to 350°F (175°C) and line two baking sheets with parchment paper. While the oven warms, take a moment to appreciate the quiet hum of the heating elements – that’s the sound of anticipation building. Place the parchment on a flat surface and lightly dust it with flour; this prevents the dough from sticking later on.
Kitchen Hack: Keep a metal spatula handy to scrape the sides of the bowl; this ensures every crumb of butter and cocoa gets incorporated.In a large mixing bowl, whisk together the flour, unsweetened cocoa powder, baking powder, and salt until fully combined. The mixture should look uniformly dark with no streaks of flour. This dry blend is crucial; it distributes the leavening evenly, preventing any odd “puffy” spots in the final cookies.
In a separate bowl, cream the softened butter with both sugars using a handheld mixer on medium speed. Continue for about 3 minutes, until the mixture turns pale and fluffy, resembling a cloud that’s about to burst. The texture at this stage is the foundation for that melt‑in‑your‑mouth crumb.
Add the eggs one at a time, beating well after each addition, then stir in the vanilla extract. Watch the batter become glossy and slightly thicker – that’s the emulsification process at work, binding the fat and liquid together. If the mixture looks too thick, add a splash of milk (about a tablespoon) to loosen it, but be careful not to over‑liquefy.
Fold in the marshmallow fluff using a rubber spatula, gently turning it into the butter‑sugar mixture. This step is where the magic truly begins; the fluff should swirl in, creating ribbons of pinkish‑white against the brown dough. Do not over‑mix – you want pockets of fluff to stay intact for that gooey burst.
Watch Out: If the dough becomes too sticky after adding marshmallow fluff, chill it for 10 minutes; this prevents it from spreading excessively on the sheet.Gradually add the dry ingredient mixture to the wet ingredients, stirring just until combined. The dough will be thick, almost too stiff to stir, but that’s exactly what we want. Over‑mixing at this stage can develop gluten, leading to tough cookies.
Finally, fold in the dark chocolate chips, ensuring an even distribution. The chips should be speckled throughout, like tiny night‑sky constellations. If you prefer extra pockets of chocolate, reserve a handful and press them gently into the top of each cookie before baking.
Scoop the dough onto the prepared parchment using a cookie scoop (about 2 tablespoons per cookie) and space them 2 inches apart. Lightly press the tops with the back of a spoon to flatten just a touch – this encourages the edges to crisp while the centers stay soft.
Slide the trays into the preheated oven and bake for 12‑14 minutes. You’ll know they’re done when the edges turn a deep, golden‑brown and you can smell a faint toasty aroma. The centers will still look slightly under‑baked – that’s intentional; they’ll finish setting as they cool.
Kitchen Hack: Rotate the baking sheets halfway through the bake to ensure uniform browning.Remove the cookies from the oven and let them rest on the sheet for 3 minutes before transferring to a wire rack. This short rest allows the interior to set without losing the soft, marshmallowy core. As they cool, you’ll hear that subtle “snap” from the edges – that’s the sound of perfection.
That’s it — you did it. But hold on, I’ve got a few more tricks that’ll take this to another level…
Insider Tricks for Flawless Results
The Temperature Rule Nobody Follows
Always start with butter that’s just soft enough to leave an imprint when you press it with your fingertip. If it’s too warm, the cookies will spread thin and lose that coveted edge. If it’s too cold, they’ll stay dense and under‑baked in the middle. I keep a small bowl of ice water nearby to quickly chill butter if it gets too soft during mixing.
Why Your Nose Knows Best
The moment the cookies hit the oven, a subtle nutty aroma emerges from the cocoa. Trust that scent; when it shifts to a caramelized, slightly smoky note, the cookies are nearly done. Relying solely on a timer can lead to over‑baking, especially if your oven runs hot.
The 5‑Minute Rest That Changes Everything
After baking, let the cookies rest on the tray for exactly five minutes before moving them. This short pause lets steam redistribute, keeping the center soft while the edges firm up. Skipping this step results in a cookie that’s too crumbly on the bottom.
The Chill‑Before‑Bake Secret
I dare you to chill the dough for 15 minutes after mixing. The butter firms up, which means the cookies won’t spread as much, giving you those thick, chewy centers we all love. A friend once tried to skip this step and ended up with flat, cookie‑crisp sheets – not the texture we’re after.
The Double‑Layer Technique
For an extra‑gooey heart, place a teaspoon of marshmallow fluff on top of each dough ball before baking, then gently press the top cookie dough over it. The fluff melts into a molten core that oozes out when you bite in. This trick takes the cookie from great to legendary.
Creative Twists and Variations
This recipe is a playground. Here are some of my favorite ways to switch things up:
Nutty Crunch
Swap half of the chocolate chips for toasted chopped hazelnuts or almonds. The nuts add a satisfying crunch that contrasts with the soft marshmallow core, perfect for those who love texture.
Spicy Surprise
Add a pinch of cayenne pepper or a dash of chili powder to the dry ingredients. The subtle heat amplifies the chocolate’s depth, creating a sophisticated flavor that’s great for adult gatherings.
White Chocolate Dream
Replace dark chocolate chips with white chocolate chips and a teaspoon of orange zest. The citrus brightens the sweetness, turning the cookie into a festive treat for holidays.
Berry Burst
Fold in a half‑cup of dried cranberries or freeze‑dried raspberries. The tart berries cut through the richness, delivering a burst of flavor with each bite.
Vegan Velvet
Swap butter for coconut oil, use a flax‑egg mixture (1 tbsp ground flaxseed + 3 tbsp water per egg), and choose dairy‑free chocolate chips. The result is a plant‑based version that still delivers that melt‑in‑your‑mouth experience.
Storing and Bringing It Back to Life
Fridge Storage
Place cooled cookies in an airtight container with a slice of bread on top. The bread releases moisture, keeping the cookies soft for up to five days. If you notice any hardening, pop the container in the microwave for 10 seconds to revive the fluffiness.
Freezer Friendly
Layer cookies between parchment sheets and seal them in a zip‑top freezer bag. They’ll stay fresh for up to three months. When you’re ready to enjoy, let them thaw at room temperature for 15 minutes, then give them a quick 30‑second blast in a 350°F oven to re‑crisp the edges.
Best Reheating Method
Add a tiny splash of water (about a teaspoon) to the plate before microwaving for 15 seconds. The steam revives the marshmallow interior while the outer crust stays pleasantly crisp. This trick works wonders for cookies that have been sitting out for a day.