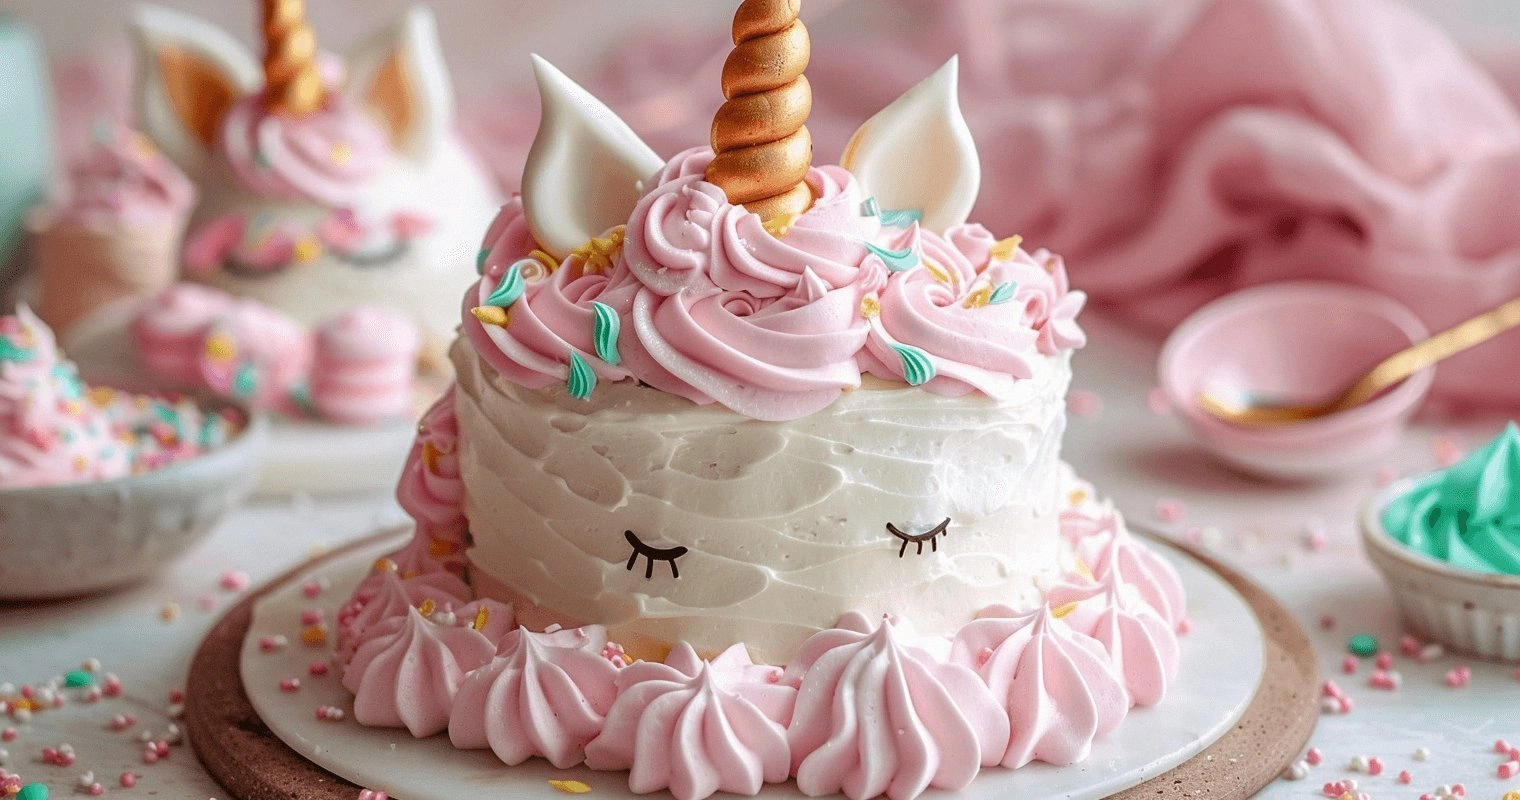
I still remember the day my niece looked up at me with those big hopeful eyes and asked if I could make a unicorn cake for her birthday. Not just any unicorn cake, mind you — she wanted one that looked like it had pranced straight out of a fairytale and tasted like pure magic. I laughed it off at first, thinking I'd just whip up a simple vanilla cake with some food coloring and call it a day. But then she added, "And Auntie, can it taste like rainbows?" Challenge accepted. What followed was three weeks of kitchen experiments that left my counters looking like a glitter bomb exploded and my stand mixer begging for mercy.
The first attempt was a disaster — I over-mixed the batter trying to swirl in too many colors, creating a muddy purple mess that looked more like a bruise than a rainbow. The second try collapsed in the middle because I got impatient and opened the oven door too early. By attempt number five, my neighbors were starting to avoid eye contact, probably wondering why I kept bringing them failed cake experiments. But then something magical happened. I discovered that the secret wasn't just in the colors or the decorations — it was in creating layers of flavor that actually tasted as enchanting as they looked. The final result made my niece gasp, then giggle, then refuse to let anyone cut it for a full twenty minutes because it was "too pretty to eat."
Here's the thing about most unicorn cake recipes floating around the internet — they're all show and no substance. Sure, they look Instagram-worthy, but they taste like someone dumped a bottle of vanilla extract into a sugar factory and called it a day. This version? This is the unicorn cake that actually tastes like your childhood dreams. We're talking about tender vanilla cake layers that melt on your tongue like cotton candy clouds, buttercream so light it could float away, and yes — actual flavor layers that surprise you with every bite. The secret is in the technique of creating distinct flavor zones that complement each other, rather than just relying on food coloring to do all the heavy lifting.
Picture yourself pulling this cake out of the oven, the whole kitchen smelling like a vanilla bean had a party with a stick of butter and invited all their friends. The colors swirl together like an artist's palette, but each section maintains its own personality. When you slice into it, people won't just see a rainbow — they'll taste it. Trust me when I say this is hands down the best version you'll ever make at home. Let me walk you through every single step — by the end, you'll wonder how you ever made it any other way.
What Makes This Version Stand Out
Flavor Explosion: Unlike those sad, overly sweet versions that taste like pure sugar, this cake features distinct flavor layers — strawberry, orange, lemon, lime, blueberry, and grape — that actually complement each other instead of creating a confusing mess. Each bite is like tasting a different color of the rainbow, but in the best possible way.
Texture Perfection: The crumb is so tender and moist, it practically dissolves on your tongue. We're using a combination of cake flour and a special mixing technique that creates air pockets so tiny, they make the cake feel like you're biting into a cloud made of sugar and dreams.
Color That Stays Vibrant: Most recipes end up with muted, sad colors after baking. Not here. We're using a specific ratio of gel food coloring to batter that keeps the hues bright and magical, even after a full bake in the oven.
Foolproof Assembly: The decorating technique looks impossibly complex, but it's actually just a series of simple steps that anyone can master. No special tools required — just a few piping bags and the patience of a saint (or at least someone who's had their morning coffee).
Make-Ahead Magic: Every component can be prepped ahead, making this the perfect party cake. Bake the layers on Monday, make the buttercream on Tuesday, and assemble on Wednesday — it'll still taste like you spent all day in the kitchen.
Crowd Reaction Guarantee: I've made this cake for birthday parties, office celebrations, and random Tuesday afternoons when I needed cheering up. The reaction is always the same: gasps, squeals, and people taking photos before they even taste it. But the real magic happens when they take that first bite and their eyes go wide with surprise at how good it actually tastes.
Inside the Ingredient List
The Flavor Foundation
Cake flour is the unsung hero here — its lower protein content creates that tender, fine crumb that makes people close their eyes when they take a bite. Regular all-purpose flour will give you a denser cake, more like pound cake than the ethereal texture we're after. If you absolutely must substitute, use all-purpose flour but replace two tablespoons per cup with cornstarch, though honestly, just buy the cake flour — your future self will thank you when you're basking in compliments.
European-style butter with its higher fat content makes all the difference in both the cake and the buttercream. It creates a richness that coats your tongue like liquid gold, but without the greasy aftertaste that cheap butter leaves behind. Yes, it costs more, but this cake is a celebration — and celebrations deserve the good stuff. Skip the butter flavored with "natural flavors" and go for the real deal, preferably from grass-fed cows if you can find it.
Vanilla paste is where we start building our flavor pyramid. Extract works in a pinch, but the paste contains those gorgeous little vanilla bean flecks that make people think you've been secretly stashing vanilla beans in your pantry like some kind of baking dragon hoarding treasure. The aroma alone will have your neighbors wandering over to investigate what smells so incredible. Don't you dare use artificial vanilla here — this cake deserves better than that sad imposter.
The Color Crew
Gel food coloring is absolutely essential for this recipe — liquid food coloring will throw off the liquid ratios and leave you with sad, washed-out colors. The gel concentrates are like little pots of pure magic, and a tiny amount goes a long way. I've had the same set of gel colors for three years because you literally need the tiniest amount on a toothpick to achieve vibrant results. Americolor and Chefmaster are my go-to brands, but Wilton's gel colors work well too if that's what's available.
Each color gets its own flavor profile — we're not just making a rainbow, we're making a flavored rainbow. Strawberry extract for the pink layer, orange oil for the orange, lemon zest for yellow, lime oil for green, blueberry extract for blue, and grape extract for purple. These aren't overwhelming flavors, just enough to make each bite interesting and prove that this isn't just another pretty face in the cake world.
White vinegar might seem like an odd addition, but it's the secret weapon that keeps our colors bright and prevents them from browning during baking. Just a tiny splash in each colored batter neutralizes the alkalinity that would otherwise muddy our beautiful hues. Don't worry — you won't taste it at all, but your colors will stay as vibrant as a unicorn's mane in a Lisa Frank sticker book.
The Unexpected Star
Corn syrup in the buttercream might make purists clutch their pearls, but it's what gives us that impossibly smooth, almost porcelain-like finish that makes the unicorn decorations look professionally done. It prevents crystallization and creates a stability that regular buttercream dreams about. If you're really against corn syrup, you can substitute with honey, but the flavor will be more pronounced and the finish slightly less smooth.
Cream of tartar is another stabilizing agent that helps our meringue-based buttercream hold its shape, even on warm days when regular buttercream would start sliding off the cake like a sugary avalanche. It also helps create that slight tang that balances all the sweetness, making people wonder what your secret ingredient is. Pro tip: buy it in bulk at warehouse stores — you'll use more than you think once you discover its magic.
The Final Flourish
Edible gold stars are optional but highly recommended for that extra touch of whimsy. They catch the light like tiny disco balls and make everyone feel like they're celebrating something special, even if it's just a random Tuesday. Look for ones that are actually labeled as edible, not just decorative — some craft store varieties contain metals that aren't food-safe. Wilton makes reliable ones, or check specialty baking supply stores online.
Pearl dust gives our unicorn horn that magical shimmer that makes people ask if you hired a professional. It's just luster dust mixed with a bit of vanilla extract, but the effect is pure alchemy. A little goes a long way — you're going for ethereal shimmer, not disco ball. Though honestly, if you want to go full disco unicorn, who am I to stop you?
The Method — Step by Step
- Start by preheating your oven to 350°F (175°C) and preparing six 6-inch round cake pans. If you don't have six pans (because who does?), you can bake in batches, but make sure to keep the batter covered in the fridge while it waits its turn. Line the bottoms with parchment paper rounds and grease the sides with butter, then dust with flour, tapping out the excess. This extra step prevents our colorful layers from sticking and tearing, which would be heartbreaking after all the work we're about to put in. Trust me, I once had to remake an entire layer because I got lazy with the parchment paper.
- Make the vanilla base batter by creaming together the butter and sugar until it's pale and fluffy, about 5 minutes on medium speed. This isn't the time to rush — properly creamed butter creates air pockets that give us that tender crumb. Add the eggs one at a time, beating well after each addition, then mix in the vanilla paste. The mixture should look like pale yellow clouds at this point, and you'll be tempted to eat it with a spoon. Resist, or you'll be short one layer and explaining to children why the unicorn only has five colors instead of six.
- Whisk together the dry ingredients in a separate bowl — cake flour, baking powder, and salt. Combine the milk and sour cream in a measuring cup. Now here's where we get fancy: add the dry ingredients to the butter mixture in three additions, alternating with the milk mixture in two additions, beginning and ending with the dry ingredients. Mix just until combined — over-mixing here will give you tough, sad cake that no amount of frosting can fix. The batter should be smooth and glossy, like liquid silk.
- Divide the batter equally among six bowls — about 1 cup per bowl if you're being precise, but I usually just eyeball it. Now comes the fun part where you get to play artist. To each bowl, add the appropriate extract or zest for its flavor profile, plus a tiny splash of white vinegar. Start with just a toothpick's worth of gel coloring, mix thoroughly, and add more until you achieve the vibrancy you want. Remember, the colors will fade slightly during baking, so go a shade darker than you think you need.
- Spread each colored batter into its prepared pan and smooth the tops with an offset spatula. The batter should be thick enough to hold its shape but still spread easily — if it's too thin, your colors will blend together and you'll end up with a muddy mess. Give each pan a gentle tap on the counter to release any air bubbles that might create craters in your perfect layers. This is also when you discover if your oven is level, because rainbow layers that slope to one side just look sad.
- Bake for 18-20 minutes, or until the edges start pulling away from the sides of the pans and a toothpick inserted in the center comes out clean. Resist the urge to open the oven door for the first 15 minutes — that's when the magic happens and our layers rise to their full potential. When they're done, the layers should spring back lightly when touched and smell like vanilla clouds. Let them cool in the pans for 10 minutes before turning out onto wire racks to cool completely.
- While the cakes cool, make the buttercream by beating the egg whites and cream of tartar until foamy, then gradually adding the sugar until you get stiff, glossy peaks. This meringue base is what gives our buttercream its stability and lightness — it's like building a foundation out of sweet, sweet clouds. Add the butter bit by bit, beating well after each addition. The mixture might look curdled at some point, but keep beating and it will come together into silky smooth perfection.
- Divide the buttercream and tint portions to match your cake layers, reserving about 2 cups white for the outside. Here's where your inner artist gets to shine — pipe rosettes, swirls, or simple dollops between each layer, building up your rainbow from purple on the bottom to pink on top. The key is keeping the layers level as you stack, so take your time and use a cake turntable if you have one. Don't worry if it's not perfect — the outside frosting will hide any minor imperfections, and slightly wonky cakes taste better anyway.
Insider Tricks for Flawless Results
The Temperature Rule Nobody Follows
Room temperature ingredients aren't just a suggestion — they're the difference between a cake that rises like a dream and one that sits in the pan like a sad, dense frisbee. Take your eggs, butter, milk, and sour cream out of the fridge at least an hour before you start baking. Cold butter won't cream properly, cold eggs can cause your batter to curdle, and cold dairy creates lumps that no amount of mixing can fix. If you're impatient (and I usually am), you can speed up the process by placing eggs in warm water for 10 minutes and cutting butter into small cubes to help it warm faster.
Why Your Nose Knows Best
Don't just rely on timers — your nose is actually one of the best tools for determining when cake layers are done. When they're perfectly baked, your kitchen will smell like vanilla clouds with a hint of whatever flavor layer you're baking. If you start smelling something toasty or caramelized, you're about 30 seconds away from over-baked edges that will ruin the soft, tender texture we're after. I always set my timer for 2 minutes less than the minimum time and start checking then — every oven is different, and guessing games with cake layers never end well.
The 5-Minute Rest That Changes Everything
After you add the final layer of buttercream, walk away for five minutes. Seriously. Put down the piping bag, step back, and let the cake settle. This brief rest allows everything to meld together and prevents the frosting from sliding off when you start the final decorations. During this time, you can clean up the inevitable mess you've made, or better yet, lick the frosting bowl clean like the responsible adult you are. When you come back, the cake will be ready for its final decorating flourish, and you'll have a clearer vision of how you want the finished product to look.
The Secret to Sharp Edges
Professional-looking cakes have one thing in common: crisp, clean edges that look like they were carved from marble. The secret isn't expensive tools — it's a bench scraper and hot water. Dip your bench scraper in hot water, wipe it dry, then hold it vertically against the side of the cake while spinning your turntable. The heat slightly melts the buttercream, creating impossibly smooth sides. Don't press too hard or you'll scrape off all your frosting, revealing the cake layers beneath like some kind of geological formation.
Storage That Saves Sanity
If you're not serving the cake immediately, store it in the fridge uncovered for the first hour — this sets the frosting and prevents it from picking up any weird fridge odors. After that, cover it loosely with plastic wrap, making sure it doesn't touch the decorations. The cake will actually taste better after sitting overnight, as the flavors have time to meld together into something truly magical. Just remember to take it out of the fridge 30 minutes before serving — cold buttercream is like eating sweetened butter, and nobody wants that.
Creative Twists and Variations
Galaxy Unicorn Cake
Swap the bright rainbow colors for deep purples, midnight blues, and shimmering silvers to create a unicorn that lives among the stars. Use blackberry extract for the purple layers, blueberry for blue, and add edible silver stars throughout. The outside can be frosted in black buttercream with silver luster dust brushed on to create a galaxy effect. Kids who prefer cool tones over bright pastels go absolutely wild for this version, and it photographs beautifully in low light.
Chocolate Lover's Unicorn
For the chocoholic in your life, replace one cup of flour with cocoa powder and use chocolate extract in place of vanilla. Keep the bright colors for the inside layers but frost the outside with chocolate buttercream. Pipe white chocolate unicorn features and use gold leaf for the horn. The contrast between the colorful interior and chocolate exterior creates a reveal that's almost as exciting as the flavor combination. It's like a party inside a chocolate factory.
Mini Unicorn Cupcakes
Transform this recipe into individual unicorn cupcakes by dividing the colored batters into mini muffin tins. Reduce baking time to 12-15 minutes and create tiny unicorn faces using marshmallows cut in half for the snouts, with piped buttercream manes. These are perfect for school parties where you need individual portions, and kids love having their own personal unicorn. Plus, you can make the horn out of a single candy melt rolled into a cone shape.
Sugar-Free Unicorn
Use Swerve or erythritol in place of sugar for a diabetes-friendly version that still tastes magical. The colors won't be quite as vibrant, but kids with dietary restrictions deserve unicorns too. Add extra vanilla and a touch of almond extract to compensate for the different sweetener flavor. The buttercream works beautifully with powdered erythritol, though you'll want to add it gradually as it can have a cooling effect if you use too much.
Winter Wonderland Unicorn
Create a white-on-white unicorn with pearl dust and edible snowflake decorations. Use clear vanilla flavoring and white food coloring to keep everything pristine. The inside can be subtle pastel layers — think blush pink, pale blue, and mint green. Add peppermint extract to the buttercream for a winter fresh flavor that makes this perfect for holiday parties. Top with isomalt icicles for an extra magical touch that looks like Elsa commissioned a unicorn cake.
Breakfast Unicorn Pancake Cake
For a fun brunch twist, turn this into a giant pancake cake by making thin layers of rainbow pancakes stacked with maple buttercream. Use pancake batter tinted with the same colors, cooked in 6-inch pans. The maple buttercream is absolutely divine, and you can top it with candied bacon for the horn. It's the kind of over-the-top breakfast that makes people question your sanity but ask for the recipe anyway.
Storing and Bringing It Back to Life
Fridge Storage
Store your finished unicorn cake in the refrigerator for up to 5 days, though I dare you to make it last that long. The key is proper wrapping — first, chill the cake uncovered for an hour to set the decorations, then wrap loosely in plastic wrap, making sure it doesn't touch any of the unicorn features. Place the wrapped cake in a cardboard box (the one from a liquor store works perfectly) to protect it from getting bumped around by hungry family members. The buttercream will harden in the fridge, so always let it sit at room temperature for 30 minutes before serving to return to its silky smooth texture.
Freezer Friendly
This cake freezes beautifully for up to 2 months if you follow the right steps. First, freeze the cake uncovered for 2 hours until solid, then wrap tightly in plastic wrap followed by aluminum foil. Label it with the date and contents — future you will thank present you when you're digging through the freezer at midnight looking for something magical. When ready to serve, thaw overnight in the refrigerator, then let it come to room temperature for an hour before unveiling. The colors might be slightly less vibrant after freezing, but the taste will be just as enchanting as day one.
Best Reheating Method
While you generally don't reheat cake, you can refresh slightly stale slices with a 10-second zap in the microwave. Place a slice on a microwave-safe plate with a tiny cup of water next to it — the steam will help rehydrate the cake without making it rubbery. For the full experience, add a fresh dollop of buttercream and a sprinkle of decorations to make it feel special again. If the cake has been refrigerated, the microwave method works even better, bringing it back to that just-baked state that makes people wonder if you secretly baked a fresh cake.