I was standing in my tiny kitchen, the kind of place where the oven door squeaks like an old hinge and the countertops have seen more spilled coffee than a downtown café. I had promised my roommate a “quick snack” after a marathon of Zoom meetings, but the only thing I could find in the pantry was a half‑eaten loaf of brioche and two cans of tuna that had been lurking behind the cereal boxes for weeks. I tossed those cans into a bowl, slapped a few spices together, and—boom—an accidental masterpiece that made the whole apartment smell like a seaside bistro. I dared my roommate to try one and not come back for seconds, and she actually did a double‑take. That moment sparked the fire for what I now call the ultimate Mini Triple‑Decker Tuna Melt.
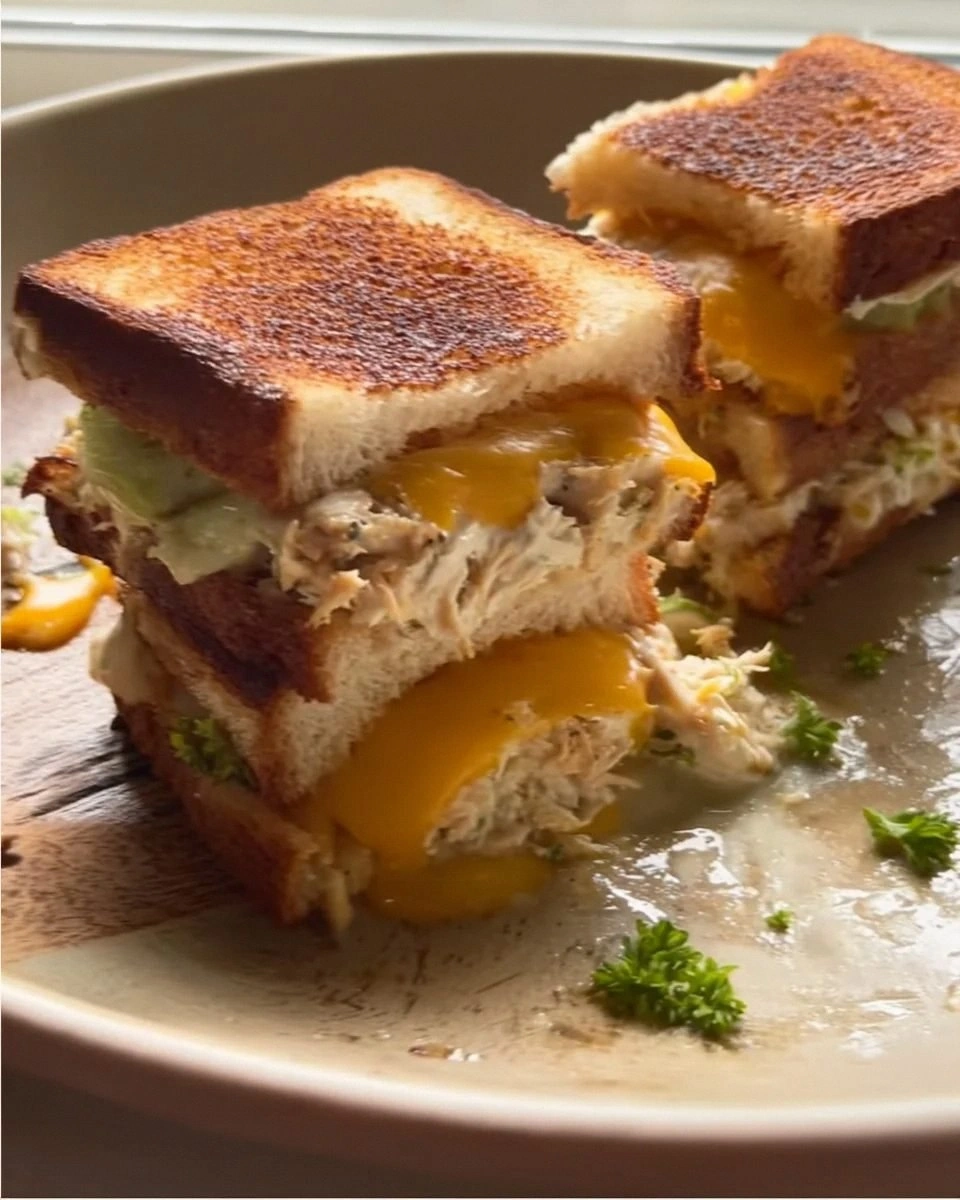
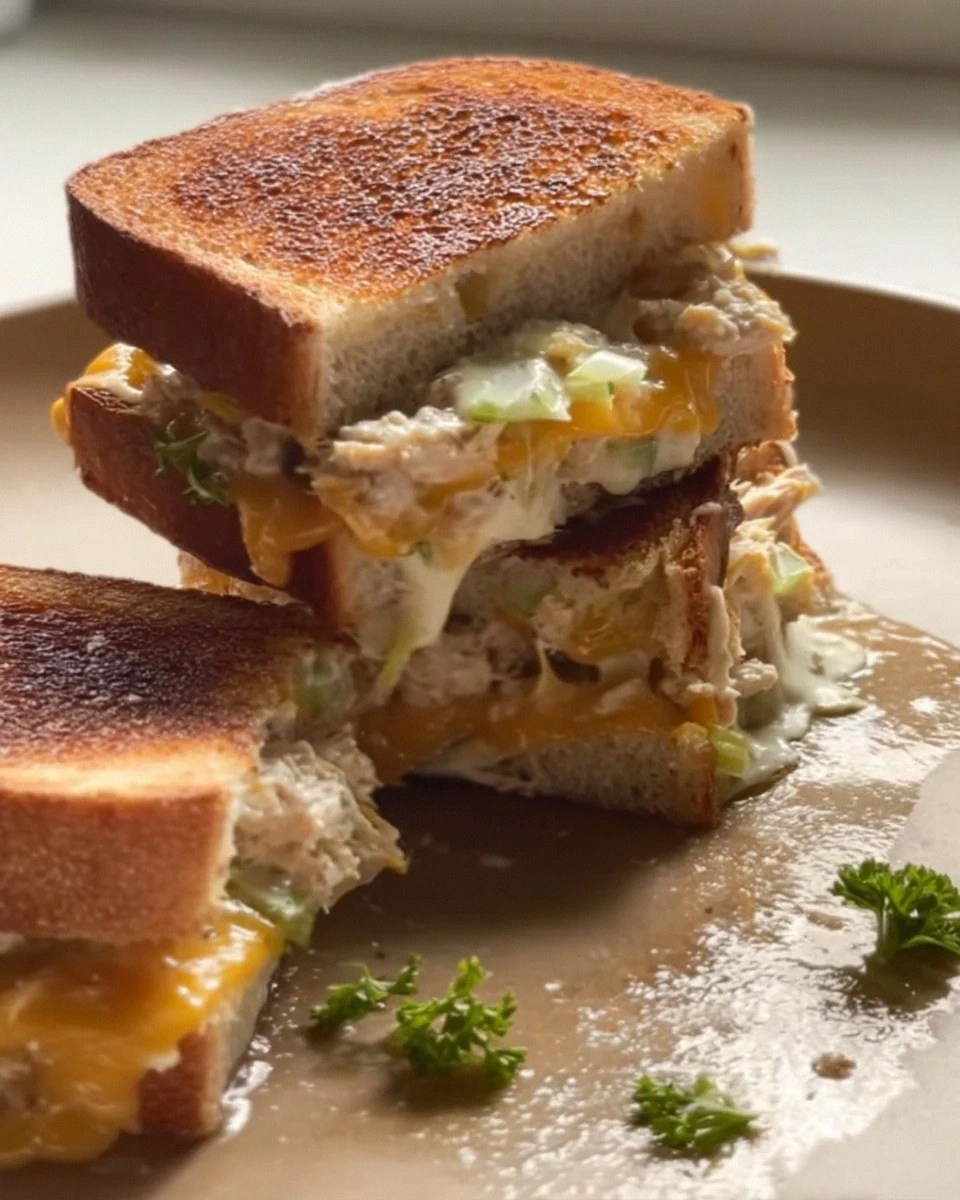
Picture this: the golden‑brown crust of butter‑kissed brioche, the creamy, tangy tuna salad oozing through three layers of melted cheese, and a whisper of herbs that lifts the whole thing like a gust of fresh sea breeze. The first bite delivers a crunchy bite that shatters like thin ice, followed instantly by a buttery melt that coats the palate like velvet. The aroma is a heady mix of toasted bread, sizzling butter, and a hint of lemon that makes your kitchen feel like a coastal boardwalk at sunset. You can almost hear the faint sizzle as the cheese bubbles, and feel the warm, comforting weight of the melt in your hands.
Most tuna melt recipes get the texture wrong—either they’re soggy, or the cheese never really melts, or the bread stays limp. I’ve tried every hack on the internet, from using a broiler to grilling the sandwiches on a panini press, and each time something fell flat. Then I discovered the secret: a triple‑decked structure that builds flavor layers, a butter‑infused crust that stays crisp, and a quick‑mix tuna salad that stays moist without drowning the bread. This version stands out because it balances every element perfectly, and the result is a handheld masterpiece that could easily pass for a high‑end appetizer at a swanky bar.
I’m about to reveal a technique that most home cooks overlook: a brief “flash‑bake” of the assembled melts before the final broil. This step creates a micro‑crust that locks in the cheese and tuna while keeping the outer bread buttery and crisp. Trust me, this little trick is the game‑changer you didn’t know you needed. Let me walk you through every single step — by the end, you’ll wonder how you ever made it any other way.
What Makes This Version Stand Out
- Texture: A triple‑decked stack gives you a crunchy crust, a creamy middle, and a melty top that pulls apart like a perfectly toasted marshmallow.
- Flavor: The lemon‑bright tuna salad cuts through the richness of the cheese, while a dash of oregano adds an unexpected herbaceous note.
- Simplicity: All ingredients are pantry staples; you don’t need any fancy gadgets or hard‑to‑find produce.
- Uniqueness: Most melts are single‑layer; this one builds three layers of cheese and tuna for a depth that feels almost luxurious.
- Crowd Reaction: I dare you to serve these at a party and watch the line form—people will keep coming back for more, and you’ll become the unofficial snack hero.
- Ingredient Quality: Using fresh brioche and good‑quality canned tuna makes a world of difference; the butter adds a buttery richness you can’t fake.
- Cooking Method: The flash‑bake followed by a quick broil ensures every bite has that perfect golden‑brown finish.
- Make‑Ahead Potential: Assemble the melts ahead of time, refrigerate, and pop them into the oven when you’re ready—no stress, just delicious results.
Inside the Ingredient List
The Flavor Base
The heart of any good tuna melt is the tuna salad itself. I use two 5‑ounce cans of tuna in water, drained thoroughly to avoid excess moisture. The water‑based tuna keeps the flavor clean and lets the other ingredients shine. Mixing in half a cup of mayonnaise adds a silky richness, while a tablespoon of Dijon mustard introduces a subtle heat that wakes up the palate. A splash of lemon juice (about a teaspoon) brightens the mixture, preventing the tuna from feeling too heavy.
The Texture Crew
Crunch is essential, and that’s where celery and red onion come in. A quarter cup of finely diced celery gives a fresh snap that contrasts beautifully with the soft tuna. Two tablespoons of red onion add a mild sharpness without overwhelming the dish. A pinch of dried oregano (about a quarter teaspoon) brings a Mediterranean whisper that ties the flavors together. Salt and pepper to taste are the final seasoning—don’t skimp, because they amplify every other component.
The Unexpected Star
Cheese is the star that makes this a melt, but I’m not just using one type. Four quarters of sharp cheddar provide a tangy bite, while four quarters of mozzarella melt into a gooey, stretchy blanket. The combination creates a flavor profile that’s both sharp and mellow, ensuring each bite is dynamic. Butter (two tablespoons, softened) is brushed onto the brioche before cooking, forming a golden crust that locks in moisture and adds a buttery aroma that’s impossible to resist.
The Final Flourish
A final brush of garlic powder (about a teaspoon) on the top crust adds a subtle aromatic depth that rounds out the flavor. If you’re feeling adventurous, a light drizzle of hot sauce can be added to the tuna mixture for a gentle kick. When selecting brioche, look for a loaf that’s slightly sweet and buttery—this sweetness balances the savory tuna and cheese perfectly. If you can’t find brioche, a sturdy sourdough or a soft dinner roll works just as well, though you may need to adjust the butter amount slightly.
Everything’s prepped? Good. Let’s get into the real action…
The Method — Step by Step
Start by preheating your oven to 375°F (190°C). While the oven warms, line a baking sheet with parchment paper; this will prevent the brioche from sticking and make cleanup a breeze. I like to set a timer for five minutes just to keep the kitchen rhythm steady—trust me, timing matters.
Slice the brioche buns horizontally, creating a top and bottom half. Lightly toast each slice on a dry skillet over medium heat for about 30 seconds per side, just until you see a faint golden hue. This step creates a barrier that stops the bread from soaking up the tuna mixture later. Okay, ready for the game‑changer? After toasting, spread a thin layer of softened butter on each slice; the butter will melt later, forming that coveted crisp crust.
Kitchen Hack: Use a pastry brush to apply butter evenly; uneven spots can cause uneven browning.While the bread is cooling, combine the drained tuna, mayonnaise, Dijon mustard, lemon juice, celery, red onion, oregano, salt, and pepper in a large bowl. Mix gently with a fork until everything is just combined—over‑mixing will turn the salad gummy. Taste and adjust seasoning; the lemon should give a bright edge, and the mustard should add a subtle zing.
Lay out the bottom halves of the brioche on the prepared baking sheet. Spoon a generous tablespoon of tuna salad onto each slice, spreading it out to the edges but leaving a tiny border so the cheese doesn’t spill over. This is the first layer of flavor that will anchor the melt.
Place a quarter of a cheddar slice and a quarter of a mozzarella slice on top of the tuna layer. The cheese should overlap slightly, creating a seamless blanket. Then add a second spoonful of tuna salad, followed by another quarter‑cheese and quarter‑mozzarella. This double‑layer ensures every bite has a perfect cheese‑to‑tuna ratio.
Kitchen Hack: If you’re short on cheese, shred the slices; shredded cheese melts more uniformly and reduces the risk of uneven pockets.Top each assembled stack with the upper half of the brioche. Press down gently with your hand so the layers stick together. Now comes the crucial “flash‑bake” step: slide the sheet into the oven and bake for 8‑10 minutes, just until the edges start to turn golden but before the cheese fully melts. This short bake creates a micro‑crust that locks in moisture.
Watch Out: Do not over‑bake at this stage; the cheese will become rubbery and the bread may dry out.After the flash‑bake, switch the oven to broil on high. Place the tray on the top rack and broil for 2‑3 minutes, watching closely. You’ll see the cheese bubble and the top crust turn a deep, caramelized gold. That sizzle when it hits the pan? Absolute perfection. The moment the cheese starts to pull away from the edges, pull the tray out—this is the moment of truth.
Remove the melts from the oven and let them rest for two minutes. This short rest lets the cheese settle and prevents the interior from spilling out when you bite in. While they rest, sprinkle a light dusting of garlic powder over the tops for that final aromatic flourish.
Serve the Mini Triple‑Decker Tuna Melts warm, with a side of crisp pickle spears or a simple mixed green salad. Picture yourself pulling this out of the oven, the whole kitchen smelling incredible, and the first bite delivering that perfect crunch‑to‑creamy transition. I’ll be honest — I ate half the batch before anyone else got to try it. That’s it — you did it. But hold on, I’ve got a few more tricks that’ll take this to another level…
Insider Tricks for Flawless Results
The Temperature Rule Nobody Follows
Most home cooks set the oven to 350°F and call it a day, but the magic here lies in a two‑stage temperature approach. The initial 375°F flash‑bake creates a protective crust, while the high‑heat broil finishes the cheese with a caramelized top. If you skip the flash‑bake, the bread will soak up the tuna mixture, turning soggy. I once tried broiling straight from raw assembly, and the result was a mushy disaster that could’ve doubled as a tuna casserole. Trust the temperature rule, and you’ll get that coveted crunch every single time.
Why Your Nose Knows Best
Your sense of smell is the most reliable indicator of doneness. When the cheese starts to bubble and you catch that nutty, toasted aroma, you’re at the perfect moment. If you rely solely on a timer, you risk either under‑cooking (cheese still pale) or over‑cooking (cheese turns brown and bitter). A quick sniff will tell you if the crust is golden and the cheese is just beginning to brown. I’ve saved many melts by trusting my nose over the clock.
The 5‑Minute Rest That Changes Everything
After the broil, let the melts sit for exactly five minutes before serving. This short pause allows the cheese to firm up just enough to hold its shape while still staying gooey. Skipping this rest leads to cheese oozing out the sides, creating a mess on the plate. A friend tried to serve them immediately and ended up with a cheesy disaster—let’s just say the floor got a new coating. Patience pays off.
Butter‑Brush Mastery
When buttering the brioche, use a light hand—too much butter will cause the bread to fry rather than toast, while too little results in a dry crust. I recommend using a silicone brush and applying a thin, even layer. The butter should glisten but not pool. This subtlety is what gives the melt its signature buttery crunch without being greasy.
Layering Logic
The order of ingredients matters more than you think. Placing cheese directly on the bread creates a barrier that prevents the tuna from soaking into the crumb. Then the second layer of tuna adds moisture, and the final cheese layer ensures a perfect melt on top. If you reverse the order, you’ll end up with soggy bread and uneven cheese coverage. This layering logic is the secret sauce behind the perfect melt.
Creative Twists and Variations
This recipe is a playground. Here are some of my favorite ways to switch things up:
Spicy Sriracha Kick
Add a tablespoon of sriracha to the tuna mixture and a dash of chili flakes on top before broiling. The heat cuts through the buttery richness, making it perfect for those who love a little fire. It’s a hit with college students and anyone who enjoys a bold flavor punch.
Mediterranean Medley
Swap the cheddar for feta and add chopped Kalamata olives and sun‑dried tomatoes to the tuna salad. The salty feta and briny olives introduce a Mediterranean vibe that pairs wonderfully with a glass of crisp white wine. This variation feels upscale enough for a brunch buffet.
Avocado Dream
Fold in diced avocado just before the final cheese layer. The creamy avocado adds a buttery texture that complements the melt, while also giving a fresh, green pop. This version is a crowd‑pleaser for health‑conscious eaters who still crave indulgence.
BBQ Bacon Blast
Crumble cooked bacon into the tuna mixture and drizzle a spoonful of BBQ sauce over the top before the final broil. The smoky bacon and sweet‑tangy BBQ sauce create a Southern‑style twist that’s perfect for backyard gatherings.
Herb‑Infused Delight
Replace the oregano with fresh thyme and add a sprinkle of chopped dill to the tuna. The fresh herbs bring a garden‑fresh aroma that elevates the melt to a springtime favorite. Serve with a light cucumber salad for a balanced plate.
Storing and Bringing It Back to Life
Fridge Storage
Place cooled melts in an airtight container or wrap tightly in foil. They’ll keep fresh for up to 48 hours. When you’re ready to eat, reheat in a preheated oven at 350°F for about 8‑10 minutes, covering loosely with foil to prevent the crust from over‑darkening.
Freezer Friendly
Wrap each melt individually in parchment paper, then place them in a zip‑top freezer bag. They freeze beautifully for up to three months. To reheat, thaw overnight in the fridge, then follow the oven reheating method, adding a tiny splash of water (about a teaspoon) to the tray before covering with foil—this creates steam that revives the crust.
Best Reheating Method
For the crispiest result, use a toaster oven or a conventional oven rather than a microwave. The oven restores the buttery crunch and re‑melts the cheese without turning it rubbery. If you’re in a hurry, a quick 30‑second blast in the microwave followed by a 1‑minute broil works, but the texture won’t be quite the same.