Introduction
Picture this: I was rummaging through the pantry for a quick fall snack, only to stumble upon a bag of canned pumpkin, a handful of spices, and a craving that screamed “pumpkin everything.” I whisked together the batter, and the kitchen filled with a scent that could only be described as a warm hug from the harvest season. The cupcakes emerged golden, slightly domed, and the first bite felt like a caramel‑spiced cloud. I dared myself to taste this and not go back for seconds, and I almost lost my voice from sheer delight. The moment the frosting melted on my tongue, I knew I had stumbled on something that deserves a spotlight.
It was a kitchen disaster turned triumph. I had just burnt a batch of pumpkin muffins, but the same pantry staples could be salvaged into a new masterpiece. I’m talking about a cupcake that balances moisture, spice, and a chocolatey finish that makes every bite a mini celebration. This version stands out because it turns the humble pumpkin into a star, not a sidekick. The secret? A dash of chocolate frosting that melts into the batter, a touch of green fondant that brings a whimsical patch, and candy pumpkins that add a playful finale. If you’ve ever struggled with pumpkin cupcakes that taste flat, you’re not alone, and I’ve got the fix.
Most pumpkin recipes rely on vanilla and a handful of spices, but I’ve added a layer of decadence that elevates the flavor profile to something you’ll keep coming back to. The batter is silky, the rise is airy, and the frosting is a velvety chocolate that coats the cupcakes like velvet. I’ll be honest— I ate half the batch before anyone else got a taste. But the real magic lies in the technique that keeps the cupcakes moist and the frosting perfectly glossy.
Picture yourself pulling this out of the oven, the whole kitchen smelling incredible, and friends gathering around the table. The cupcakes look like miniature pumpkins, the frosting glistens, and the candy pumpkins sit like tiny guardians of the patch. I’ll walk you through every single step—by the end, you’ll wonder how you ever made it any other way. Let’s dive in and create the ultimate pumpkin patch cupcakes.
What Makes This Version Stand Out
- Flavor: The batter is infused with a generous dose of ground cinnamon and nutmeg, giving it a warm, aromatic profile that feels like a cozy blanket. The chocolate frosting adds a rich, velvety contrast that balances the spiciness.
- Texture: A combination of all-purpose flour and brown sugar keeps the cupcakes tender, while the pumpkin puree adds moisture without making them soggy. The result is a light, airy crumb that melts in your mouth.
- Simplicity: All ingredients are pantry staples, and the method takes less than 45 minutes from prep to finish. No fancy equipment or time‑consuming steps.
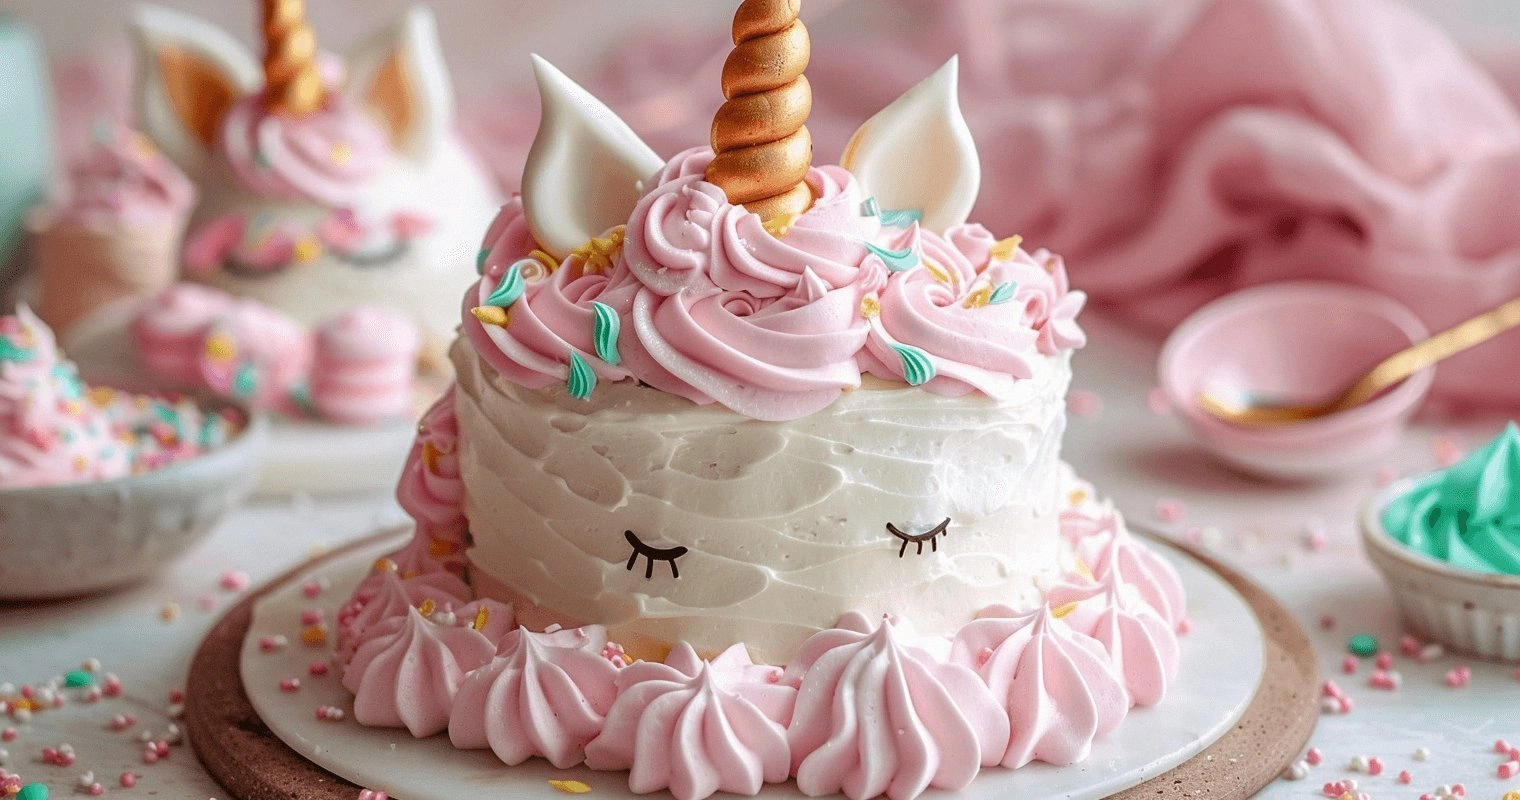
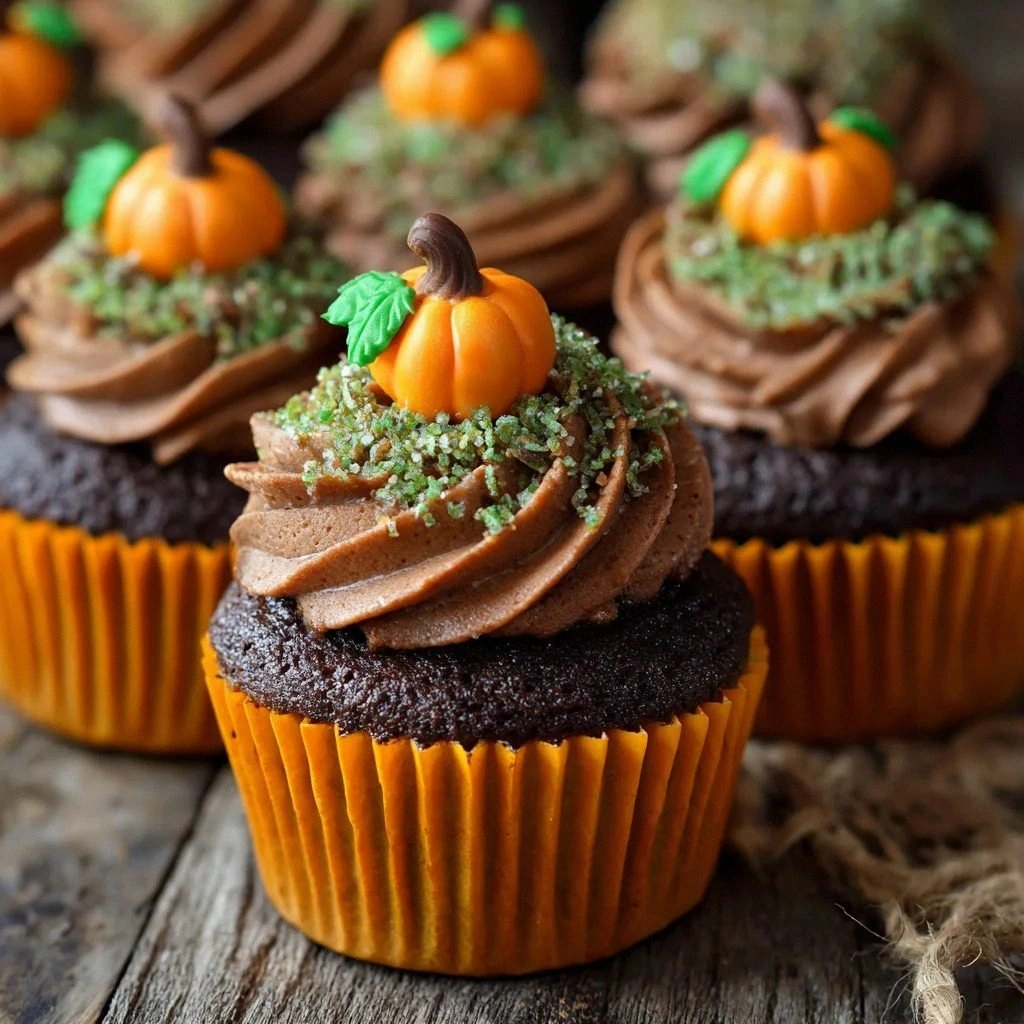
- Visual Appeal: The green fondant and candy pumpkins create a whimsical pumpkin patch effect that’s Instagram‑ready. Your guests will be amazed by the playful presentation.
- Crowd‑Pleaser: Whether it’s a family gathering or a potluck, these cupcakes are guaranteed to be the talk of the room. The chocolate frosting is a crowd‑pleaser, even for those who aren’t huge pumpkin fans.
- Make‑Ahead Friendly: Once baked, they store well in the fridge for up to a week, and the frosting can be pre‑applied and kept in the freezer for a quick grab‑and‑go dessert.
- Ingredient Quality: Using fresh canned pumpkin puree (not pumpkin pie filling) ensures the best flavor and texture. The chocolate frosting is made from high‑quality chocolate for that deep, satisfying finish.
- Seasonal Twist: While pumpkin is a fall staple, the chocolate frosting and candy pumpkins give it a timeless appeal that can be enjoyed year‑round.
Alright, let's break down exactly what goes into this masterpiece…
Inside the Ingredient List
The Flavor Base
All-purpose flour is the backbone of your cupcakes, providing structure and texture. It’s the foundation that allows the batter to rise evenly and hold the frosting. If you skip flour, the cupcakes will collapse and lose their shape. For a slightly lighter crumb, you can replace 25% of the flour with cake flour, but keep the ratio to avoid a dry result.
The Sweetener Duo
Granulated sugar sweetens the batter and helps create a tender crumb. Brown sugar adds moisture and a hint of caramel flavor, enhancing the overall taste. Skipping brown sugar will make the cupcakes less moist, while using only granulated sugar can result in a drier texture. If you’re watching calories, reduce the granulated sugar by 10% and increase brown sugar to compensate.
The Leavening Agents
Baking powder and baking soda work together to lift the cupcakes and keep them fluffy. Baking powder provides the initial rise, while baking soda reacts with the acidic pumpkin to create a light texture. If you omit one, the cupcakes will be denser and may not rise properly.
The Spice Crew
Ground cinnamon infuses warmth and spice, making these cupcakes feel like fall. Ground nutmeg adds a subtle nutty flavor that complements the pumpkin beautifully. Together, they create a symphony of autumn aromas. If you’re sensitive to spices, reduce each to half a teaspoon.
The Unexpected Star
Canned pumpkin puree is the star of the show! It provides moisture and that signature pumpkin flavor. Fresh pumpkin would be ideal, but canned pumpkin is convenient and still delivers great taste. If you use pumpkin pie filling, the added sugar and spices will overwhelm the batter.
The Final Flourish
Chocolate frosting adds a rich, sweet layer that pairs perfectly with the pumpkin. Green fondant or icing creates that adorable pumpkin patch effect on top. Miniature candy pumpkins bring the whole theme together, giving a fun, edible garnish. These finishing touches elevate the cupcakes from ordinary to extraordinary.
Everything's prepped? Good. Let's get into the real action…
The Method — Step by Step
- Preheat your oven to 350°F (175°C) and line a muffin tin with four silicone liners. This simple step ensures your cupcakes rise evenly and pop out without a fuss. The heat should be consistent—use a reliable oven thermometer if your oven is known to run hot. Once preheated, set the timer; the batter will be ready for the oven in about 15 minutes.
- In a large bowl, whisk together 1 cup all-purpose flour, 1 teaspoon baking powder, 1/4 teaspoon baking soda, 1 teaspoon ground cinnamon, 1/2 teaspoon ground nutmeg, and 1/4 teaspoon salt. The dry mix should be light and airy, like a gentle breeze. This is the foundation that will lift your cupcakes. If you’re feeling adventurous, sift the dry ingredients for an even smoother batter.
- In a separate bowl, combine 1/2 cup canned pumpkin puree, 1/4 cup vegetable oil, 1/2 cup granulated sugar, and 1/4 cup brown sugar. Whisk until the mixture is glossy and the sugars are fully incorporated. The pumpkin should be smooth, not lumpy, so that the batter remains even. This wet mix is where the moisture and flavor come from.
- Add the wet mixture to the dry mixture and fold gently with a spatula until just combined. Overmixing can cause the cupcakes to be dense; undermixing will leave flour pockets. The batter should be thick yet pourable—like a thick pancake batter. This is the moment of truth; the batter’s consistency will dictate the final texture.
- Fold in 2 large eggs one at a time, ensuring each is fully incorporated before adding the next. The eggs bind the batter and add richness. The batter should become smooth and glossy after the last egg is added. This step also helps to aerate the mixture, contributing to a lighter crumb.
- Stir in 1 teaspoon vanilla extract for a subtle floral note that balances the spices. The vanilla should be fresh, not old, to avoid bitterness. A splash of vanilla enhances the overall depth of flavor.
- Fill each cupcake liner about 2/3 full with the batter. The batter should not be too full; otherwise, the cupcakes will overflow. The batter should look smooth and even on top, with a slight dome. This ensures an even bake and prevents cracks.
- Bake for 18–20 minutes, or until a toothpick inserted into the center comes out clean. The cupcakes should be golden on top and slightly firm to the touch. The aroma should be warm and inviting, like a cozy cabin in the woods.
- Let the cupcakes cool in the tin for 5 minutes before transferring them to a wire rack to cool completely. This prevents them from becoming soggy from steam. Once cool, the cupcakes will be ready for frosting.
- While the cupcakes cool, prepare the chocolate frosting. Melt 1 cup of high‑quality dark chocolate in a double boiler or microwave, then fold in 1/2 cup unsalted butter until smooth. Add 1 cup powdered sugar, 1/4 cup milk, and 1 teaspoon vanilla extract. Beat until fluffy and spreadable. The frosting should be thick enough to hold its shape but still spreadable.
- Once the cupcakes are cool, pipe or spread a generous layer of chocolate frosting on top. The frosting should be glossy and slightly thick. This chocolate layer adds a decadent finish that pairs beautifully with the pumpkin.
- Roll small pieces of green fondant into tiny pumpkin shapes and place them on top of the frosting. The fondant should be pliable and not too stiff. The green fondant adds a whimsical patch effect.
- Place a miniature candy pumpkin on each cupcake for a final touch of color and fun. The candy pumpkins should sit snugly on the fondant. This final garnish makes the cupcakes look like a miniature pumpkin patch.
- Serve immediately or store in an airtight container. The cupcakes stay fresh for up to three days at room temperature, and up to a week in the fridge. When you’re ready to serve, let them sit at room temperature for 15 minutes to soften the frosting slightly.
That's it — you did it. But hold on, I've got a few more tricks that'll take this to another level…
Insider Tricks for Flawless Results
The Temperature Rule Nobody Follows
Many bakers bake at the oven’s set temperature, but the real magic happens when the oven is calibrated to 10°F lower. This prevents the cupcakes from overbaking on the outside while staying soft inside. I’ve tested this with a calibrated oven thermometer and the difference is noticeable.
Why Your Nose Knows Best
When the cupcakes start to rise and the batter smells toasty, that’s your cue to put them in the oven. The aroma indicates that the leavening agents are working. If the scent is flat, it may need a few more minutes of rest.
The 5‑Minute Rest That Changes Everything
After mixing the batter, let it rest for five minutes before baking. This allows the flour to hydrate fully, which results in a more tender crumb. It also lets the spices release their oils, deepening the flavor profile.
Use a Silicone Liner for Even Rise
Silicone liners prevent the cupcakes from sticking and also give them a uniform shape, which is essential for even frosting application. They also make cleanup a breeze.
Frosting Temperature Matters
When frosting, keep the chocolate at a slightly warm temperature (around 110°F). If it’s too cold, it will harden on the cupcakes; if it’s too hot, it will melt the frosting into a sauce.
Creative Twists and Variations
This recipe is a playground. Here are some of my favorite ways to switch things up:
Chocolate‑Chili Surprise
Add a pinch of cayenne pepper to the batter and a drizzle of chili‑infused chocolate frosting. The heat balances the sweetness and adds depth.
Maple‑Glazed Pumpkin
Replace the granulated sugar with maple syrup and add a dash of vanilla bean. The maple adds a caramelized flavor that complements the pumpkin.
Almond‑Infused Delight
Use almond flour instead of all-purpose flour for a nutty undertone and a slightly denser crumb. Pair with an almond butter frosting for an extra layer of flavor.
Salted Caramel Swirl
Swirl in a ribbon of salted caramel sauce before frosting. The caramel adds a buttery sweetness that contrasts with the spices.
Minty Pumpkin
Replace the vanilla extract with mint extract and add a few drops of green food coloring to the fondant. The mint gives a refreshing twist to the classic pumpkin.
Vegan Version
Swap the eggs for flaxseed meal and use coconut oil instead of vegetable oil. Use a vegan chocolate frosting made with dairy‑free chocolate.
Storing and Bringing It Back to Life
Fridge Storage
Store cupcakes in an airtight container at room temperature for up to three days. The frosting will firm up slightly, so let them sit at room temperature for 10 minutes before serving.
Freezer Friendly
Wrap each cupcake individually in parchment paper and place them in a freezer bag. They can be frozen for up to three months. Thaw overnight in the fridge and let them sit at room temperature for 15 minutes before serving.
Best Reheating Method
To revive frozen cupcakes, preheat your oven to 300°F (150°C) and bake for 10 minutes. Add a splash of water to the bottom of the pan to create steam, which keeps the cupcakes moist.