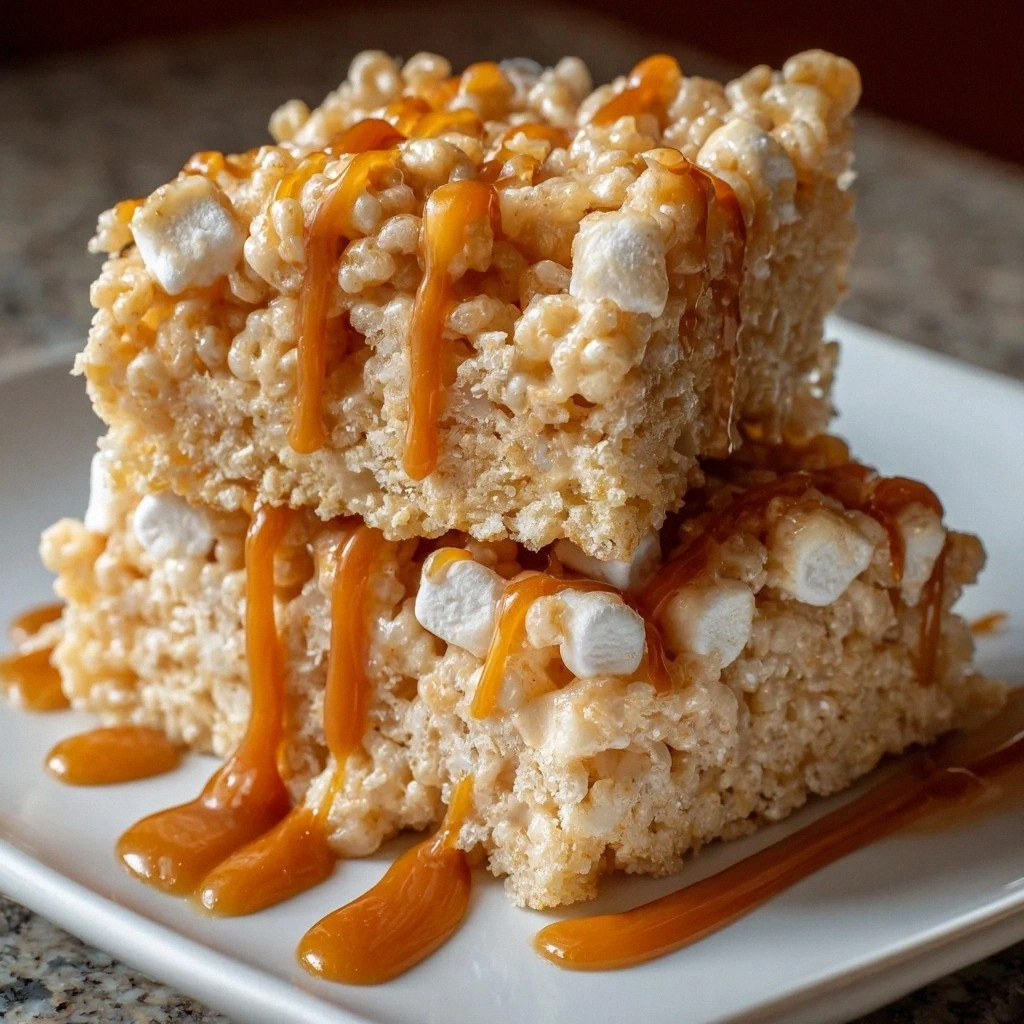
I ruined Thanksgiving. There, I said it. While everyone else was obsessing over turkey brine and whether Aunt Linda would bring her infamous jello salad, I was in the kitchen torching marshmallows like some kind of sugar-crazed arsonist. The original plan was a simple batch of classic Rice Krispie treats for the kids' table. But then I spotted that half-empty jar of salted caramel in the fridge—leftover from an ambitious apple tart that never happened—and suddenly I was on a mission. Twenty minutes later, I pulled out a pan of golden squares that looked innocent enough, but one bite and I knew I had created something dangerous. The caramel had melted into the marshmallow matrix, creating these sticky ribbons of buttery sweetness, while the salt danced in like a party crasher who somehow makes everything better. The crispy cereal softened just enough to become chewy without losing its crunch entirely. My cousin Sarah took one bite, her eyes went wide, and she whispered "you monster" before stealing the entire pan to her bedroom. That's when I realized I had accidentally invented the dessert equivalent of a cult classic.
Here's the thing about most Rice Krispie treat recipes floating around the internet—they're stuck in 1950s suburbia, bland and predictable as a sitcom rerun. They rely on the same tired ratio of cereal to marshmallow, completely ignoring the potential for greatness lurking in your pantry. Most recipes get this completely wrong. They'll tell you to use stale marshmallows (criminal!), skip the salt (insane!), or worse—add vanilla extract where caramel should reign supreme. Picture yourself pulling this pan of liquid gold out of your kitchen, the scent of burnt sugar and butter wafting through your house like edible aromatherapy. Your neighbors will start showing up with casserole dishes and weak excuses. "Oh, I was just... walking my cat... and smelled something amazing?" Trust me, this happens. I've had three different neighbors "casually drop by" since I started testing this recipe.
What makes this version different? We're not just adding caramel—we're building layers of flavor that would make a French pastry chef weep with joy. The caramel gets heated until it bubbles and darkens, developing those complex, nutty notes that separate amateur hour from dessert divinity. We fold it into the marshmallow mixture at the exact moment when it's still warm enough to blend but cool enough not to seize up like taffy. The salt isn't an afterthought—it's a co-star, enhancing every sweet note while adding sophistication that makes these treats feel grown-up. If you've ever struggled with treats that are too hard, too soft, or taste like sugary cardboard, you're not alone—and I've got the fix that's going to change your dessert game forever.
Okay, ready for the game-changer? We're browning the butter first. I know, I know—everyone claims browned butter is their secret weapon, but hear me out. When you take the time to cook that butter until the milk solids turn amber and smell like toasted hazelnuts, you're creating a flavor foundation that makes store-bought caramel taste like it was crafted by artisan angels. This next part? Pure magic. Stay with me here—this is worth it. We're making these treats in one pot, no fancy equipment required, but we're using techniques that would make professional candy makers nod approvingly. Let me walk you through every single step—by the end, you'll wonder how you ever made it any other way.
What Makes This Version Stand Out
Deep Caramel Infusion: Unlike recipes that merely drizzle caramel on top, we're incorporating it into every molecule of marshmallow, creating treats that taste like they were kissed by a caramel angel. The sauce gets heated until it reaches that perfect amber stage where it's developed complex, almost burnt sugar notes that make your taste buds sit up and pay attention.
Browned Butter Brilliance: Most recipes melt butter and call it a day. We're taking it to the edge, cooking those milk solids until they turn golden brown and smell like you're standing in a French pastry shop. This simple step adds nutty, toasted flavors that make regular butter taste positively pedestrian.
Perfect Salt Balance: The kosher salt doesn't just enhance sweetness—it creates these little flavor fireworks that explode across your palate. We're talking about the difference between a flat, one-note dessert and something that makes you close your eyes and sigh involuntarily.
Texture That Dreams Are Made Of: Through precise timing and temperature control, we achieve that elusive balance where the treats are chewy but not jaw-breaking, crispy but not crumbly. They hold their shape when you bite in but melt on your tongue like caramel snowflakes.
One-Pot Wonder: Despite tasting like they came from a boutique bakery, these treats come together in a single saucepan. No candy thermometers, no special molds, no culinary school degree required—just you, a wooden spoon, and about fifteen minutes of your time.
Make-Ahead Champion: These actually taste better the next day, after the flavors have had time to meld and mingle. Make a double batch on Sunday, and you'll have dessert sorted through Wednesday—or, let's be real, until Tuesday afternoon.
Inside the Ingredient List
The Flavor Base
Unsalted butter is our starting quarterback here, and quality matters more than you'd think. Those generic store brands often contain more water and less butterfat, which means less browning and less flavor development. Spring for the good stuff—European-style butter with 82% butterfat transforms into liquid gold when browned. The milk solids in premium butter toast more evenly, creating deeper, more complex flavors that permeate every bite of your treats. Skip the salted butter even if it seems convenient; we need complete control over salt levels, and different brands vary wildly in their salt content. Think of unsalted butter as a blank canvas where we get to paint our flavor masterpiece.
Caramel sauce is where this recipe really sings, and not all caramel is created equal. That cheap ice cream topping will give you one-note sweetness that tastes like disappointment and high fructose corn syrup. Look for caramel that's made with real cream, butter, and sugar—ingredients you can pronounce and would use in your own kitchen. The color should be deep amber, not pale gold, indicating it's been cooked long enough to develop those complex, slightly bitter notes that balance perfectly with sweet marshmallow. If you can find caramel labeled "cajeta" or "dulce de leche," grab it—these Latin American versions have been cooked longer and offer deeper, more intense flavor.
The Texture Crew
Mini marshmallows are non-negotiable for the perfect texture, and here's why: they melt more evenly than their jumbo cousins, creating a smooth, homogeneous base that coats every cereal piece. The large marshmallows take forever to melt, often burning on the bottom before the tops even start to soften. Fresh marshmallows are key—stale ones have lost moisture and will give you treats that taste like sugary cardboard. Press gently on a marshmallow; it should spring back like a fresh pillow, not feel firm or crusty. And please, for the love of all things sweet, don't use those flavored marshmallows someone brought to the barbecue last summer.
Rice Krispies cereal provides the essential crunch, but don't just grab any crispy rice cereal. The name-brand version has a specific toasting process that creates sturdier pieces that won't turn to mush under the caramel-marshmallow coating. Off-brand cereals often absorb moisture too quickly, leaving you with treats that taste like soggy breakfast. Check the expiration date—stale cereal has lost its snap and will make your treats taste flat and sad. If you're feeling fancy, try mixing in some puffed quinoa or millet for extra texture, but keep the ratio at least 75% Rice Krispies for authenticity.
The Unexpected Star
Kosher salt is the secret weapon that transforms these from "pretty good" to "I need to sit down and think about my life choices" good. Unlike table salt, kosher salt has larger, flakier crystals that distribute more evenly and provide little bursts of salinity instead of uniform saltiness. The coarse texture means some crystals stay intact, giving you these delightful salty pockets that make the sweet parts taste even sweeter. Don't substitute table salt here—you'll end up with treats that taste weirdly chemical and overly salty. If you can find Maldon or another flaky sea salt for the final garnish, the pyramid-shaped crystals add delightful crunch and visual appeal.
The Final Flourish
Additional kosher salt for garnish isn't optional if you want to achieve dessert nirvana. That final sprinkle on top hits your tongue first, creating a salty-sweet contrast that makes the caramel taste more caramel-y and the butter taste more buttery. Timing matters here—sprinkle while the treats are still slightly warm so the salt crystals stick, but not so hot that they dissolve completely. The visual of those white crystals against the golden caramel signals to your brain that something special is about to happen. If you're serving these to self-proclaimed salt haters, go light, but don't skip it entirely—that little touch of salt is what separates amateur treats from the ones people will beg you to make.
Everything's prepped? Good. Let's get into the real action...
The Method — Step by Step
- Start with your largest, heaviest saucepan—this is not the time for your tiny milk-warming pan that burns everything. Place it over medium heat and add your butter, swirling occasionally as it melts. Watch closely as the butter foams and the milk solids start to turn golden brown; this should take about 5-7 minutes depending on your stove. The moment you smell nutty, toasted aromas that make you want to bottle the scent, you're there. Remove from heat immediately—butter goes from perfect to burnt faster than a teenager's attention span.
- Return the pan to low heat and add your caramel sauce, stirring constantly with a wooden spoon or heatproof spatula. The mixture will bubble and steam—that's the water cooking off, which concentrates the flavor. Keep stirring for 2-3 minutes until the caramel loosens up and blends completely with the butter. Don't rush this step; those bubbles are developing the complex flavors that make these treats extraordinary. If you see the caramel starting to darken dramatically, reduce heat immediately.
- Add your kosher salt to the caramel mixture, stirring to distribute evenly. The salt should dissolve almost immediately in the hot caramel, creating a smooth, glossy sauce that coats the back of your spoon. Taste a tiny bit—careful, it's hot!—and adjust salt if needed. Remember, you'll be adding more on top later, so err on the side of less rather than more. The caramel should taste balanced, not salty.
- Now comes the marshmallow moment. Reduce heat to the lowest setting and add your mini marshmallows all at once. Stir gently but constantly, watching as they transform from individual puffs into a smooth, white river. This should take 3-4 minutes—don't rush it or you'll end up with a scorched bottom that flavors the entire batch with bitterness. The mixture will look impossibly sticky and you'll think you've made a terrible mistake, but trust the process.
- Remove the pan from heat and quickly stir in your Rice Krispies. Work fast but gently—you want to coat every piece without crushing the cereal into dust. Use a folding motion, bringing the bottom mixture up and over the top, rotating the pan as you go. The cereal should make a satisfying crunching sound as it hits the hot marshmallow mixture. If you see dry patches, keep folding until everything is evenly coated and glossy.
- Immediately pour the mixture into a buttered 9x13 pan. Don't wait—these set up fast as they cool. Use a buttered spatula or your hands (careful, it's hot!) to press the mixture evenly into the pan. Press firmly enough to eliminate air pockets but gently enough to maintain some height. If you compress too much, you'll end up with dense, tooth-breaking treats that no amount of caramel can save.
- While the treats are still warm and pliable, drizzle additional caramel sauce over the top in artistic swirls. Use a spoon or small zip-top bag with the corner snipped off for more control. Don't drown them—a little goes a long way and you want some crispy cereal texture to remain. Immediately sprinkle with additional kosher salt, letting the crystals adhere to the warm caramel.
- Let the treats cool completely at room temperature for at least 30 minutes. During this time, the caramel will set up slightly and the flavors will meld into something greater than their individual parts. Resist the urge to cut into them while warm—they'll be gooey and difficult to serve. Once cool, cut into squares using a sharp knife or pizza cutter. The treats should hold their shape but yield easily to a gentle bite.
That's it—you did it. But hold on, I've got a few more tricks that'll take this to another level...
Insider Tricks for Flawless Results
The Temperature Rule Nobody Follows
Here's where most home cooks go wrong: they crank the heat to high, thinking faster is better. I dare you to taste these treats made with properly tempered ingredients versus the rushed version—the difference will make you a believer in low and slow. Your caramel mixture should never exceed 250°F when you add the marshmallows, or they'll seize up and create hard, unpleasant chunks throughout your treats. Keep a bowl of ice water nearby when you're browning butter and heating caramel—if things start to look too dark too fast, you can quickly cool the bottom of your pan to stop the cooking. This is the moment of truth where patience pays off in dividends of deliciousness.
Why Your Nose Knows Best
Don't walk away from the stove here—this is where the magic happens. Your nose is actually a more reliable indicator than any timer when it comes to browning butter and caramel. When the butter starts smelling like toasted nuts and the caramel develops a deep, almost burnt sugar aroma, you're in the sweet spot. A friend tried skipping this step once—let's just say it didn't end well. She ended up with treats that tasted like sugary nothing, all because she pulled the caramel off too early. The sizzle when it hits the pan? Absolute perfection. Trust your senses; they've been honed over thousands of years of human cooking evolution.
The 5-Minute Rest That Changes Everything
After you press the mixture into your pan, walk away. Seriously, set a timer for exactly five minutes and resist all urges to poke, prod, or add more salt. During this brief rest, the cereal is still absorbing some of the caramel mixture, creating a better bond that prevents your treats from crumbling apart when cut. This is also when the caramel on top sets just enough to hold the salt without letting it dissolve completely. Most recipes get this completely wrong, telling you to add salt immediately or wait until completely cool. The five-minute mark is the Goldilocks zone where everything comes together.
The Double-Caramel Technique
If you really want to blow minds, reserve a quarter cup of caramel sauce and heat it with a tablespoon of heavy cream until it's pourable but thick. This creates a glossy, professional-looking finish that makes your treats look like they came from a boutique chocolate shop. Drizzle this in thin lines across the top, then use a toothpick to create feathered patterns. The cream prevents the caramel from becoming rock-hard when cool, maintaining that perfect chewy texture. Picture yourself pulling this out of the oven, the whole kitchen smelling like a French patisserie had a baby with an American candy store.
Creative Twists and Variations
This recipe is a playground. Here are some of my favorite ways to switch things up:
Smoky Bourbon Caramel Edition
Add two tablespoons of good bourbon to your caramel sauce before heating it—don't worry, the alcohol cooks off, leaving behind smoky vanilla notes that pair beautifully with the salt. The bourbon's natural sweetness enhances the caramel while adding depth that makes people ask "what's that amazing flavor?" Use a bourbon you'd actually drink, not the bottom-shelf stuff that tastes like regret and poor decisions.
Chocolate Lover's Dream
Replace half the Rice Krispies with cocoa-krispies cereal for a mocha-caramel experience that coffee addicts will worship. Drizzle melted dark chocolate over the top instead of extra caramel, and finish with flaky sea salt. The bitterness of the chocolate creates a perfect counterpoint to the sweet caramel, making these dangerously addictive. I'll be honest—I ate half the batch before anyone else got to try it when I made this version.
Pumpkin Spice Fall Fantasy
Stir a teaspoon of pumpkin pie spice into your marshmallow mixture along with the salt. Use maple caramel sauce instead of regular caramel, and top with candied pecans. These taste like autumn exploded in your mouth, making them perfect for October through December. If you've ever struggled with seasonal desserts that taste artificial, this variation will restore your faith in pumpkin spice everything.
Tropical Coconut Escape
Replace two tablespoons of butter with coconut oil, and fold toasted coconut flakes into the cereal mixture. Use coconut caramel if you can find it, or add coconut extract to regular caramel. The tropical notes transport you to a beach where calories don't count and dessert is always appropriate. These are particularly amazing for summer potlucks when you want something different from the usual berry desserts.
S'mores Mashup Madness
Fold crushed graham crackers into the cereal mixture, and top with mini chocolate chips and mini marshmallows that you've lightly toasted with a kitchen torch. The s'mores flavors meld perfectly with the caramel, creating a hybrid dessert that's better than either original. Kids go absolutely bonkers for this version, and adults pretend they're only eating it "for the children."
Espresso Buzz Bliss
Dissolve a teaspoon of instant espresso powder in your caramel before adding it to the butter. The coffee flavor enhances the caramel's complexity without making the treats taste like coffee candy. Perfect for dinner parties where you want dessert to double as an after-dinner pick-me-up. The slight bitterness balances the sweetness, making these sophisticated enough for the most discerning palates.
Storing and Bringing It Back to Life
Fridge Storage
Store your treats in an airtight container at room temperature for up to five days—any longer and they start to taste stale no matter what you do. Layer them between sheets of parchment paper to prevent sticking, and keep them away from direct sunlight or heat sources that could melt the caramel. If your kitchen runs warm, the fridge is your friend, but be warned: refrigeration changes the texture significantly. The cereal will absorb moisture and become chewy rather than crispy, but some people prefer this softer texture. Bring refrigerated treats to room temperature for 30 minutes before serving for the best eating experience.
Freezer Friendly
These treats freeze beautifully for up to two months, making them perfect for emergency dessert situations. Cut them into squares first, then wrap individually in plastic wrap before placing in a freezer bag. This prevents freezer burn and allows you to thaw only what you need. When you're ready to serve, thaw at room temperature for about an hour—they'll taste almost as fresh as the day you made them. For best results, add fresh caramel drizzle and salt after thawing, since freezing can dull these finishing touches.
Best Reheating Method
If your treats have become too hard (this happens when the caramel gets cold), you have options. Microwave individual squares for 8-10 seconds—no more or you'll create molten sugar lava. For larger batches, place them in a 250°F oven for 5-7 minutes until just warmed through. Add a tiny splash of water to the container before reheating—it steams back to perfection, reviving the chewy texture without making them soggy. The goal is gentle warming, not cooking, so err on the side of less time rather than more.