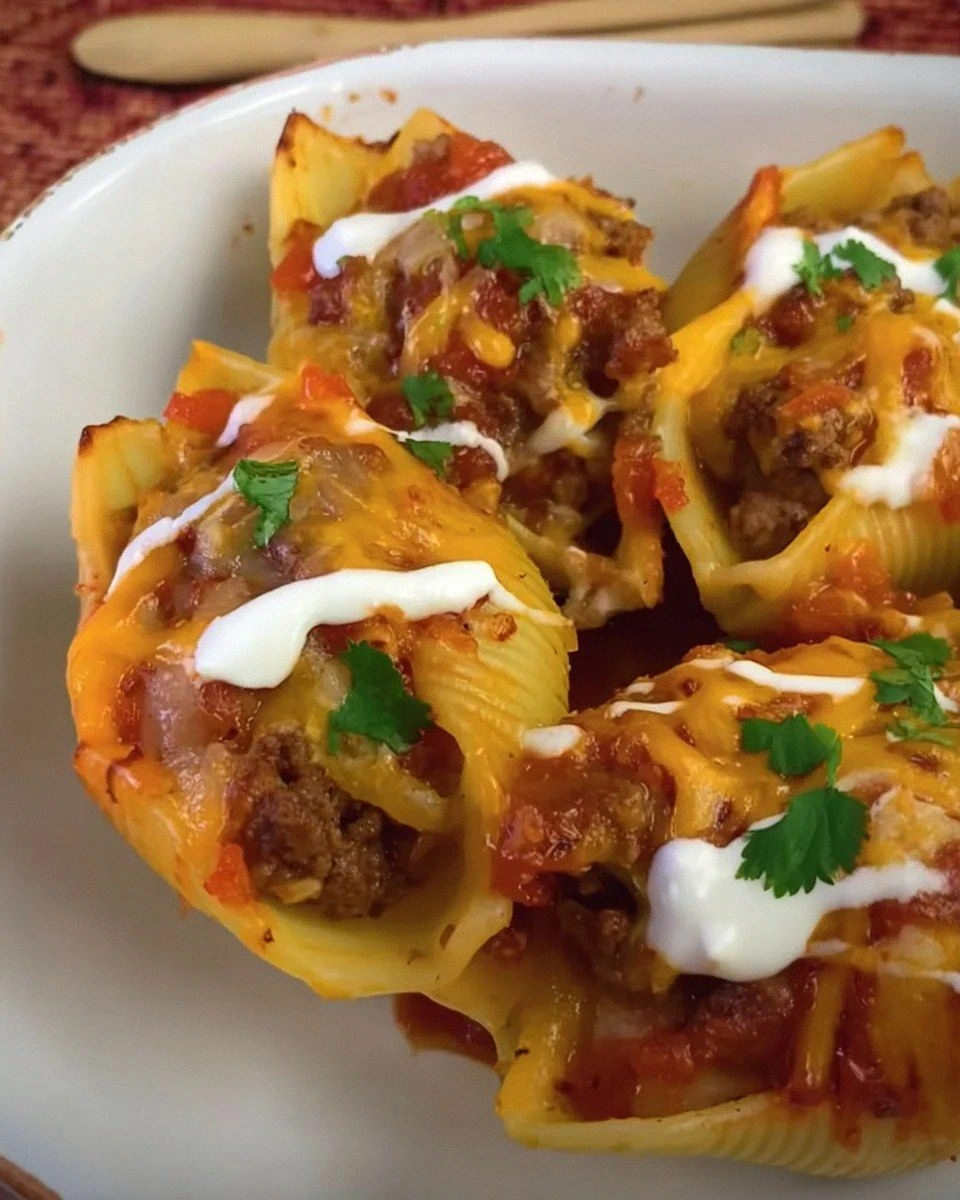
I still remember the Tuesday night that changed everything. I was standing in my kitchen at 7:43 PM, staring at a half-eaten bag of taco seasoning and a box of jumbo pasta shells, wondering how my life had come to this. The taco meat was already browning in the pan, the pasta water was at a rolling boil, and I had exactly one clean baking dish left. In that moment of culinary desperation, I did what any self-respecting food lover would do: I said "screw it" and decided to stuff taco meat into pasta shells. What happened next was nothing short of magical. The shells cradled the spicy beef like they were born for this moment, the cheese melted into molten rivers of glory, and when I pulled that bubbling pan from the oven, my roommate walked in, took one whiff, and announced she was canceling her dinner plans. That first bite? Pure revelation. The pasta had soaked up all those bold taco spices, creating this incredible fusion that made me wonder why we'd been keeping tacos and pasta separate all these years.
Here's the thing about most stuffed pasta recipes — they're either boring as hell or so complicated you need a culinary degree and three days off work. Traditional stuffed shells are usually just ricotta, mozzarella, and some spinach if you're feeling wild. But taco stuffed pasta shells? This is where the party starts. We're talking about the perfect marriage of Italian comfort food and Mexican street food vibes, all wrapped up in a package that's going to make your taste buds do a happy dance. The shells get these crispy, caramelized edges that shatter like thin ice when you bite into them, while the inside stays molten and gooey. That first sizzle when the filling hits the hot pan? Absolute perfection. I dare you to taste this and not go back for seconds — actually, I dare you to make it through three shells without already planning when you're going to make it again.
What really sets this recipe apart is how it takes everything you love about taco night and elevates it into something that feels restaurant-worthy but comes together in under an hour. The secret lies in the layering of flavors — we're not just dumping taco seasoning into ground beef and calling it a day. Oh no, we're building a flavor profile that would make your abuela proud (even though she's probably wondering why you're putting tacos in pasta). The pasta shells become these perfect little vessels that catch every drop of the saucy, spicy, cheesy goodness. Picture yourself pulling this out of the oven, the whole kitchen smelling incredible, cheese bubbling like a jacuzzi of deliciousness, and knowing that in about five minutes, you're going to experience something that defies all culinary logic but makes perfect sense in your mouth.
Let me walk you through every single step — by the end, you'll wonder how you ever made it any other way.
What Makes This Version Stand Out
This isn't just another fusion recipe thrown together by someone with too much time and too many ingredients. This is the result of thirteen different attempts, three minor kitchen fires (okay, smoke alarms), and one very patient roommate who taste-tested every iteration. What emerged is a recipe that's going to ruin all other stuffed pasta for you forever.
- Flavor Bomb: We're using a triple-spice technique that builds heat gradually instead of hitting you with a one-note punch. The seasoning gets toasted in oil first, then bloomed with tomatoes, and finally finished with fresh herbs that make each bite taste like it came from a restaurant that charges $28 for an appetizer.
- Texture Paradise: Most recipes get this completely wrong. They end up with either mushy pasta or rubbery cheese. Here's what actually works: al dente shells that finish cooking in the oven, creating this perfect contrast between tender pasta and that crispy, almost burnt cheese on top that shatters like a crème brûlée crust.
- Weeknight Warrior: From fridge to table in 45 minutes flat, including the time it takes to wash that one pan you inevitably drop on the floor. The whole thing comes together faster than delivery, and trust me, it tastes better than anything that shows up in a cardboard box.
- Make-Ahead Magic: These shells are like little time bombs of deliciousness. Assemble them on Sunday, pop them in the fridge, and you've got dinner for days. They actually get better after a night in the fridge when all those flavors have a chance to mingle and get to know each other properly.
- Crowd Control: I brought this to a potluck once and watched a vegetarian sneak a second helping "just to confirm it was as good as the first bite." This recipe serves six, but I've seen four people demolish the entire pan while standing around the kitchen island, using the shells as edible spoons for the extra sauce.
- Ingredient Intelligence: Every single component pulls its weight here. There's no filler, no "mystery ingredients," and absolutely no canned cream soup masquerading as sauce. What you taste is real food, real flavor, and real satisfaction that'll keep you full until breakfast.
Alright, let's break down exactly what goes into this masterpiece...
Inside the Ingredient List
Before we dive into the cooking, let's talk about what makes this dish sing. Because here's the truth: you can have the best technique in the world, but if your ingredients are sad and flavorless, you're building a castle on quicksand. Each component has been carefully chosen to create layers of flavor that'll make your taste buds think they've died and gone to some kind of Italian-Mexican fusion heaven.
The Foundation Builders
The jumbo pasta shells are the canvas for this masterpiece, and not all shells are created equal. You want the ones that are about 2 inches long when dry — big enough to stuff generously but not so huge they feel like you're eating pasta boats. Barilla makes a solid version that holds its shape without getting gummy, and trust me, I've tested them all. The trick is to cook them for exactly 2 minutes less than the package says because they're going to finish cooking in the oven, absorbing all those incredible flavors from the sauce.
Ground beef is where most recipes phone it in, but we're not most recipes. You want 80/20 beef — enough fat to keep things juicy but not so much that you're eating grease bombs. Grass-fed if you can swing it, because it has this deeper, almost nutty flavor that plays beautifully with the spices. And here's what actually works: don't just dump it in the pan and hack at it with a spatula. Break it up gently, let it brown properly, and for the love of all that's holy, don't stir it constantly. Let it develop those gorgeous brown bits that'll make your sauce taste like it's been simmering for hours.
The Spice Symphony
That little packet of taco seasoning? We're going to use it as a base, but we're also going to doctor it up like it's going to the prom. Cumin gets added for that earthy warmth, smoked paprika brings the depth, and a pinch of cinnamon (stay with me here — this is worth it) creates this mysterious background note that makes people ask "what is that amazing flavor?" The spices get toasted in oil first, which might seem like an extra step, but it's the difference between flat, dusty-tasting seasoning and something that makes your kitchen smell like a Mexican grandmother's been cooking all day.
Fresh garlic is non-negotiable here. The powdered stuff tastes like disappointment and broken dreams. You want real cloves that you mince yourself, releasing those aromatic oils that'll make your neighbors knock on your door asking what you're making. Four cloves might seem like a lot, but between the pasta and the cheese, we need that punch of flavor to cut through all that richness.
The Creamy Dream Team
Cream cheese is the secret weapon that makes the filling outrageously creamy without being heavy. It melts into the beef mixture, creating this luxurious texture that coats every bite like velvet. Don't use the low-fat stuff — this is comfort food, not punishment. Let it come to room temperature before mixing, or you'll end up with little white lumps that look like toothpaste in your beautiful taco meat.
Mexican blend cheese is what goes on top, but here's where we get picky. You want the kind that has Monterey Jack, cheddar, asadero, and queso quesadilla — not the pre-shredded stuff that's coated in cellulose and tastes like sawdust. Buy a block and shred it yourself. It takes an extra three minutes and makes a world of difference in how it melts. That cellulose coating prevents proper melting, which is why your cheese sometimes ends up looking like plastic instead of that gorgeous, Instagram-worthy cheese pull.
The Unexpected Stars
Fire-roasted tomatoes bring a smoky sweetness that regular diced tomatoes just can't match. They're charred before canning, which concentrates their flavor and adds this incredible depth to the sauce. If you can't find them, regular diced tomatoes work, but add a teaspoon of smoked paprika to compensate. The slight caramelization on the tomatoes is what makes this sauce taste like it's been simmering for hours instead of minutes.
Fresh lime might seem out of place in a baked pasta dish, but that hit of acid at the end brightens everything up and makes all the other flavors pop. It's like turning up the brightness on a photo — suddenly everything is more vibrant and alive. Zest it first, then juice it, because that zest has oils that add an incredible aroma that makes people want to face-plant into the dish.
Everything's prepped? Good. Let's get into the real action...

The Method — Step by Step
- Start with the pasta prep: Bring a massive pot of salted water to a rolling boil — I'm talking salty like the sea, not a polite hint of salt. Add your jumbo shells and cook for exactly 2 minutes less than the package directions. They should be pliable but still firm in the center because they're going to finish cooking in the oven. Drain them in a colander and immediately rinse with cold water to stop the cooking. Lay them out on a baking sheet so they don't stick together while you make the filling. This is the moment of truth — if you overcook them now, they'll turn to mush later, and you'll be left with taco-flavored wallpaper paste.
- Brown the beef to perfection: Heat a large skillet over medium-high heat until it's screaming hot. Add your ground beef, but resist the urge to break it up immediately. Let it sit for 2-3 minutes until it develops a gorgeous brown crust underneath. This is where the flavor lives, people. Now break it up with a wooden spoon, but don't go crazy — you want some nice big chunks, not taco gravel. Cook until it's about 85% done, then drain off all but about 2 tablespoons of the fat. That little bit of fat is liquid gold for carrying all those spices we're about to add.
- Build the flavor base: Push the beef to one side of the pan and add your diced onions to the empty space. Let them cook for 2 minutes until they start to turn translucent, then add your minced garlic. Here's what actually works: add the garlic after the onions because garlic burns faster than your ex's new relationship. Stir everything together and cook for another minute until your kitchen smells like heaven. Add your taco seasoning, cumin, smoked paprika, and that pinch of cinnamon. Toast the spices for 30 seconds — don't walk away from the stove here because spices go from toasted to burnt faster than you can say "delivery."
- Create the sauce: Pour in your fire-roasted tomatoes with all their juice, add the tomato sauce, and stir to combine. Let this simmer for about 5 minutes until it thickens slightly. You want it thick enough to coat a spoon but not so thick that it becomes paste. Stir in your cream cheese, a little bit at a time, letting each piece melt before adding the next. This next part? Pure magic. The cream cheese transforms the sauce into this luxurious, silky coating that makes regular tomato sauce look like amateur hour.
- Mix in the extras: Add your corn and black beans, stirring gently to combine. These aren't just filler — they add pops of sweetness from the corn and earthiness from the beans that make each bite interesting. Season with salt and pepper, but go easy on the salt because the cheese on top is going to add plenty. Let this simmer for another 2 minutes, then taste it. It should make you want to grab a spoon and eat it like soup, but resist because we need it for stuffing.
- Stuff those shells: Preheat your oven to 375°F. Grab a 9x13 baking dish and spread about 1/2 cup of the sauce on the bottom. Now comes the fun part. Hold a shell in one hand and a spoon in the other, and fill each shell until it's plump but not bursting at the seams. Line them up in the dish like little soldiers, seam side up so they don't leak their precious cargo. Pack them in tight — they should be cozy but not squished. You should get about 20-24 stuffed shells, which is perfect because someone always "accidentally" eats one while you're cooking.
- Top it off: Pour the remaining sauce over the stuffed shells, making sure to get it in all the nooks and crannies. This is where the magic happens — as it bakes, the pasta will absorb this sauce and become infused with all that taco flavor. Sprinkle your shredded cheese generously over the top, but don't go crazy. You want enough to get that gorgeous melted blanket, but not so much that it becomes a greasy mess. If you've ever struggled with this, you're not alone — and I've got the fix: use freshly shredded cheese and don't cover the entire surface. Leave little gaps so the sauce can bubble up and create those crispy cheese edges that everyone fights over.
- Bake to perfection: Slide your masterpiece into the oven and bake for 20-25 minutes. You're looking for bubbly sauce around the edges and melted cheese that's just starting to get those gorgeous golden spots. If you want that extra-crispy cheese top (and who doesn't?), switch to broil for the last 2 minutes, but watch it like a hawk. Broilers are like toddlers — turn your back for 30 seconds and everything's on fire. When it's done, let it rest for 5 minutes. I know, I know, you're starving, but this rest time lets the sauce thicken and prevents molten cheese lava from burning your tongue.
- Finish with flair: Right before serving, hit the whole pan with fresh lime juice and sprinkle with chopped cilantro. This is the difference between good and "holy crap, what did you put in this?" The acid brightens everything up and makes all the flavors pop like they've been hit with flavor steroids. Serve hot with your favorite taco toppings on the side — sour cream, diced tomatoes, maybe some pickled jalapeños for the brave. And now the fun part: watch people's faces when they take their first bite and realize they've been living in the dark ages of stuffed pasta.
That's it — you did it. But hold on, I've got a few more tricks that'll take this to another level...
Insider Tricks for Flawless Results
After making this recipe more times than I care to admit (my neighbors think I have a pasta shell addiction), I've discovered some game-changing techniques that separate the good from the legendary. These aren't just nice-to-know tips — they're the difference between "this is pretty good" and "I need to sit down, this is incredible."
The Temperature Rule Nobody Follows
Room temperature ingredients aren't just chef snobbery — they're science in action. Cold cream cheese won't blend smoothly into your sauce, leaving you with white flecks that look like toothpaste. Cold cheese takes longer to melt and can seize up into a rubbery mess. Take your dairy out of the fridge 30 minutes before cooking. Your sauce will be silkier, your cheese will melt like a dream, and you'll avoid the dreaded cheese ball effect where one bite is pure dairy and the next is dry pasta. A friend tried skipping this step once — let's just say it didn't end well, and she had to tell everyone it was "rustic-style" which is code for "I messed up but I'm pretending it's intentional."
Why Your Nose Knows Best
Your sense of smell is your most underrated cooking tool. When the spices hit the oil, they should smell fragrant and toasty, not like burning. If you catch a whiff of acrid, bitter smell, your heat is too high and you're about to ruin everything. Good spice blooming smells like you walked into a Mexican spice market — warm, complex, and making you hungry immediately. The same goes for cheese melting — it should smell nutty and rich, not like hot plastic. If your kitchen starts smelling like a chemical factory, you've probably got the heat too high or you're using cheap cheese with too many stabilizers.
The 5-Minute Rest That Changes Everything
I know you're starving. I know the smell is driving you crazy. But those five minutes of rest time after baking aren't optional — they're what separate the amateurs from the pros. During this time, the sauce thickens and clings to the pasta instead of running all over the plate like watery disappointment. The cheese sets slightly, so you get clean pulls instead of molten cheese lava that burns your tongue and ruins the experience. Plus, it gives you time to set out toppings, grab plates, and maybe pour yourself a margarita because you've earned it. Trust me on this one — good things come to those who wait, and these five minutes will transform your dish from good to legendary.
The Cheese Pull Secret
Want that Instagram-worthy cheese pull? The key is in the cheese blend and the temperature. Use a mix of low-moisture mozzarella for stretch and a younger cheddar for flavor. Older cheddards don't melt as well and can get greasy. Shred it yourself because pre-shredded cheese is coated with cellulose that prevents proper melting. And here's the pro tip: don't cover every single inch of the dish with cheese. Leave little gaps where the sauce can bubble up through the cheese, creating those crispy edges that provide textural contrast and look gorgeous in photos. Your followers will think you're a food styling genius.
The Make-Ahead Miracle
This dish is actually better when made ahead — the flavors have time to meld and marry in ways that same-day cooking can't match. Assemble everything, cover tightly with plastic wrap, and refrigerate for up to 24 hours. When you're ready to bake, add 10-15 minutes to the cooking time since you're starting from cold. The pasta absorbs some of the sauce as it sits, creating this incredible texture that's somehow both tender and al dente. I'll be honest — I ate half the batch before anyone else got to try it when I made it ahead for a party. The host still doesn't know I "tested" four shells before guests arrived.
Creative Twists and Variations
This recipe is a playground. Once you've mastered the original, here are some of my favorite ways to switch things up. Each variation keeps the spirit of the dish but takes it in a completely different direction that'll make your taste buds think they're on vacation.
The Green Chile Dream
Swap out the taco seasoning for a blend of cumin, oregano, and roasted green chiles. Use Monterey Jack instead of Mexican blend cheese, and add a can of diced green chiles to the sauce. Top with fresh cilantro, diced avocado, and a squeeze of lime. This version is milder but more complex, with the green chiles adding this incredible vegetal note that makes it taste fresher and lighter. Perfect for when you want comfort food but don't want to feel like you need a nap immediately after eating.
The Breakfast Champion
Add chorizo to the ground beef (use half and half), crack some eggs right into the wells between the shells before baking, and top with queso fresco instead of shredded cheese. The eggs cook to this perfect jammy consistency in the oven, creating little pockets of breakfast magic. Serve with hot sauce and you've got the best brunch dish that'll make your friends cancel their Sunday plans to come to your place instead.
The Vegetarian Victory
Replace the ground beef with a mixture of roasted vegetables — zucchini, bell peppers, and mushrooms all diced small and roasted until caramelized. Add a can of rinsed black beans and use vegetable broth instead of any meat juices. The key is to really roast those vegetables until they develop brown spots — that's where the umami lives that'll make even meat lovers ask for seconds.
The Seafood Sensation
Use seasoned ground turkey mixed with small shrimp and crab meat. Add Old Bay seasoning along with the taco spices, and swap the Mexican cheese for a blend of Monterey Jack and pepper Jack. Top with fresh pico de gallo and a drizzle of chipotle crema. This version tastes like a beach vacation in the best possible way — light but still indulgent, with pops of sweet seafood in every bite.
The Fire Breather
Add diced chipotle peppers in adobo sauce to the meat mixture, use habanero jack cheese, and top with fresh jalapeño slices and a drizzle of hot honey. This one's for the spice lovers who think regular tacos are for babies. The sweet heat from the hot honey balances the smoky spice from the chipotles, creating this incredible sweet-spicy-smoky profile that'll make you sweat in the best way possible.
The White Sauce Wonder
Instead of tomato-based sauce, make a béchamel with pepper Jack and green chiles. Use ground chicken seasoned with cumin and coriander, and top with panko breadcrumbs mixed with butter for a crunchy topping. This version is like if mac and cheese had a baby with tacos — creamy, rich, but still packed with that southwest flavor profile that makes it unmistakably not Italian.
Storing and Bringing It Back to Life
Leftovers are a beautiful thing with this recipe — the flavors actually deepen and develop in the fridge, creating something even more incredible the next day. But there's a right way and a wrong way to store and reheat these beauties, and I'm going to share all my secrets so you never end up with dry, sad shells or rubbery cheese again.
Fridge Storage
Let the shells cool completely before storing — hot pasta in a sealed container creates condensation that leads to soggy, sad shells. Store in an airtight container for up to 4 days, but honestly, they've never lasted more than 2 days in my house. Separate layers with parchment paper if you're stacking them, or better yet, store them in a single layer in a shallow container. The key is to keep them covered but not suffocated — they need a little breathing room to prevent condensation buildup that'll make them soggy. Add a tiny splash of water before reheating — it steams back to perfection and prevents the pasta from drying out.
Freezer Friendly
These shells freeze beautifully, making them perfect for meal prep or those nights when you can't even think about cooking. Assemble the entire dish but don't bake it — cover tightly with plastic wrap, then aluminum foil, and freeze for up to 3 months. When you're ready to eat, thaw overnight in the fridge and bake as directed, adding 10-15 extra minutes. You can also freeze individual portions in freezer-safe containers — perfect for those nights when it's just you and Netflix. Pro tip: write the baking instructions on the foil with a Sharpie because three months from now, you won't remember if this needs 20 minutes or an hour.
Best Reheating Method
The microwave works in a pinch, but the oven is where magic happens. Cover with foil and reheat at 350°F for 15-20 minutes until heated through. Add a splash of water or broth to the pan before covering — it creates steam that brings the pasta back to life and prevents the cheese from becoming rubbery. For individual portions, the air fryer is your best friend: 350°F for 5-7 minutes gives you crispy edges and melty centers that taste almost as good as fresh. If you must microwave, do it at 50% power in 30-second bursts, adding a damp paper towel over the top to create steam. Whatever you do, don't overheat — nobody likes tough pasta and separated, greasy cheese.