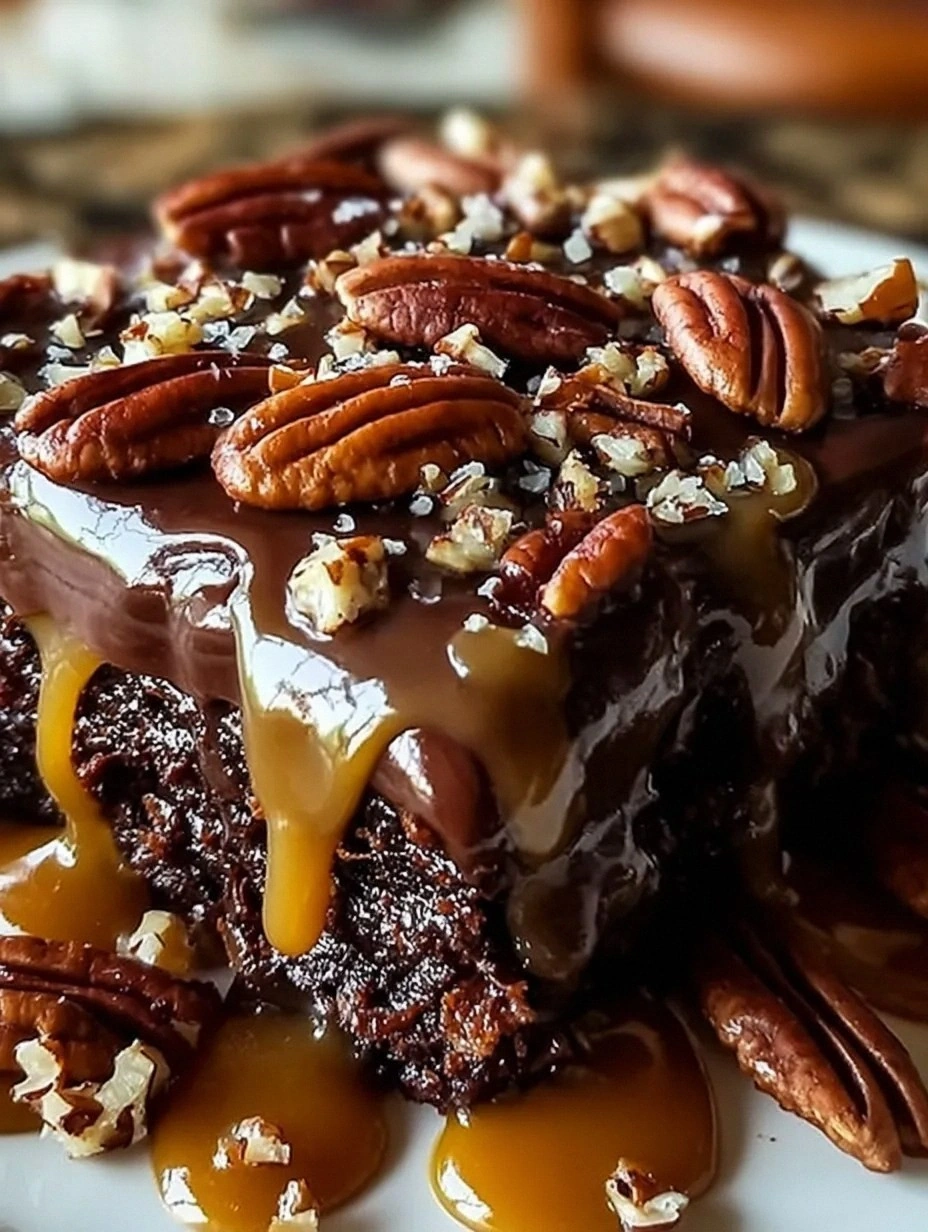
I was sitting at a Thanksgiving table, watching my aunt’s dry, crumbly “sheet cake” wobble under a sad drizzle of store‑bought caramel. The whole thing tasted like a sad, overcooked brownie that had given up on life. I stared at that plate, thought, “I dare you to taste this and not go back for seconds,” and then I realized the only way to settle the score was to create my own version – a cake that would make even the most skeptical sweet‑tooth say, “Whoa, that’s the best version you’ll ever make at home.” I spent a weekend experimenting, swapping out bland margarine for real butter, adding a secret pinch of espresso, and finishing it with a glossy river of caramel and a shower of toasted pecans. The result? An indulgent, fudgy, buttery sheet cake that smells like a chocolate shop on a rainy day and looks like a glossy, caramel‑dripping masterpiece straight out of a Texas bake‑sale.
Picture yourself pulling this out of the oven, the whole kitchen smelling incredible, the edges pulling away from the pan like a shy cat ready to be petted. The top is a glossy, caramel‑kissed crust that crackles softly as you cut a slice, and the interior is a dense, fudgy wonder that melts on the tongue faster than a snowflake on a hot skillet. When the first bite hits, the chocolate and caramel dance together in perfect harmony, while the pecans add a buttery crunch that makes you think, “I’ll be honest — I ate half the batch before anyone else got to try it.” This isn’t just a cake; it’s a celebration of texture, flavor, and that nostalgic feeling of a Texas backyard potluck, but elevated to a level that will make you the hero of any gathering.
Most recipes get this completely wrong. They either make a soggy mess, use low‑quality chocolate that tastes like a cheap candy bar, or skip the crucial caramel glaze that gives the “turtle” its signature shine. Here’s what actually works: a high‑quality cocoa powder, a generous amount of butter for that melt‑in‑your‑mouth richness, and a caramel that’s cooked just long enough to develop a deep amber hue without turning bitter. I also throw in a dash of espresso powder – it’s the secret weapon that amplifies the chocolate without tasting like coffee. And the final trick? A quick blast of the broiler to set the caramel glaze, creating a crackle that’s as satisfying to the ears as it is to the palate.
Okay, ready for the game‑changer? I’m about to walk you through every single step — by the end, you’ll wonder how you ever made it any other way. Stay with me here — this is worth it. Let’s dive into the world of ultimate turtle chocolate fudge cake and turn your kitchen into a dessert haven.
What Makes This Version Stand Out
- Flavor Explosion: The combination of rich cocoa, buttery caramel, and toasted pecans creates a layered taste experience that’s both deep and bright, like a symphony of chocolate and nutty notes.
- Texture Mastery: The cake’s interior stays fudgy and dense, while the edges turn slightly crisp, giving you a delightful contrast that shatters like thin ice when you bite.
- Simplicity Meets Sophistication: Despite the impressive result, the ingredient list is short and the technique is straightforward, perfect for a weekday treat or a weekend show‑stopper.
- Unique Caramel Glaze: A homemade caramel glaze that sets with a glossy finish, adding both visual drama and a buttery sweetness that store‑bought versions can’t match.
- Crowd‑Pleaser Factor: This cake has a proven track record of clearing plates in minutes – I’ve seen entire families disappear after the first slice.
- Ingredient Quality: Using premium cocoa and real butter elevates the flavor profile, turning a humble sheet cake into a gourmet experience.
- One‑Pan Wonder: All the action happens in a single sheet pan, meaning less cleanup and more time to enjoy the results.
- Make‑Ahead Magic: The cake stores beautifully, and the caramel glaze can be reheated to a perfect shine, making it ideal for advance planning.
Inside the Ingredient List
The Flavor Base
Flour is the structural backbone of any cake, and here we use an all‑purpose variety that provides just the right amount of gluten to hold the dense, fudgy interior together without turning it into a bread‑like slab. Skipping the flour or cutting the amount in half would leave you with a batter that spreads too thin, losing that coveted fudgy texture. If you’re gluten‑intolerant, a 1‑to‑1 gluten‑free flour blend works just as well, but be sure it contains a starch like potato or tapioca to maintain moisture.
Cocoa powder is the soul of this cake. I choose a Dutch‑process cocoa because its deep, earthy flavor and darker color give the cake that rich, almost black appearance that screams “decadent.” Substituting natural cocoa will make the cake slightly more acidic, which can affect the rise, but the flavor will still be solid. Look for a cocoa that’s at least 20% cocoa solids for the best taste.
The Texture Crew
Butter is the secret weapon that turns a regular sheet cake into a melt‑in‑your‑mouth masterpiece. Using real unsalted butter (and adding a pinch of salt) gives a buttery mouthfeel that margarine can never replicate. If you’re short on time, you can melt the butter with a splash of oil, but the flavor depth will suffer.
Sugar not only sweetens but also helps create that glossy caramel glaze. Granulated white sugar dissolves evenly, ensuring a smooth batter. If you prefer a hint of molasses, you can swap ¼ cup of the sugar for dark brown sugar, which will add a subtle caramel undertone to the cake itself.
The Unexpected Star
Espresso powder is the tiny hero that amplifies the chocolate without tasting like coffee. Just a teaspoon wakes up the cocoa, making the chocolate flavor sing louder than a choir. If you don’t have espresso powder, a shot of strong brewed coffee works as a backup, but use less liquid overall to keep the batter consistency right.
Pecans bring a buttery crunch that contrasts the fudgy interior. Toasting them beforehand releases their natural oils, creating a nutty aroma that mingles beautifully with the caramel. If pecans aren’t your thing, toasted walnuts or almonds make excellent swaps, though they’ll shift the flavor slightly toward a more earthy profile.
The Final Flourish
Caramel sauce is the crowning glory. I make it by gently simmering sugar, butter, and a splash of heavy cream until it reaches a deep amber hue. Over‑cooking turns it bitter, while under‑cooking leaves it too runny to set. The secret is to watch the color, not the clock – once it reaches a rich amber, it’s ready.
Chocolate chips added on top create a glossy, crackly top after the broiler blast. Use semi‑sweet or dark chips for a balanced sweetness; milk chocolate will make the top too sweet and may melt too quickly. If you’re dairy‑free, opt for high‑quality dairy‑free chips, but expect a slightly different melt texture.
Everything's prepped? Good. Let's get into the real action...
The Method — Step by Step
Preheat your oven to 350°F (175°C). While the oven warms up, line a 13x18‑inch sheet pan with parchment paper, allowing the paper to overhang the sides for easy lift‑out later. This step is crucial – a well‑lined pan prevents the cake from sticking and makes the final presentation look professional. Pro tip: Lightly butter the parchment for extra insurance.
In a medium bowl, whisk together 2 cups of all‑purpose flour, 1 cup of Dutch‑process cocoa powder, 1 tsp baking soda, and ½ tsp salt. The dry mix should be uniformly dark, like midnight velvet. This ensures the leavening is evenly distributed, preventing any pockets of raw flour.
Kitchen Hack: Sift the cocoa and flour together. It eliminates lumps and aerates the mixture, giving you a lighter batter.Melt 1 cup (2 sticks) of unsalted butter in a large saucepan over low heat. Once melted, add 2 cups of granulated sugar and stir constantly for about 2 minutes until the mixture glistens. Then, whisk in 4 large eggs one at a time, making sure each egg is fully incorporated before adding the next. The batter should look thick, glossy, and slightly cooler than a hot fudge sauce.
Add 1 cup of buttermilk and 2 teaspoons of vanilla extract to the butter‑sugar‑egg mixture, followed by the espresso powder. Stir until the liquid is smooth and the espresso has dissolved completely. This is the moment of truth – the batter should have a deep, chocolatey sheen that hints at the richness to come.
Gradually fold the dry ingredients into the wet mixture, using a rubber spatula. Start from the center and work outward, scraping the sides of the bowl to ensure no flour pockets remain. The batter will be thick – that’s exactly what we want.
Watch Out: Over‑mixing can develop gluten, turning the cake rubbery. Stop as soon as the flour disappears.Spread the batter evenly in the prepared sheet pan, using the back of a spoon or an offset spatula. The surface should be smooth, with the edges slightly higher than the center – this helps the caramel glaze settle into the middle while the edges set firm. Once spread, sprinkle 1 cup of chopped toasted pecans over the top, pressing them lightly into the batter.
Bake for 30‑35 minutes, or until a toothpick inserted into the center comes out with a few moist crumbs but no wet batter. The top should have a thin, crackly crust that smells toasty. As soon as you see the edges start to pull away from the pan, it’s time to pull it out – over‑baking will dry the fudgey interior.
While the cake is cooling, prepare the caramel glaze. In a saucepan, combine 1 cup of granulated sugar, ¼ cup of water, and a pinch of salt. Heat over medium‑high until the sugar dissolves and turns a deep amber color, swirling the pan gently (don’t stir). Remove from heat, whisk in ½ cup of heavy cream, then 2 tbsp of unsalted butter. The mixture will bubble vigorously – that’s normal. Let it sit for a minute to thicken slightly.
Once the cake has cooled for about 10 minutes, drizzle the caramel glaze over the surface in a slow, circular motion, letting it pool in the center and flow to the edges. Then, immediately scatter 1 cup of semi‑sweet chocolate chips over the warm caramel. The heat from the cake will melt the chips, creating a glossy, crackly top.
Kitchen Hack: For an ultra‑shiny finish, pop the pan under the broiler for 30 seconds – watch closely or it will burn.Allow the cake to set for at least 15 minutes before slicing. Use the parchment overhang to lift the whole sheet onto a cutting board, then cut into squares with a sharp, warmed knife. Serve warm for maximum fudgy melt, or at room temperature for a firmer bite. That first bite? Pure magic. That's it — you did it. But hold on, I've got a few more tricks that'll take this to another level...
Insider Tricks for Flawless Results
The Temperature Rule Nobody Follows
Never bake a sheet cake at a temperature higher than 350°F. Higher heat creates a rapid rise that can cause the center to stay undercooked while the edges become overly crisp. By keeping the oven at a steady 350°F, you allow the batter to set evenly, producing that coveted fudgy interior. I once tried 375°F to speed things up – the result was a dry, crumbly disaster that tasted like a burnt biscuit. Trust the low‑and‑slow approach, and you’ll get a uniformly moist cake every time.
Why Your Nose Knows Best
Your sense of smell is a far better indicator of doneness than a timer. When the caramel reaches a deep amber hue, you’ll notice a buttery, slightly nutty aroma that signals it’s ready. Likewise, when the cake is baking, the kitchen will fill with a rich chocolate scent that deepens around the 25‑minute mark. If you can smell that toasty edge, the cake is likely done, even if the timer says otherwise. Trust that nose – it’s the secret weapon of seasoned bakers.
The 5‑Minute Rest That Changes Everything
After pulling the cake from the oven, let it rest in the pan for exactly five minutes before adding the caramel. This short pause allows the crumb structure to firm up just enough to hold the glaze without sinking. Skipping this step results in a soggy bottom where the caramel pools excessively. I once poured the glaze immediately and ended up with a puddle of caramel that ruined the texture. Five minutes is all it takes to lock in that fudgy consistency.
Pecan Toasting Perfection
Toast pecans in a dry skillet over medium heat for 4‑5 minutes, stirring constantly. You’ll hear a faint “pop” as the oils release, and the nuts will turn a fragrant golden brown. This step is non‑negotiable – untoasted pecans taste bland and can introduce a raw, gritty texture. If you’re in a hurry, a quick 2‑minute burst in the microwave works, but the skillet method yields a deeper flavor.
Caramel Consistency Check
When the caramel sauce is ready, dip a spoon into it and let it cool for a few seconds. It should coat the back of the spoon thickly without running off too quickly. If it’s too thin, return it to low heat for another minute; if too thick, whisk in a splash of milk or cream. This “spoon test” ensures the glaze will set with that perfect glossy crackle instead of turning into a sticky mess.
Creative Twists and Variations
This recipe is a playground. Here are some of my favorite ways to switch things up:
Salted Caramel Delight
Add 1 teaspoon of flaky sea salt to the caramel glaze before drizzling. The salty bite cuts through the sweetness, creating a sophisticated flavor balance that will impress even the most discerning palate.
Mocha Madness
Swap the espresso powder for 2 tablespoons of strong brewed coffee and increase the cocoa powder by ¼ cup. The result is a mocha‑infused sheet cake that pairs beautifully with a dollop of whipped cream.
Nut‑Free Nirvana
Replace pecans with toasted pumpkin seeds or omit nuts entirely for a nut‑free version. The caramel and chocolate still provide crunch, while the seeds add a subtle earthiness.
White Chocolate Raspberry
Fold ½ cup of freeze‑dried raspberry pieces into the batter and top the glaze with white chocolate chips instead of dark. The tartness of raspberry cuts through the richness, making a festive holiday variation.
Spiced Autumn
Add 1 teaspoon of pumpkin spice to the dry mix and drizzle a caramel‑apple sauce instead of plain caramel. This version is perfect for a Thanksgiving spread, delivering warm spices that evoke cozy evenings.
Storing and Bringing It Back to Life
Fridge Storage
Cover the cake tightly with plastic wrap or store it in an airtight container. It will stay fresh for up to 5 days in the refrigerator. The caramel may firm up a bit, but a quick microwave burst (10 seconds) will soften it again.
Freezer Friendly
Slice the cake into individual squares, place a piece of parchment between each, and freeze in a zip‑top bag. It freezes beautifully for up to 3 months. When ready to serve, let a piece thaw at room temperature for 30 minutes, then microwave for 15 seconds to revive the fudgy interior.
Best Reheating Method
To bring a refrigerated slice back to its glorious warm state, place it on a microwave‑safe plate, add a tiny splash (about a teaspoon) of water around the edge, and heat for 20‑30 seconds. The water creates steam that re‑hydrates the crumb, while the caramel glazes back to a silky sheen.