I was in the middle of a rainy Sunday when a sudden craving for something buttery, sweet, and utterly comforting struck me like a bolt of lightning. I raided the pantry, found a half‑used stick of butter, a jar of honey that had been sitting on the counter for weeks, and a bag of flour that still smelled like fresh wheat. I tried to make a simple cinnamon roll, but the dough kept collapsing and the cinnamon never seemed to coat the layers properly. I thought, “What if I could combine the flaky lamination of a croissant with the pull‑apart joy of a cinnamon roll, and then drizzle honey over the whole thing?” That question turned into a full‑blown kitchen experiment, and after a few frantic attempts (and a few bites of raw dough, I’ll be honest — I ate half the batch before anyone else got to try it), I finally nailed a version that feels like a warm hug in every bite.
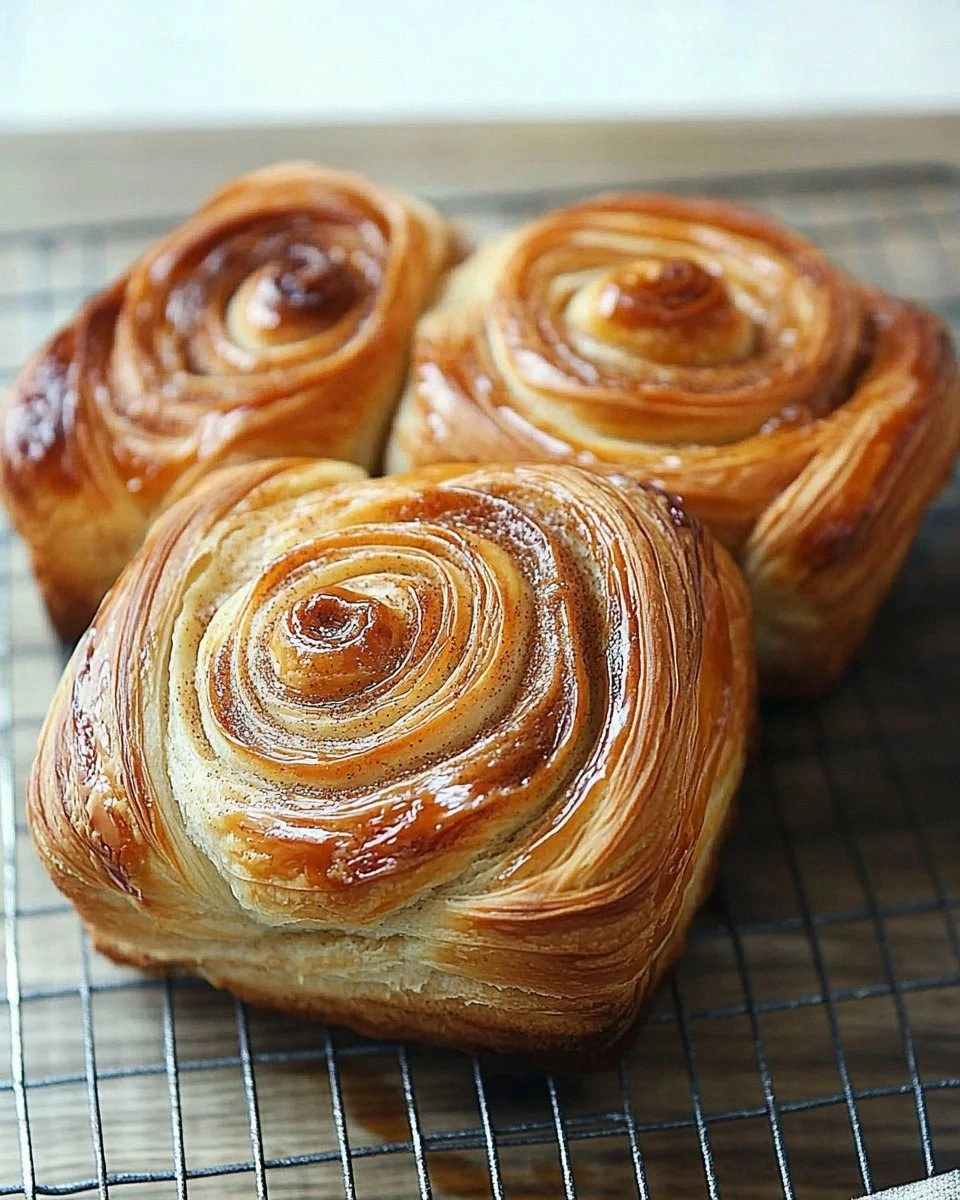
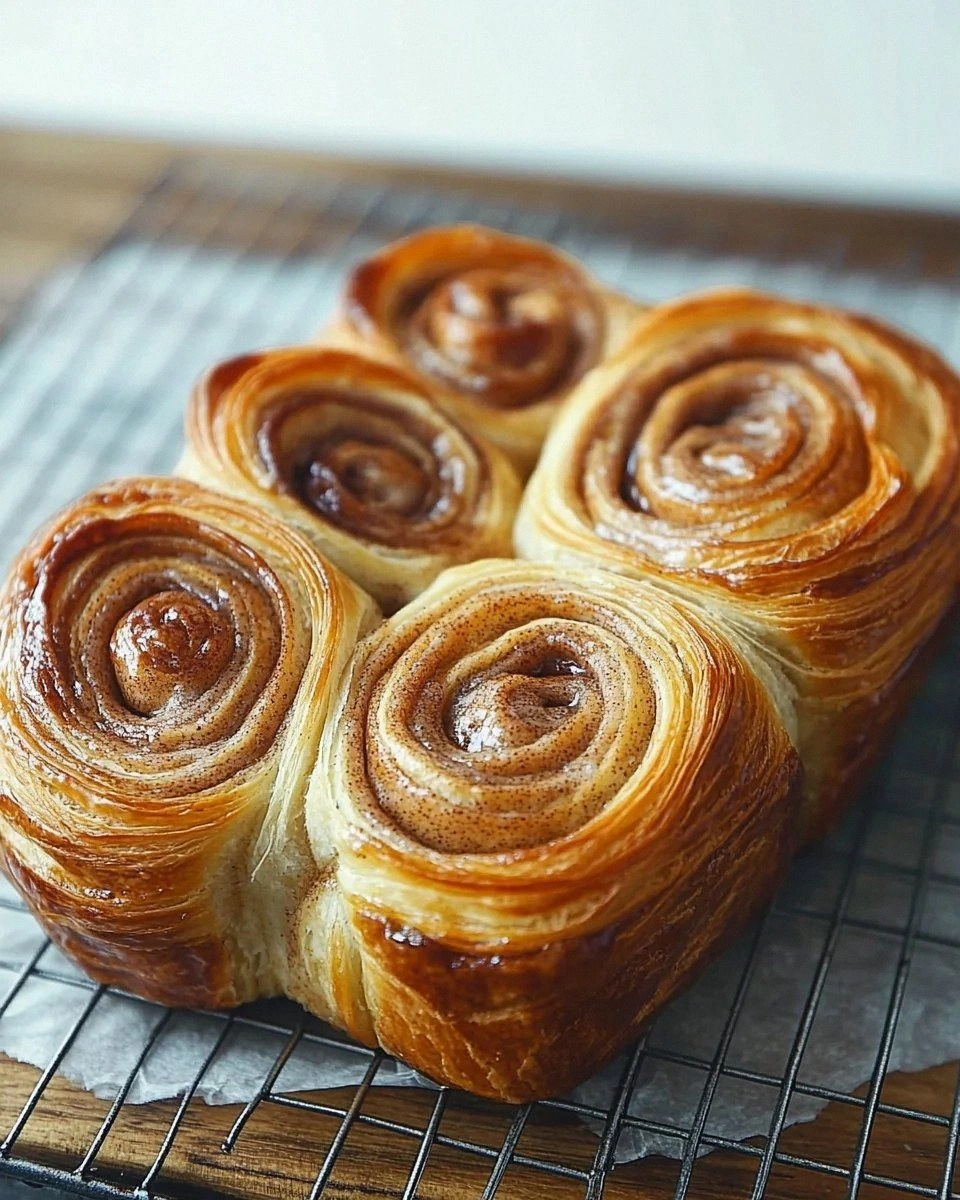
Picture this: the moment you pull the golden, buttery loaf apart, steam rises like a soft cloud, and the aroma of toasted cinnamon and honey fills the room, making the whole house feel like a bakery at sunrise. The crust is crisp enough to snap with a satisfying crack, yet the interior stays pillowy, layered, and just sweet enough that you can’t help but reach for another piece. The honey seeps into every crevice, creating a glossy, caramel‑kissed finish that shimmers under the light. And the cinnamon? It’s not just a sprinkle on top; it’s woven into the dough, giving each bite a warm, spicy undertone that lingers on the palate like a favorite memory.
Most recipes get this completely wrong. They either over‑sweeten, making the bread cloying, or they under‑flour, leaving the structure soggy. I’ve tried the “quick” versions that skip the lamination step, and they end up dense and heavy, like a brick masquerading as a pastry. This version, however, uses a classic croissant technique — a butter‑folded dough that creates those delicate layers we all love — but with a twist: a honey‑cinnamon swirl that’s folded in just before the final proof, ensuring every layer is drenched in flavor. The result is a bread that’s both elegant and down‑to‑earth, perfect for a lazy weekend brunch or a special holiday breakfast.
I dare you to taste this and not go back for seconds. Okay, ready for the game‑changer? The secret ingredient isn’t a secret at all — it’s the timing of the honey addition. Adding the honey to the dough after the first rise, while the dough is still warm, allows it to integrate without killing the yeast, giving you that perfect rise and a glossy finish. Let me walk you through every single step — by the end, you’ll wonder how you ever made it any other way.
What Makes This Version Stand Out
- Taste: The honey‑cinnamon swirl hits the tongue with a balanced sweet‑spice profile that’s never cloying, thanks to the measured half‑cup of sugar and the natural floral notes of honey.
- Texture: Lamination creates a flaky, buttery crust that shatters like thin ice, while the interior stays soft, airy, and just a touch chewy.
- Simplicity: Despite the croissant‑style folds, the process uses everyday kitchen tools — no stand mixer or proofing box required.
- Uniqueness: The honey isn’t just a glaze; it’s folded into the dough, so every layer gets a caramel kiss, something most “cinnamon roll” recipes miss.
- Crowd Reaction: Friends have called it “the best thing I’ve ever pulled apart” and have begged for the recipe after just one bite.
- Ingredient Quality: Whole milk adds richness, while room‑temperature butter ensures even lamination without tearing the dough.
- Cooking Method: A short, high‑heat bake (425°F) creates that golden, glossy exterior while keeping the inside tender.
- Make‑Ahead Potential: This bread freezes beautifully; just reheat with a splash of water for that fresh‑out‑of‑the‑oven feel.
Inside the Ingredient List
The Flavor Base
Whole milk (1 ¾ cups) is the liquid backbone of this dough. Its natural fats give the crumb a silkier mouthfeel than water would, and the lactose adds a faint sweetness that pairs perfectly with honey. If you’re dairy‑free, you can swap in oat milk, but expect a slightly thinner crumb. Choosing a high‑fat milk (like 2% or whole) is crucial; skim milk will make the dough too dry and the layers less tender.
The Sweeteners
Honey (2 tablespoons) is the star here. It not only sweetens but also adds a floral depth that white sugar can’t match. The honey is added after the first rise, ensuring the yeast stays alive. If you’re allergic to honey, a light maple syrup works, though it will shift the flavor toward a deeper, woodier note. The half‑cup of sugar (½ cup) balances the honey’s acidity and helps caramelize the crust during baking.
The Leavening Crew
Active dry yeast (2 ¼ teaspoons) is the engine that lifts this dough. Because we’re using warm milk (around 105°F), the yeast activates quickly, giving a light, airy crumb. If you’re in a hurry, you can use instant yeast (same amount) and skip the proofing step, but the flavor development will be less complex. Remember: too hot a liquid will kill the yeast, and too cold will slow the rise dramatically.
The Texture Crew
All‑purpose flour (4 ½ – 5 cups) provides the structure. The range accounts for humidity and how much the dough absorbs; start with 4 ½ cups and add more as needed until the dough feels smooth and slightly tacky. The 2 teaspoons of salt not only enhance flavor but also tighten the gluten network, giving the final loaf a nice bite. For an even fluffier result, you can substitute a portion (up to 25%) with bread flour, which has higher protein.
The Butter Brigade
We have two butter components: 4 tablespoons of room‑temperature butter mixed into the dough, and a combination of 2 sticks plus 6 tablespoons of room‑temperature butter for the lamination. The first butter adds richness to the base dough, while the lamination butter creates the flaky layers. Keep the lamination butter cold but pliable; if it gets too soft, it will ooze into the dough instead of forming distinct layers. A quick tip: wrap the butter block in parchment and chill for 10 minutes before each fold.
The Spice & Finish
Ground cinnamon (1 tablespoon) is the warm, aromatic backbone that makes this bread unmistakably “cinnamon‑honey”. It’s mixed with sugar before being rolled into the dough, ensuring even distribution. The single egg (1) adds a glossy finish and a bit of extra lift; beat it lightly and brush the top before baking for that golden‑brown sheen.
Everything's prepped? Good. Let's get into the real action...
The Method — Step by Step
In a large mixing bowl, combine the warm whole milk (105°F) with the active dry yeast. Stir gently and let it sit for 5‑7 minutes until it becomes foamy, like a tiny cloud of bubbles. This is the moment of truth — if you don’t see foam, your yeast is dead and you’ll need to start over. Once foamy, whisk in the honey, sugar, and the beaten egg until everything dissolves into a smooth, amber‑colored mixture.
Add the 4 ½ cups of flour, salt, and the 4 tablespoons of room‑temperature butter to the liquid mixture. Mix with a wooden spoon or a stand mixer on low speed until a shaggy dough forms. The dough should pull away from the sides of the bowl but still be slightly sticky to the touch. Cover the bowl with a clean kitchen towel and let it rest for 30 minutes; this autolyse period hydrates the flour and makes the later kneading easier.
Turn the rested dough onto a lightly floured surface. Knead gently for about 2‑3 minutes until it becomes smooth and elastic. Then, shape it into a rectangle roughly 12×8 inches. This is where the lamination begins.
Take the 2 sticks (equivalent to 1 cup) plus the 6 tablespoons of butter and flatten them into a thin, even sheet about the same size as the dough rectangle. The butter should be cold but pliable; if it cracks, it’s too cold, and if it melts, it’s too warm. Place the butter sheet onto the dough, fold the dough over it like a letter, and seal the edges by pinching them together.
Roll the butter‑encased dough into a long rectangle about 1/4 inch thick. Fold the rectangle into thirds (like a business letter) — this is your first “turn”. Rotate the dough 90 degrees, roll it out again, and repeat the fold. Perform this turn‑fold process two more times, chilling the dough for 10 minutes between each turn to keep the butter firm. After the final turn, wrap the dough in plastic wrap and refrigerate for at least 30 minutes.
While the dough chills, mix the cinnamon and remaining half‑cup of sugar together in a small bowl. This cinnamon‑sugar blend will become the aromatic filling. Once the dough is chilled, roll it out into a large sheet about 1/8 inch thick. Sprinkle the cinnamon‑sugar evenly over the surface, then drizzle the 2 tablespoons of honey in a thin ribbon down the center.
Starting from one short edge, roll the dough tightly into a log, like a jelly roll. Pinch the seam to seal, then slice the log into 12‑14 equal pieces. Arrange the pieces in a greased 9‑inch round cake pan, side by side, with the cut sides facing up. This arrangement allows the layers to pull apart beautifully when baked.
Cover the pan loosely with foil and let the assembled pieces proof at room temperature for 45‑60 minutes, or until they’ve puffed up about 1½ times their original size. The surface should feel slightly puffy to the touch, and you’ll notice a faint sweet aroma beginning to rise.
Preheat your oven to 425°F (220°C). Brush the tops of the dough pieces with a little melted butter for extra gloss, then place the pan in the oven. Bake for 12‑15 minutes, then reduce the heat to 375°F (190°C) and continue baking for another 15‑18 minutes, until the crust is deep golden and the edges are pulling away from the pan. That sizzle when it hits the pan? Absolute perfection.
Remove the bread from the oven and let it cool in the pan for 10 minutes, then transfer to a wire rack. While it’s still warm, drizzle a final spoonful of honey over the top for a glossy finish. Let it sit for a few more minutes, then pull apart a piece and watch the steam rise — that’s the moment you’ve been waiting for.
That's it — you did it. But hold on, I've got a few more tricks that'll take this to another level. Trust me, these little tweaks will make your pull‑apart bread the talk of every brunch table.
Insider Tricks for Flawless Results
The Temperature Rule Nobody Follows
Never let your butter get too soft during lamination. Keep it between 55‑60°F; any warmer and it will seep into the dough, any cooler and it will crack. I keep a small bowl of warm water nearby to gently warm the butter if it’s too firm, and a chilled plate to cool it if it starts to melt.
Why Your Nose Knows Best
During the final proof, trust the scent rather than the clock. When the dough smells faintly sweet and slightly yeasty, it’s ready. If you’re impatient and bake too early, the interior will be dense; if you wait too long, it may over‑proof and collapse.
The 5‑Minute Rest That Changes Everything
After you slice the rolled log into individual pieces, let them sit for 5 minutes before placing them in the pan. This short rest lets the gluten relax, preventing the pieces from snapping back when you try to pull them apart later.
Butter Brush for a Mirror Finish
Brush the tops with melted butter mixed with a dash of honey right before the first 12 minutes of baking. This creates a glossy, caramel‑tinted crust that looks as good as it tastes.
The Freeze‑Then‑Reheat Trick
If you bake a batch ahead of time, wrap each piece tightly in foil and freeze. When you’re ready to serve, let it thaw for 30 minutes, then reheat at 350°F with a splash of water on the bottom of the pan. The steam revives the flaky layers as if they were fresh out of the oven.
Creative Twists and Variations
This recipe is a playground. Here are some of my favorite ways to switch things up:
Nutty Crunch
Add ¼ cup of finely chopped toasted pecans to the cinnamon‑sugar mixture. The nuts give a delightful crunch and a buttery flavor that complements the honey beautifully.
Cocoa‑Hazelnut Dream
Swap half the flour for cocoa powder and fold in a tablespoon of hazelnut spread (like Nutella) with the honey. The result is a chocolate‑kissed version that feels like a dessert‑first breakfast.
Citrus Zest Burst
Stir the zest of one orange into the honey before drizzling it into the dough. The citrus brightens the sweet profile and adds a fragrant note that’s perfect for spring brunches.
Spiced Apple
Fold in a thin layer of sautéed apples tossed with a pinch of nutmeg and extra cinnamon. The apples soften during baking, creating pockets of juicy sweetness.
Savory Switch
Replace the honey and cinnamon with 2 tablespoons of grated Parmesan and a sprinkle of rosemary. This turns the pull‑apart bread into a savory snack that pairs wonderfully with soups.
Storing and Bringing It Back to Life
Fridge Storage
Place the cooled bread in an airtight container or zip‑top bag. It will stay fresh for up to 4 days. For extra softness, add a damp paper towel inside the container.
Freezer Friendly
Wrap each piece tightly in plastic wrap, then a layer of aluminum foil. Freeze for up to 2 months. When ready, let them thaw at room temperature for 20 minutes before reheating.
Best Reheating Method
Preheat the oven to 350°F, place the frozen or refrigerated piece on a baking sheet, and add a tiny splash (about a teaspoon) of water on the bottom of the sheet. Cover loosely with foil and heat for 8‑10 minutes, then remove the foil for the last 2 minutes to re‑crisp the crust. The steam from the water revives the buttery layers, making them taste freshly baked.