I was standing in my kitchen at 2 a.m., half‑asleep, when my roommate shouted, “You have to try this new bacon‑chicken thing I saw on TikTok!” I rolled my eyes, but the smell of sizzling bacon that wafted through the hallway was a siren call I couldn’t ignore. I grabbed the nearest pan, tossed a handful of cooked bacon pieces into the hot butter, and instantly the kitchen transformed into a smoky, buttery haven that made my heart race faster than a sprint to the fridge. That moment sparked a culinary epiphany: what if I could marry the crunchy, salty crunch of bacon with the comforting, melt‑in‑your‑mouth goodness of a creamy chicken wrap? I dared myself to create a version that would make even the most skeptical eater say, “I’ll be honest — I ate half the batch before anyone else got to try it.”
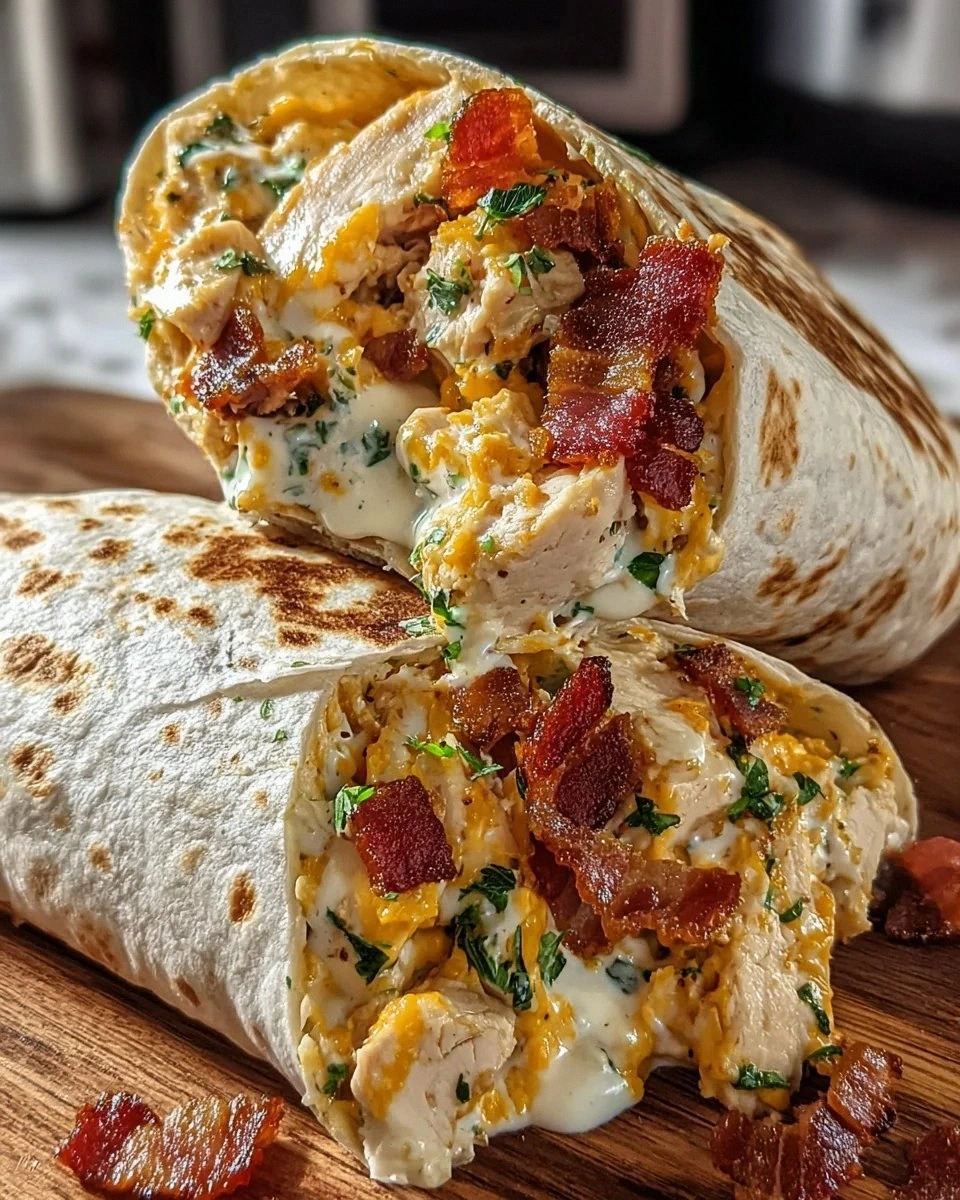
Picture this: a golden‑brown flour wrap, its edges crisped just enough to whisper “crackle” as you bite, while the interior swirls with a sauce so rich it feels like a velvet blanket draped over shredded chicken. The sauce clings to every morsel like a lover that refuses to let go, and the bacon pieces provide that satisfying crunch that shatters like thin ice under a weighty foot. The aroma of garlic dancing with butter and a hint of ranch sauce teases your nostrils, promising a flavor explosion that will make your taste buds do a happy jig. I’ll be honest — I’ve already imagined the look on my family’s faces when they see this dish coming out of the oven, eyes widening, mouths forming that “wow” shape that only truly amazing food can elicit.
Most recipes for bacon‑chicken wraps either drown the chicken in a soggy sauce or forget the crucial step of giving the bacon its signature crunch. Most get this completely wrong. Here’s what actually works: a quick flash‑fry of the bacon to lock in crispness, a light dusting of plain flour to thicken the sauce without turning it gummy, and a finishing bake that seals everything together while keeping the wrap pliable. The secret ingredient that most cooks overlook is the combination of rich cream and milk, which creates a sauce that’s both indulgent and silky, yet light enough to let the other flavors shine. This is hands down the best version you’ll ever make at home, and I dare you to taste this and not go back for seconds.
Okay, ready for the game‑changer? I’m about to walk you through every single step — from selecting the perfect bacon to mastering the art of the perfect wrap fold. By the end, you’ll wonder how you ever made this dish any other way, and you’ll have a new go‑to recipe that will dominate dinner tables, potlucks, and even those impromptu midnight cravings. Stay with me here — this is worth it.
What Makes This Version Stand Out
- Crunch Factor: The bacon is flash‑fried until it reaches a crackling perfection that stays crunchy even after being enveloped in the creamy sauce, delivering a textural surprise in every bite.
- Creamy Luxury: A blend of rich cream and milk forms a sauce that coats the chicken like velvet, providing a luxurious mouthfeel without overwhelming the palate.
- Flavor Harmony: Ranch sauce, garlic, and fresh herbs are balanced so that no single element dominates, creating a symphony of savory, tangy, and aromatic notes.
- Wrap Integrity: The flour wraps are lightly toasted before filling, ensuring they stay sturdy enough to hold the sauce yet remain tender enough to bite through effortlessly.
- Speedy Simplicity: With a prep time of just 15 minutes and a total cook time under an hour, this dish fits perfectly into a busy weeknight schedule without sacrificing quality.
- Make‑Ahead Magic: You can prep the sauce and chicken mixture a day ahead, store it in the fridge, and assemble the wraps right before baking, saving precious time on the day of serving.
- Universal Appeal: Whether you’re feeding picky kids, meat‑loving adults, or anyone in between, the combination of cheese, bacon, and chicken is a crowd‑pleaser that rarely meets resistance.
- Ingredient Flexibility: Each component can be swapped (turkey bacon, whole‑wheat flour, almond milk) to accommodate dietary preferences while still delivering that signature crunch and creaminess.
Inside the Ingredient List
The Flavor Base
The backbone of this dish is the rich cream and milk mixture, which creates a sauce that feels like a warm hug for the chicken. The cream adds body and a subtle sweetness, while the milk lightens the texture, preventing the sauce from becoming cloying. If you’re looking for a dairy‑free twist, swap the cream for coconut cream and the milk for oat milk; the result is a slightly tropical undertone that still delivers that luxurious mouthfeel. Tip: Use a heavy‑bottomed saucepan to avoid scorching the dairy, and keep the heat on medium‑low while you whisk.
The Texture Crew
Cooked bacon pieces are the star of the texture crew, providing that satisfying crunch that makes every bite interesting. Choose thick‑cut bacon for a heartier bite, or opt for turkey bacon if you want a lighter version without sacrificing the crunch. Plain flour is the quiet workhorse, thickening the sauce without turning it gummy; a whole‑wheat alternative adds a nutty note and a bit more fiber. Butter, melted into the garlic, adds a buttery depth that pairs perfectly with the bacon’s smoky richness. If you prefer a healthier fat, swap butter for extra‑virgin olive oil, but expect a slightly different flavor profile.
The Unexpected Star
Shredded chicken may seem ordinary, but it’s the perfect canvas for the sauce to cling to. Using rotisserie chicken saves you time and adds an extra layer of smoky flavor that complements the bacon beautifully. If you’re cooking from scratch, poach chicken breasts in a broth seasoned with bay leaves and peppercorns, then shred while still warm for maximum juiciness. Ranch sauce, with its herb‑laden tang, lifts the entire dish, giving it that zesty kick that makes the palate sing. Don’t be shy with the ranch; a generous drizzle ensures every bite has that bright, herby note.
The Final Flourish
Grated cheddar is the melty, comforting finish that brings everything together in a gooey embrace. Choose a sharp cheddar for a punchier flavor, or a milder one if you prefer the bacon and ranch to dominate. Diced green onions add a fresh bite that brightens the richness, while seasonings—salt, pepper, and a pinch of parsley—enhance every component. Flour wraps act as the cozy vessel; they’re sturdy enough to hold the sauce yet soft enough to bite through without feeling like a cardboard box. For a low‑carb twist, use lettuce leaves or collard greens as a wrap alternative.
Everything's prepped? Good. Let's get into the real action…
The Method — Step by Step
-
Start by heating a large skillet over medium‑high heat. Add the butter and let it melt, listening for that gentle sizzle that signals it’s ready. Toss in the minced garlic and stir for about 30 seconds until fragrant, but be careful not to let it brown—burnt garlic turns bitter fast. This is the moment of truth: the aroma should fill the kitchen like a promise of something amazing.
Kitchen Hack: If you’re using pre‑minced garlic, add it a few seconds later to avoid over‑cooking; fresh cloves release their oils more slowly. -
Add the cooked bacon pieces to the pan, spreading them out in an even layer. Let them fry for 2–3 minutes, stirring occasionally, until the edges become extra crisp. You’ll hear a satisfying crackle—trust that sound; it means the bacon is reaching its peak crunch. Once done, use a slotted spoon to transfer the bacon to a paper‑towel‑lined plate, leaving the rendered fat in the pan for the next step.
-
Sprinkle the plain flour over the garlic‑bacon fat, whisking constantly to form a smooth roux. Cook the roux for about a minute, watching it turn a light golden hue—this is where the sauce gets its body. Then, slowly pour in the rich cream and milk while whisking, ensuring no lumps form. The mixture should thicken within 2–3 minutes, coating the back of a spoon with a silky sheen.
Watch Out: If the sauce starts to separate, lower the heat immediately and whisk vigorously; the fat will re‑emulsify. -
Stir in the shredded chicken, making sure each strand is enveloped in the creamy sauce. Add the ranch dressing, grated cheddar, and a generous pinch of salt and pepper. The sauce should now have a glossy, cheesy appearance, and the cheese will begin to melt into a cohesive blanket. Let everything simmer for another 2 minutes, allowing the flavors to marry fully.
-
Fold in the diced green onions and the crisp bacon you set aside earlier, reserving a small handful of bacon for garnish later. The green onions should retain a slight crunch, providing a fresh contrast to the rich sauce. Taste the mixture and adjust seasoning with a dash more salt or a sprinkle of parsley if you like. At this point, the filling should smell like a comfort‑food dream—creamy, smoky, and herbaceous all at once.
-
Preheat your oven to 375°F (190°C). While it heats, lay out the flour wraps on a clean work surface. Spoon a generous portion of the chicken‑bacon mixture onto the center of each wrap, spreading it evenly but leaving a small border around the edges. Sprinkle the remaining bacon on top for that final crunch.
-
Fold the sides of each wrap over the filling, then roll tightly, pressing gently to seal. Place the wrapped rolls seam‑side down on a baking sheet lined with parchment paper. For an extra golden finish, brush the tops with a little melted butter or a quick spray of cooking oil.
Kitchen Hack: Use a silicone brush to apply butter evenly; this prevents soggy spots and encourages an even browning. -
Bake the wraps for 12–15 minutes, or until the tops are golden‑brown and the interior is bubbling with melted cheese. The edges should start pulling away from the pan, a visual cue that the wrap is perfectly cooked. Remove from the oven and let them rest for 2 minutes—this short rest lets the sauce settle and prevents the wraps from falling apart when you slice them.
-
Slice each wrap diagonally, garnish with the reserved bacon bits and an extra sprinkle of fresh parsley if desired. Serve hot, and watch as your guests dive in, eyes widening at the sight of that glossy, cheesy interior. That sizzle when it hits the pan? Absolute perfection. And now the fun part—watch them devour every last bite while you bask in the glory of a dish well‑executed.
That's it — you did it. But hold on, I've got a few more tricks that'll take this to another level...
Insider Tricks for Flawless Results
The Temperature Rule Nobody Follows
Never rush the sauce by cranking the heat to high; a gentle medium‑low simmer allows the flour to fully gelatinize, creating a sauce that stays silky even after it cools. I once tried a shortcut, and the sauce turned grainy—like eating a bowl of sand. Keep a close eye on the pan, and if you see the edges starting to stick, lower the heat and stir continuously.
Why Your Nose Knows Best
Your sense of smell is a secret weapon. When the garlic turns golden and releases that nutty perfume, you know the flavor base is ready. If the bacon’s aroma shifts from smoky to oily, it’s a sign you’ve over‑cooked it and should remove it immediately to avoid a greasy final dish.
The 5‑Minute Rest That Changes Everything
After baking, let the wraps sit for exactly five minutes before cutting. This short rest allows the cheese to set slightly, preventing a gooey mess when you slice. It also lets the steam redistribute, keeping the interior moist while the exterior stays crisp.
Bacon‑First, Sauce‑Second Strategy
By cooking the bacon first and using its rendered fat for the roux, you infuse the entire sauce with that deep, smoky essence. Skipping this step means you lose a layer of flavor that makes the dish unforgettable. I’ve seen people add bacon at the end, and the result is a flat, one‑dimensional bite.
Wrap‑Seal Technique
When folding the wrap, don’t over‑stuff it; too much filling can cause the seam to open during baking. A good rule of thumb is to fill each wrap to about two‑thirds of its capacity, then tuck the sides in tightly before rolling. This ensures a tight seal and an even bake.
Creative Twists and Variations
This recipe is a playground. Here are some of my favorite ways to switch things up:
Spicy Southwest
Swap the ranch sauce for a chipotle‑lime aioli, add a teaspoon of smoked paprika to the flour, and sprinkle jalapeño slices into the filling. The heat pairs beautifully with the bacon’s smokiness, and the lime brightens the whole dish.
Mediterranean Delight
Replace cheddar with feta, stir in sun‑dried tomatoes, and use oregano instead of parsley. The tangy feta complements the creamy sauce while the tomatoes add a sweet burst that transports you to a sunny terrace.
Breakfast‑For‑Dinner
Add scrambled eggs to the filling, swap the ranch for a drizzle of maple‑mustard glaze, and finish with a sprinkle of chives. This version turns the dish into a hearty brunch that satisfies any morning cravings.
Vegan Victory
Use smoked tempeh instead of bacon, coconut cream and oat milk for the sauce, vegan cheddar, and a plant‑based ranch. The texture changes, but the smoky, creamy profile remains intact, proving you don’t need animal products to enjoy crunch.
Cheesy Overload
Mix mozzarella, gouda, and a dash of blue cheese into the sauce, then top each wrap with a thin slice of extra cheese before baking. The result is a stretchy, ooey‑gooey masterpiece that will make cheese lovers swoon.
Low‑Carb Lettuce Wraps
Replace flour wraps with large butter lettuce leaves, and lightly grill the leaves for a charred flavor. This version reduces carbs dramatically while still delivering that satisfying crunch from the bacon.
Storing and Bringing It Back to Life
Fridge Storage
Place any leftover wraps in an airtight container and store them in the refrigerator for up to three days. The sauce may thicken a bit, but a quick reheating in a skillet with a splash of milk will bring it back to its original silkiness.
Freezer Friendly
Wrap each fully assembled roll tightly in plastic wrap, then place them in a freezer‑grade zip‑top bag. They’ll keep for up to two months. When you’re ready to eat, thaw overnight in the fridge, then bake at 350°F for 10‑12 minutes, adding a tiny splash of water before the final bake to steam the interior back to perfection.
Best Reheating Method
For the crispiest result, reheat in a preheated oven at 375°F for 8‑10 minutes, uncovered. If you’re in a hurry, a microwave works—just cover with a damp paper towel and heat in 30‑second bursts, then finish under a broiler for a minute to restore the crunch.