I still remember the day I swore off molasses forever. There I was, fifteen years old, attempting to impress my grandmother by baking her "famous" shoofly pie from a stained index card she kept tucked behind the flour tin. The kitchen looked like a crime scene: sticky black puddles on the counter, flour dust hanging in the air like early-morning fog, and a pie that emerged from the oven looking more like volcanic rock than dessert. My pride was as burnt as the crust. Grandma took one bite, laughed so hard she had to sit down, then handed me a glass of milk and said, "Child, you're just one bake away from glory." Fast-forward twenty years and hundreds of test runs, and I can finally say I've found that glory. This shoofly pie recipe isn't just a set of instructions; it's a time machine that transports you to Pennsylvania Dutch country where the air smells like brown sugar and the coffee is always strong enough to wake the dead.
Picture this: it's 5 a.m. on a frigid January morning, the kind that makes your nose hairs freeze the second you step outside. I'm standing in my kitchen in fuzzy socks, heating up a cast-iron skillet while the wind howls against the windows. The first scent that hits is the deep, almost smoky aroma of molasses mingling with hot coffee—an aroma so nostalgic it could make a grown man weep into his flannel shirt. Then comes the magic moment when the crumb topping meets the molasses filling, creating that signature gooey layer bakers call the "wet bottom." That sizzle when it hits the pan? Absolute perfection. By the time the pie cools enough to slice, the whole house smells like a hearth in an Amish farmhouse, and every neighbor within a half-mile radius suddenly remembers they need to borrow a cup of sugar.
What makes this version different from every other shoofly pie on the internet? I'm glad you asked. Most recipes treat this legendary dessert like a glorified molasses cake with a sad, sandy topping. They miss the nuanced balance of sweet and bitter, the way the filling should tremble like a custard yet slice cleanly, the crumb that stays crisp even after three days (if it lasts that long). My method uses a reverse-mix technique I learned from an eighty-year-old baker in Lancaster who refused to share her secret until I promised to never use margarine. The result is a pie that tastes like Saturday morning at the farmers' market—wholesome, slightly rebellious, and impossible to stop eating. Let me walk you through every single step—by the end, you'll wonder how you ever made it any other way.
What Makes This Version Stand Out
Before we dive into the flour sack, let me hit you with the highlights that separate this shoofly pie from the tourist-trap versions you've probably endured. Each of these points comes from either a spectacular failure or a serendipitous discovery in my kitchen laboratory, and together they create a dessert that has converted even the most stubborn molasses skeptics.
- Molasses Matters: Instead of the standard supermarket brand, I use a bold, blackstrap molasses plus a spoonful of local honey. The combo gives depth without that metallic aftertaste that sends kids running. You get notes of smoky cocoa, burnt caramel, and something almost citrusy at the end.
- The Crumb That Refuses to Sog: Most toppings turn into wet sand by day two. My version folds in a little coarse cornmeal and chilled lard (yes, lard—trust me) so the crumbs stay shatter-crisp for days, creating a texture contrast that'll make your teeth happy.
- Hot-Fill Method: Instead of mixing everything at room temp, we heat the molasses mixture just until it loosens and bubbles around the edges. This simple step intensifies flavor and helps the filling set into that signature custardy layer everyone fights over.
- Butter-Washed Crust: After blind-baking, I brush the inside with a thin coat of melted butter and return it to the oven for three minutes. It forms a moisture shield so your bottom stays flaky, not gummy—a game-changer for fruit-phobic bakers.
- Overnight Magic: While you can eat this pie the same day, wrapping it and letting it sit transforms the texture. The crumbs absorb just enough humidity to taste freshly baked, while the filling firms up into sliceable silk. Plan ahead; you won't regret it.
- Freezer-Friendly Slices: Cut leftovers into wedges, wrap in parchment, freeze, and you have single-serve portions ready for midnight cravings. Thirty seconds in the microwave and it's like a gooey, warm cookie that pairs scandalously well with cold milk or hot coffee.
Alright, let's break down exactly what goes into this masterpiece, because once you see how humble the ingredient list is, you'll understand why technique is everything.
Inside the Ingredient List
Great shoofly pie is sneaky: it tastes like it contains twenty ingredients when it really only needs nine. Each component pulls double duty, contributing flavor, texture, or structure. Skip one and the whole house of cards tumbles down, so let's meet the players before they hit the mixing bowl.
The Flavor Base
First up is molasses, the soul of the pie. Look for an unsulphured blackstrap variety; it has the deepest color and a robust, almost coffee-like bitterness that balances the brown sugar's sweetness. If you can only find mild molasses, reduce the brown sugar by two tablespoons or you'll end up with dessert that tastes like candy. The second half of the base is hot, strong coffee—yes, coffee. It blooms the spices and thins the molasses so it pours like melted chocolate. Don't worry about caffeine; most bakes off, leaving only complexity. Finally, a pinch of baking soda reacts with the acidic molasses to create tiny bubbles that lighten the filling so it doesn't eat like a brick.
The Texture Crew
All-purpose flour forms the backbone of both filling and crumb topping. For the filling, it sets into a soft custard that still jiggles. For the topping, it mingles with brown sugar and butter to create nuggets that shatter between your teeth. Speaking of brown sugar, use dark instead of light; the extra molasses coating on the crystals adds burnt-caramel notes you can't fake. Coarse cornmeal is the secret handshake here—its gritty edges keep the crumbs from clumping into doughy blobs. And please, use real butter. Margarine melts too fast and produces greasy crumbs that taste like movie popcorn.
The Unexpected Star
Here's where I lose the purists: a single grated granny smith apple. Micro-planed into the filling, it melts completely during baking but leaves behind a bright acidity that keeps the pie from feeling like a throat-coating sugar bomb. If apples aren't your thing, substitute ½ tsp apple cider vinegar. Either way, don't skip the acid; it's the difference between a dessert you want a sliver of and one you want the whole darn pan of.
The Final Flourish
Spices should whisper, not scream. I use ¼ tsp cinnamon, a pinch of nutmeg, and a whisper of clove. That's it. Anything more and you'll taste spice cake, not molasses. A splash of vanilla rounds rough edges, while a pinch of salt amplifies every other flavor. For the crust, I blend butter for flavor and lard for flake. If lard offends your sensibilities, substitute vegetable shortening, but know you're sacrificing shatter. And always keep everything cold—lukewarm fat equals cardboard crust.
The Method — Step by Step
Okay, ready for the game-changer? We're going to treat this pie like two separate desserts that happen to share a crust. The filling cooks into a molasses custard while the topping bakes into buttery gravel. Getting both to finish at the same time requires a little kitchen choreography, but I've broken it down so even a dance-floor klutz can nail it.
- Start by making the crust because it needs to chill. In a food processor, pulse 1¼ cups flour, ½ tsp salt, and 1 tbsp sugar. Add 6 tbsp cold butter and 2 tbsp cold lard, cut into cubes. Pulse until the mix looks like coarse sand with a few pea-size lumps. Drizzle in 3 to 4 tbsp ice water, a tablespoon at a time, pulsing after each. Stop as soon as the dough starts to clump—overworking is the enemy of flake. Dump onto plastic wrap, press into a disk, and refrigerate at least 30 minutes. This rest hydrates the flour and chills the fat so the crust won't shrink into a sad, thick puck.
- While the dough chills, whisk the filling. In a saucepan combine 1 cup molasses, ½ cup hot coffee, ½ cup dark brown sugar, and the grated apple. Heat over medium just until tiny bubbles appear around the edge and the mixture thins to the texture of chocolate syrup. Remove from heat, whisk in ½ tsp baking soda, and watch it foam like a middle-school volcano. Let cool 10 minutes; if you pour it boiling hot into the shell, you'll pre-cook the bottom and glue it to the pan.
- For the crumb topping, stir together 1½ cups flour, ⅔ cup brown sugar, ¼ cup coarse cornmeal, ½ tsp cinnamon, and ¼ tsp salt. Pour 6 tbsp melted butter over the top and toss with a fork until you get clumps ranging from peas to walnuts. Chill the bowl while the oven heats—cold crumbs hold their shape and bake up crisp instead of melting into a single slab. You'll be tempted to snack on these; I dare you to taste this and not go back for seconds.
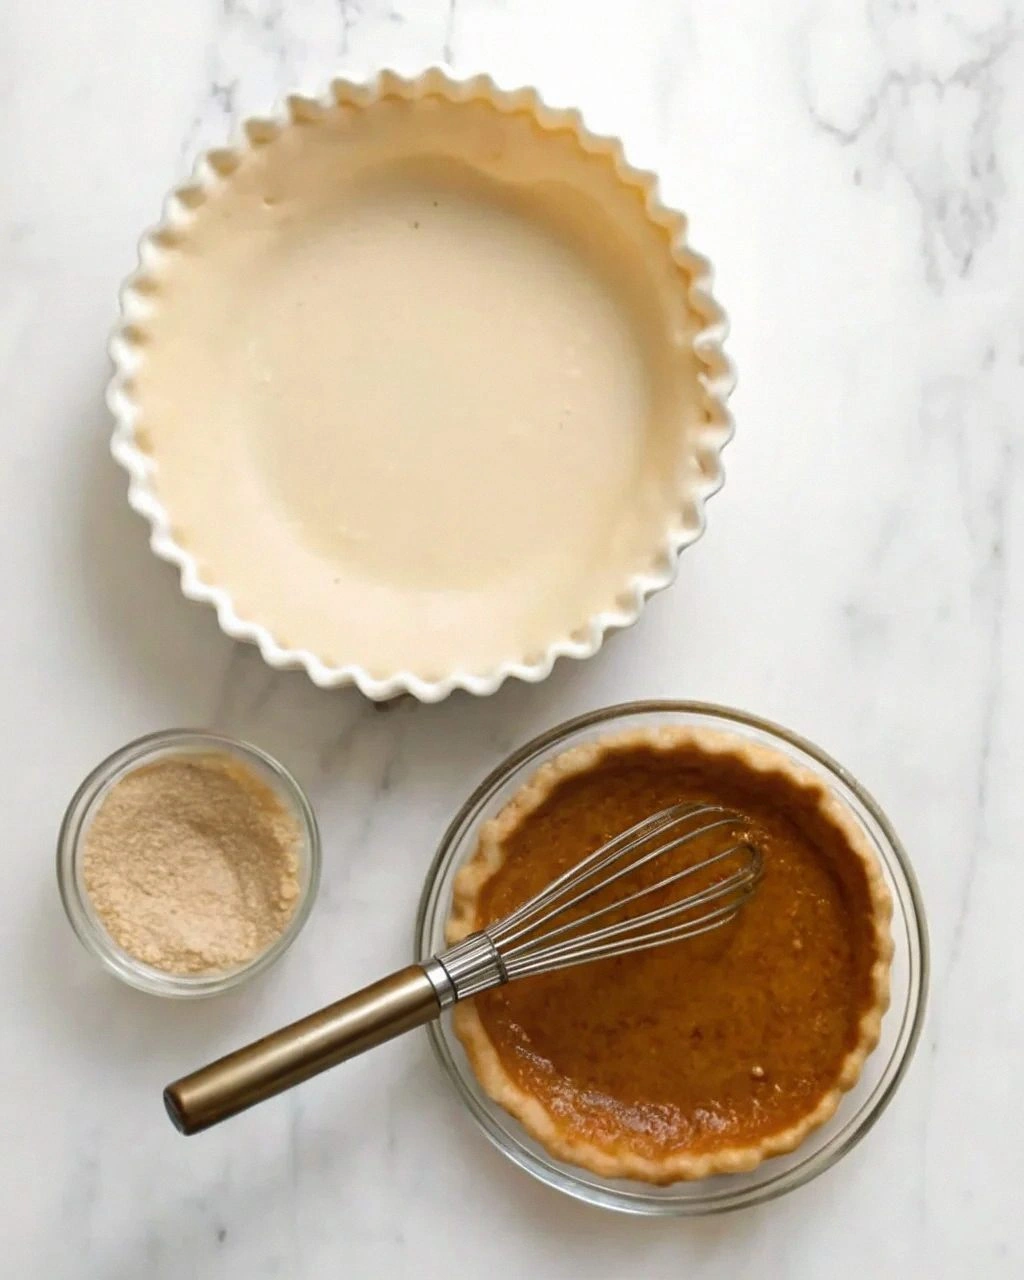
- Heat oven to 400°F with a rack in the lower third. Roll the dough into a 12-inch circle on a floured counter, rotating frequently to prevent sticking. Transfer to a 9-inch pie plate, easing it in rather than stretching. Trim to a ½-inch overhang, fold under, and crimp however you like—fluted for fancy, fork-pressed for rustic. Line with foil, fill with pie weights or dried beans, and blind-bake 15 minutes until the rim just starts to color. Remove weights, prick bottom with a fork, and bake 5 minutes more. This two-step bake prevents the dreaded soggy bottom that haunts custard pies.
- Here's the fun part: brush the hot crust with 1 tbsp melted butter, return to oven for 3 minutes, then reduce temperature to 350°F. The butter forms a hydrophobic shield so the filling can't soak in. Pour the molasses mixture into the shell; it should come within ¼ inch of the rim. Sprinkle the chilled crumbs evenly over the top, pressing lightly so some sink and some stay on the surface. Don't cover every speck of filling; those little molasses pools will bubble up and create the signature glossy spots.
- Bake 25 minutes, then rotate the pie front to back for even browning. Bake 10 to 15 minutes more, until the crumbs are deep golden and the filling jiggles like set gelatin when you nudge the pan. If the rim browns too fast, tent with foil strips. Resist the urge to overbake; the center should still sway slightly—it firms as it cools. Your kitchen will smell like brown sugar, coffee, and something almost malty, a scent so intoxicating my mail carrier once asked if he could come in for a slice.
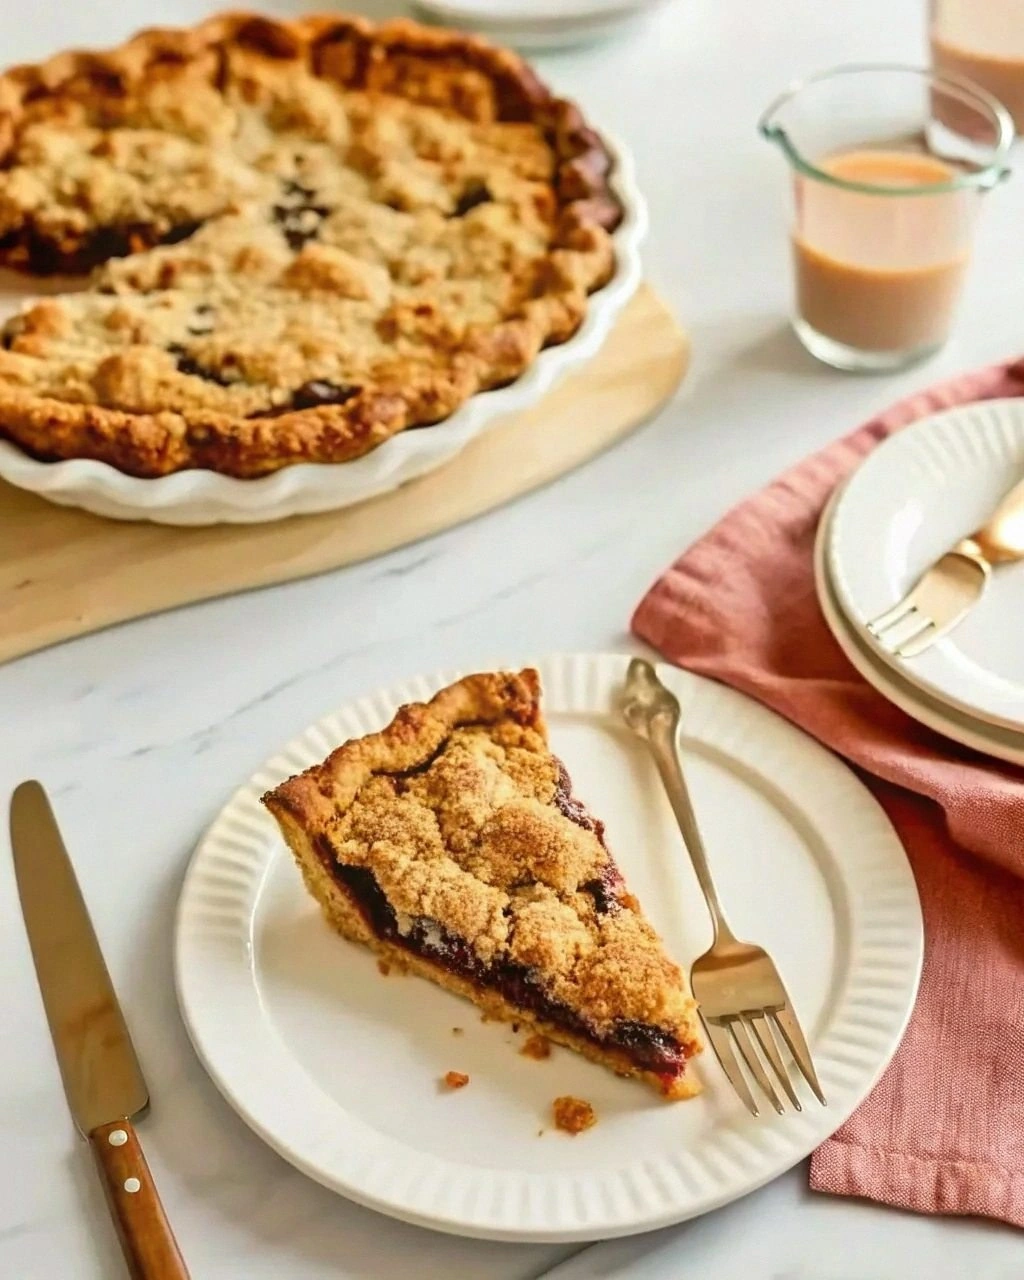
- Cool on a rack 2 hours. I know, it's torture. But cutting too early causes the molasses layer to ooze like lava, and you'll lose that gorgeous layered look. Once cool, slice with a sharp knife dipped in hot water for clean cuts. Serve at room temp or warm each wedge 15 seconds in the microwave with a dollop of whipped cream. The contrast of cold cream and warm, spicy filling is pure magic.
Insider Tricks for Flawless Results
Even seasoned bakers stumble over shoofly pie. The filling can curdle, the crumbs can melt, the crust can shrink like a wool sweater in July. After enough trials to fill a bakery case, I've distilled the process into foolproof habits that guarantee success every single time.
The Temperature Rule Nobody Follows
Everything—ingredients, bowls, even your fingertips—should hover around 68°F. Warm butter oozes into the flour, creating greasy crumbs. Cold molasses thickens like tar, trapping pockets of air that burst and leave craters. I keep a cheap infrared thermometer in my drawer and zap bowls in the freezer for 30 seconds if they feel warm. It sounds obsessive, but this is hands down the best version you'll ever make at home, and temperature is the silent puppet master.
Why Your Nose Knows Best
Forget timers; your sense of smell is the most accurate gauge. When the crumbs start to smell like toasted hazelnuts and the molasses takes on a bittersweet edge, you've got two minutes max before it's done. I once pulled a pie at the nutty-aroma mark, set it on the porch to cool, and returned to find my neighbor hovering like a bear at a beehive. She begged for the recipe on the spot, confessing she'd never liked shoofly pie before that moment.
The 5-Minute Rest That Changes Everything
After mixing the crumb topping, let it sit on the counter for five minutes before chilling. The sugar starts to dissolve, creating tiny pockets of caramel that crackle like crème brûlée when baked. Skip this step and your crumbs taste like dry shortbread. A friend tried rushing once—let's just say it didn't end well, and her kids still call that batch "sawdust pie."
Creative Twists and Variations
This recipe is a playground. Here are some of my favorite ways to switch things up, whether you're catering to picky kids, impressing foodie friends, or just plain bored on a snowy Sunday.
Bourbon Banana Shoo
Swap the coffee for strong black tea spiked with 2 tbsp bourbon, and fold in ½ cup mashed ripe banana with the molasses. The banana adds a custardy richness that makes the filling taste like banoffee's edgy cousin. Top with toasted pecans instead of crumbs for a southern twist. Serve slightly warm with a scoop of vanilla bean ice cream and prepare for swoons.
Chocolate Chili Crunch
Add ¼ cup Dutch-process cocoa to the crumb topping and a pinch of cayenne to the filling. The heat sneaks up slowly, warming the back of your throat just as the chocolate melts on your tongue. It's like Mexican hot chocolate in pie form. I'll be honest—I ate half the batch before anyone else got to try it, and I regret nothing.
Citrus Sunshine Pie
Replace the grated apple with the zest of one orange and 1 tsp fresh ginger. The bright, zesty notes cut through the molasses, making this version perfect for spring brunches. Garnish with candied orange peel and watch people guess the secret ingredient. Nobody ever pegs the ginger until you tell them.
Coconut Cream Dream
Substitute ¼ cup of the molasses with cream of coconut and fold toasted coconut flakes into the crumb topping. The result is a tropical twist that tastes like a Caribbean vacation collided with Pennsylvania farmland. Chill overnight and serve with whipped coconut cream for a dairy-free option that fools even dairy devotees.
Savory Breakfast Version
Cut the brown sugar in half, add ½ cup grated sharp cheddar to the crumbs, and swap the spices for black pepper and fresh thyme. Serve alongside scrambled eggs and hot sauce. It sounds weird until you try it—then you realize shoofly's ancestors were probably more savory than sweet. Picture yourself pulling this out of the oven, the whole kitchen smelling incredible, and your brunch guests losing their minds.
Storing and Bringing It Back to Life
If you've ever struggled with storing custard pies, you're not alone—and I've got the fix. Shoofly pie keeps beautifully when you treat it like the diva it is: cool, dry, and away from prying fingers.
Fridge Storage
Cover cooled pie with a loose dome of foil or an upside-down bowl; plastic wrap traps moisture and softens the crumbs. Refrigerate up to 5 days, though flavor peaks at day 3 when the molasses mellows and the crumbs absorb just enough humidity to taste freshly baked. Bring slices to room temp 30 minutes before serving, or microwave 15 seconds for that just-baked warmth.
Freezer Friendly
Cut pie into wedges, wrap each in parchment, then foil, and freeze up to 2 months. Thaw overnight in the fridge, then refresh in a 325°F oven for 8 minutes to re-crisp the crumbs. The filling stays silky, the crumbs regain their snap, and you have instant dessert for unexpected guests or midnight cravings.
Best Reheating Method
Add a tiny splash of water to a skillet, place pie slice in the center, cover with lid, and steam over low heat for 3 minutes. The gentle bath rehydrates the filling without turning the crust soggy. Finish under the broiler for 30 seconds to re-crisp the edge. It's like a spa day for leftovers.