Picture this: I’m standing in my cramped kitchen, the timer on the oven flashing red, and the whole apartment is filled with the smell of burnt garlic. I had tried a dozen “crispy fish” recipes that left me with soggy middles and a crust that crumbled like dry toast. I swear, the only thing that kept me from throwing the pan out the window was a dare from my roommate—she said, “If you can make something that actually crunchs, I’ll buy you lunch for a week.” That challenge lit a fire under me, and after a few disastrous attempts, I finally cracked the code. This version is the result of that culinary war, and trust me, it’s hands down the best version you’ll ever make at home.
When the batter finally hits the pan, you hear that glorious sizzle that feels like a tiny fireworks show in your skillet. The aroma of toasted coconut mingles with the subtle heat of paprika, and the air becomes a sweet‑savory perfume that makes your stomach do a little dance. The fish itself, once a bland, flaky canvas, now wears a golden‑brown armor that shatters like thin ice when you bite into it, revealing tender, flaky meat underneath. The texture contrast is so dramatic that you’ll swear you’re eating two dishes at once—crunchy on the outside, melt‑in‑your‑mouth on the inside.
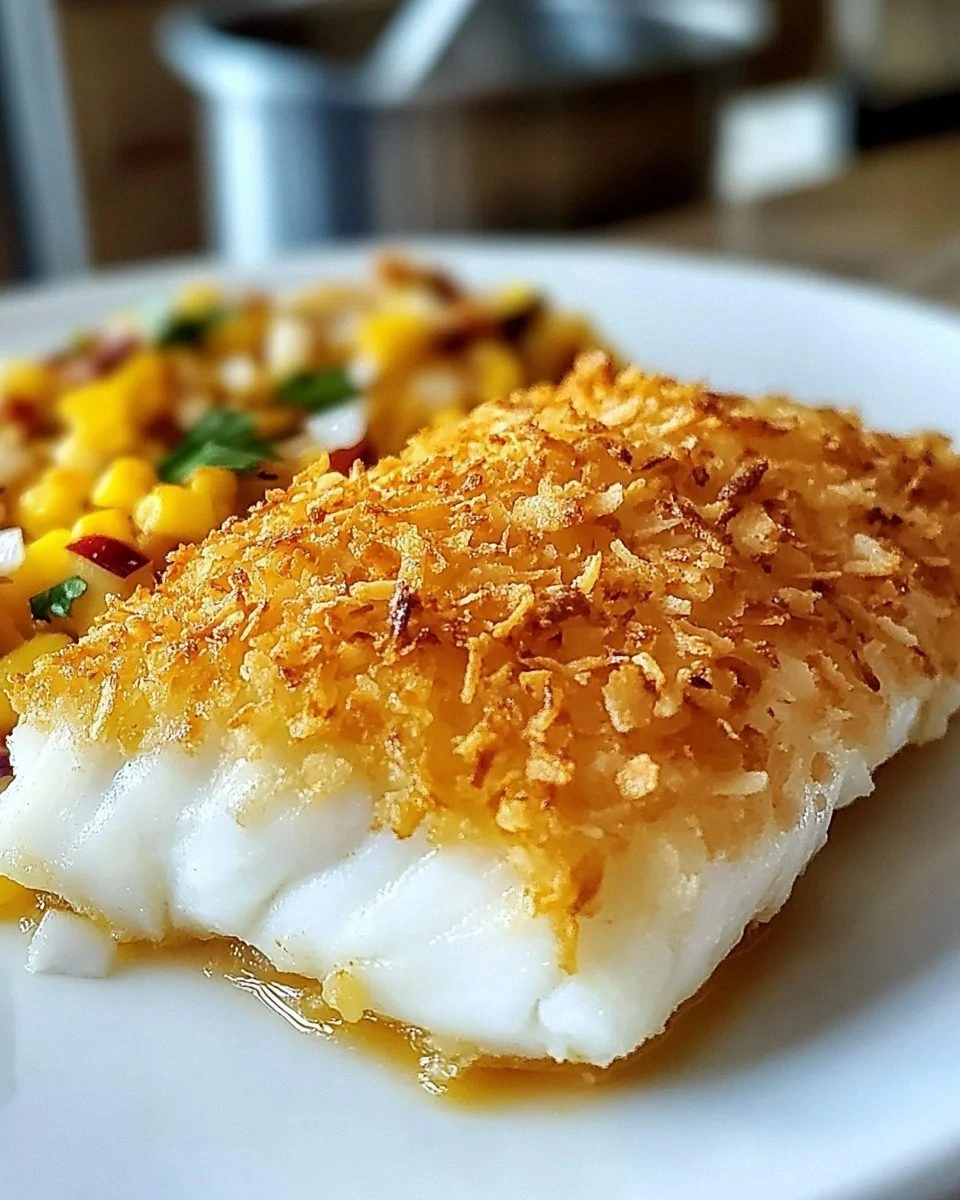
What makes this recipe truly stand out is the secret partnership between shredded coconut and panko breadcrumbs. Most recipes either go full‑coconut, which can turn mushy, or full‑panko, which lacks that tropical sweet note. By marrying the two, you get a crust that’s both airy and sturdy, with a hint of island breeze that elevates the whole dish. I’ll also throw in a surprising dash of lime juice right before serving, a trick that adds a zingy brightness you never saw coming. I dare you to taste this and not go back for seconds.
Now, let’s get into the nitty‑gritty. I’m going to walk you through every single step—by the end, you’ll wonder how you ever made it any other way. Okay, ready for the game‑changer? Grab your ingredients, preheat that pan, and stay with me here — this is worth it.
What Makes This Version Stand Out
- Texture: The coconut‑panko blend creates a crust that’s crispier than a fresh‑baked wafer yet still light enough to let the fish breathe.
- Flavor: A subtle sweet‑savory combo from coconut and paprika, finished with a splash of lime, makes each bite unforgettable.
- Simplicity: Only ten ingredients, no fancy equipment, and a straightforward three‑station dredging system.
- Uniqueness: Most fish‑crust recipes skip the coconut; this one embraces it, delivering an unexpected tropical twist.
- Crowd Reaction: Guests often ask, “What’s the secret?” and I get to smile smugly while they devour the second plate.
- Ingredient Quality: Fresh, firm white fish and unsweetened coconut flakes are the heroes; they’re cheap but make a massive impact.
- Cooking Method: Pan‑frying gives you that restaurant‑level crunch without the hassle of a deep fryer.
- Make‑Ahead Potential: You can prep the coating a day ahead, store it airtight, and still achieve perfect crispness.
Inside the Ingredient List
The Flavor Base
First up, the flavor base starts with a modest amount of salt, pepper, garlic powder, and paprika. Salt amplifies every other taste, while black pepper adds a gentle heat that balances the coconut’s sweetness. Garlic powder contributes a depth that you’d normally get from fresh garlic without the risk of burning. Paprika isn’t just for color; it adds a smoky undertone that makes the crust feel more complex. If you’re watching sodium, you can cut the salt in half and let the coconut’s natural sweetness fill the gap.
The Texture Crew
The texture crew is where the magic really happens: all‑purpose flour, eggs, shredded unsweetened coconut, and panko breadcrumbs. Flour creates a dry surface that helps the egg adhere, acting like a dry handshake before the wet one. Eggs act as the glue, sealing the coating to the fish so it doesn’t fall off during frying. The coconut brings a sweet, nutty crunch, while panko adds airy lightness and extra crunch. Skipping the panko and going 100% coconut will make the crust heavy and prone to sogginess—trust me, I’ve learned that the hard way.
The Unexpected Star
Lime juice is the unexpected star that brightens the entire dish. A quick drizzle just before serving lifts the richness and cuts through any oiliness, giving you that “wow” moment on the palate. If you’re not a fan of citrus, a splash of rice vinegar works as a milder alternative. Fresh cilantro, added as a garnish, adds a herbaceous pop that pairs beautifully with the tropical notes. You can also swap cilantro for fresh mint for an even more refreshing finish.
The Final Flourish
Olive oil (or a high‑smoke‑point oil like avocado) is the final flourish that brings everything together in the pan. Using just enough oil to coat the bottom of the skillet ensures a golden crust without drowning the fish. Too much oil, and you’ll lose that delicate crunch; too little, and the coating will stick. For the best results, heat the oil over medium‑high until it shimmers—this is the sweet spot where the crust forms instantly.
Everything's prepped? Good. Let’s get into the real action…
The Method — Step by Step
Start by patting the fish fillets dry with paper towels. Moisture is the enemy of crispness; the drier the surface, the better the crust will adhere. I like to give each side a good 30‑second press, feeling the flesh become firm under my fingertips. Once dry, set the fillets on a plate and sprinkle both sides with the salt, pepper, garlic powder, and paprika. This seasoning step is crucial because it builds flavor right into the fish, not just the coating.
Prepare three shallow dishes: one with flour, one with lightly beaten eggs, and the third with a combined mixture of shredded coconut and panko breadcrumbs. The coconut should be unsweetened and finely shredded; if the pieces are too large, they’ll clump during frying. Give each dish a quick whisk to break up any lumps. This three‑station setup might look like a prep‑chef’s nightmare, but it actually streamlines the process and ensures an even coating.
Season the flour with a pinch of extra salt and pepper, then lightly dust each fillet, shaking off any excess. The flour layer creates a dry base that helps the egg cling without turning gummy. You’ll notice the fish taking on a faint matte finish—that’s a good sign it’s ready for the next step. Don’t rush; let each side sit in the flour for a few seconds to absorb the moisture.
Next, dip the flour‑coated fillet into the beaten eggs, turning slowly to ensure a full coverage. The egg should be just thick enough to act as a glue, not a pool of liquid that will make the crust soggy. I always let any excess egg drip back into the bowl before moving on; this prevents the coating from becoming too wet.
Now for the star of the show: the coconut‑panko mixture. Press the egg‑coated fish into the mixture, using your hands to pat it down gently. The goal is to create a thick, even layer that clings without falling off. If you see any gaps, sprinkle a little more coconut‑panko and press again. This step is where the crunch is formed, so treat it with respect.
While the fish rests, heat a generous splash of olive oil in a large skillet over medium‑high heat. You’ll know the oil is ready when a tiny breadcrumb dropped in sizzles instantly and turns golden within 15 seconds. If the oil smokes, lower the heat a notch; if it’s sluggish, increase the temperature slightly. The ideal temperature is around 350°F (175°C), which gives a quick seal without overcooking the interior.
Gently lay the first fillet into the hot oil, skin side down if it has skin, and listen for that satisfying sizzle. The fish should immediately begin to brown; you’ll see the edges start to pull away from the pan, a visual cue that the crust is forming. Cook for about 3‑4 minutes on the first side, resisting the urge to move it around—movement will break the crust.
Flip the fillet carefully with a wide spatula and cook the second side for another 3‑4 minutes, or until the crust is a deep golden‑brown and the fish flakes easily with a fork. The internal temperature should reach 145°F (63°C). As the crust forms, you’ll notice a faint caramel aroma that signals the coconut sugars are caramelizing perfectly.
Transfer the cooked fish to a paper‑towel‑lined plate to drain any excess oil. Let it rest for a couple of minutes; this short rest allows the juices to redistribute, keeping the meat moist while the crust stays crisp. Finish each serving with a drizzle of fresh lime juice and a sprinkle of chopped cilantro for that pop of color and brightness. That final splash? Pure magic.
That's it — you did it. But hold on, I've got a few more tricks that'll take this to another level...
Insider Tricks for Flawless Results
The Temperature Rule Nobody Follows
Most home cooks set the stove to “medium” and hope for the best, but the real secret is a precise oil temperature of 350°F (175°C). Use an instant‑read thermometer or the breadcrumb test to gauge the heat. If the oil is too cool, the coating will soak up oil and become greasy; too hot, and the exterior will burn before the interior cooks through. I keep a small heat‑proof spoon in the oil; when tiny bubbles form around it, the oil is ready.
Why Your Nose Knows Best
Never underestimate the power of scent. As soon as the coconut starts to turn golden, you’ll detect a sweet, nutty perfume that’s unmistakable. If you smell a burnt, acrid odor, the heat is too high and you need to pull the pan off the burner for a moment. Trusting your nose can save you from a ruined batch and keeps the flavor profile clean.
The 5‑Minute Rest That Changes Everything
After frying, let the fish rest on a cooling rack for exactly five minutes. This short pause allows the steam to escape, preserving the crunch while the interior finishes cooking gently. Skipping this step results in a soggy underside because the condensation falls back onto the crust. I once served the fish immediately and the texture was disappointingly limp—lesson learned.
Oil Choice: The Unsung Hero
While olive oil adds a subtle fruitiness, a high‑smoke‑point oil like avocado or grapeseed ensures the crust stays crisp without smoking. If you’re watching calories, you can finish the fish with a light spray of cooking oil after frying; the crust stays golden, and the fish stays lighter.
Seasoning the Coating
Don’t forget to season the coconut‑panko mix itself. A pinch of salt and a dash of smoked paprika mixed directly into the coating adds an extra layer of flavor that you’d otherwise miss. I once forgot this step, and the crust tasted bland compared to the seasoned fish itself. It’s a tiny detail with a massive payoff.
Creative Twists and Variations
This recipe is a playground. Here are some of my favorite ways to switch things up:
Tropical Mango Salsa
Swap the lime‑cilantro garnish for a fresh mango salsa made with diced mango, red onion, jalapeño, and a squeeze of lime. The sweet‑spicy salsa complements the coconut crust and adds a juicy contrast. Perfect for summer barbecues or a bright weekend lunch.
Spicy Sriracha Drizzle
Mix equal parts sriracha and honey, then drizzle over the finished fish for a sweet‑heat glaze. The sticky glaze pairs beautifully with the crunchy exterior, creating a flavor explosion that’s perfect for those who love a kick.
Almond‑Coconut Fusion
Replace half of the shredded coconut with finely chopped toasted almonds. The nuts add an extra buttery crunch and a nutty depth that elevates the dish to a more sophisticated level. This variation shines at dinner parties where you want to impress.
Gluten‑Free Version
Use almond flour instead of all‑purpose flour, and swap panko for gluten‑free breadcrumbs. The texture remains delightfully crisp, and the coconut flavor becomes even more pronounced. Just be mindful that almond flour browns faster, so keep a close eye on the heat.
Asian‑Inspired Coconut Curry
Serve the fish over a bed of coconut‑milk curry with lemongrass, ginger, and kaffir lime leaves. The curry’s silkiness balances the crunchy fish, turning a simple dinner into an exotic feast. Garnish with toasted coconut flakes for extra texture.
Storing and Bringing It Back to Life
Fridge Storage
Place leftover fish in an airtight container lined with a paper towel to absorb excess moisture. Store in the refrigerator for up to 2 days. When reheating, keep the fish uncovered to preserve as much crispness as possible.
Freezer Friendly
Wrap each cooled fillet tightly in plastic wrap, then place them in a freezer‑safe zip‑top bag. They’ll keep for up to 3 months. For best results, freeze the coated, uncooked fish; you can fry straight from frozen, adding an extra minute to the cooking time.
Best Reheating Method
Preheat your oven to 375°F (190°C) and place the fish on a wire rack set over a baking sheet. Add a tiny splash of water (about a tablespoon) to the pan; the steam helps revive the crust without making it soggy. Heat for 8‑10 minutes, or until the interior is hot and the exterior is once again golden and crisp.